
The Auto-Lock feature on an iPhone is a convenient function that enhances your iPhone's security and saves battery life. However, encountering the issue that Auto-Lock is greyed out on the iPhone can be both frustrating and puzzling. Don't worry—you're not alone. Fortunately, there are some solutions to fix iPhone Auto-Lock greyed out, so let's explore why this issue occurs and how to fix it step-by-step in this detailed guide.

- Part 1. Why Is Auto-Lock Greyed Out on iPhone?
- Part 2. How to Fix Auto-Lock Greyed Out on iPhone
- Part 3. Advanced Solution to iPhone Auto-Lock Greyed Out
- Part 4. Conclusion
Part 1. Why Is Auto-Lock Greyed Out on iPhone?
Auto-Lock is a built-in feature that allows you to set a time to automatically lock your iPhone's screen after a set time of inactivity. When the Auto-Lock option is greyed out, it indicates that the setting is unavailable for modification. This typically happens due to certain configurations or restrictions enabled on your iPhone. Understanding the underlying causes is crucial to resolving the problem effectively. Here are the most common causes.

Reason 1. Low Power Mode
When Low Power Mode is active, several features on an iPhone are temporarily disabled or restricted to conserve battery. The Auto-Lock setting is one of these features, and it becomes fixed at 30 seconds until Low Power Mode is turned off.
Reason 2. Device Management
If your iPhone is managed by an organization, such as a workplace or school, the Auto-Lock settings might be controlled by Mobile Device Management. These restrictions prevent users from modifying certain settings.
Reason 3. Software Glitches
Occasionally, software bugs or glitches on an iPhone can cause features like Auto-Lock to become greyed out temporarily. Besides, an outdated iOS version can affect the Auto-Lock setting.
Part 2. How to Fix Auto-Lock Greyed Out on iPhone
For now, the reasons why you can't change Auto-Lock on iPhone are figured out. You can follow the methods below to troubleshoot the issue.
Method 1. Turn Off Low Power Mode
The first method to resolve the issue of iPhone Auto-Lock greyed out is to disable Low Power Mode. To disable Low Power Mode on your iPhone, follow the steps below.
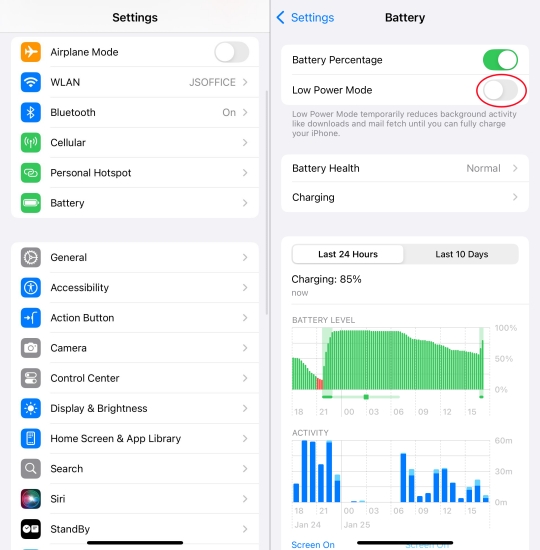
Step 1. Open the Settings app on your iPhone and tap Battery.
Step 2. Toggle off the Low Power Mode switch.
Method 2. Disable Device Management Restrictions
If your iPhone is managed by an organization, you'll need to determine whether restrictions are in place. To make the Auto-Lock setting normal, remove device management from your iPhone.
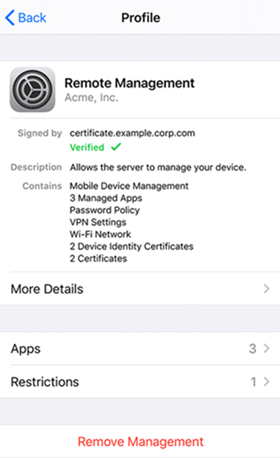
Step 1. Go to Settings > General > VPN & Device Management.
Step 2. Find any profiles listed under Configuration Profiles.
Step 3. Tap Delete Profile and enter the profile password to confirm.
Method 3. Remove Work Exchange Account
If you've added a school or company Exchange email account to your iPhone, it may prevent you from changing the Auto-Lock setting. To regain control of Auto-Lock, remove the Exchange account from your device, then try adjusting the Auto-Lock setting again.
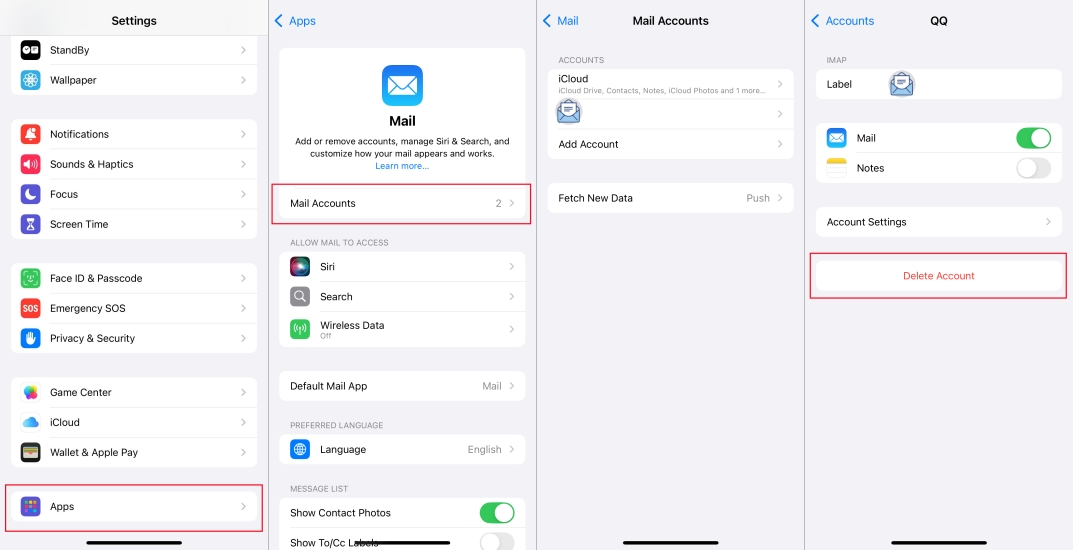
Step 1. Go to iPhone Settings > Apps > Mail.
Step 2. Tap Mail Accounts and choose the work or Exchange email account.
Step 3. Tap Delete Account to remove the exchange account from your iPhone.
Method 4. Restart Your iPhone
A simple restart can resolve most small glitches on the device. When you encounter some issues on your iPhone, including Auto-Lock being greyed out, try restarting your device.

Step 1. Open Settings and tap General.
Step 2. Scroll down to the bottom and tap Shut Down.
Step 3. Wait for a while and long-press the power button to restart your iPhone.
Method 5. Update iOS to the Latest Version
Software updates often include fixes for known bugs. If your iPhone isn't updated to the latest version, updating your iPhone can resolve the issue.
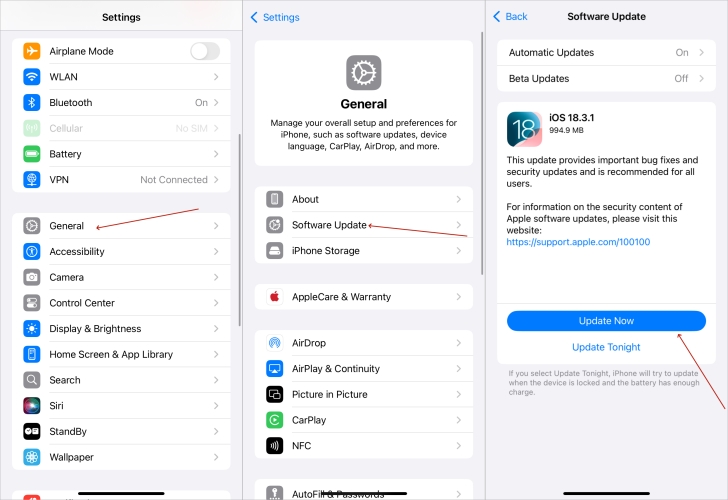
Step 1. Open Settings and tap General.
Step 2. Select Software Update and check for available updates.
Step 3. If an update is available, tap Download and Install.
Step 4. Tap Install Now and enter the screen passcode to update.
Method 6. Reset All Settings
If none of the above solutions work, you may need to reset all settings on your iPhone. This will not erase your data but will reset system configurations. Here's how.
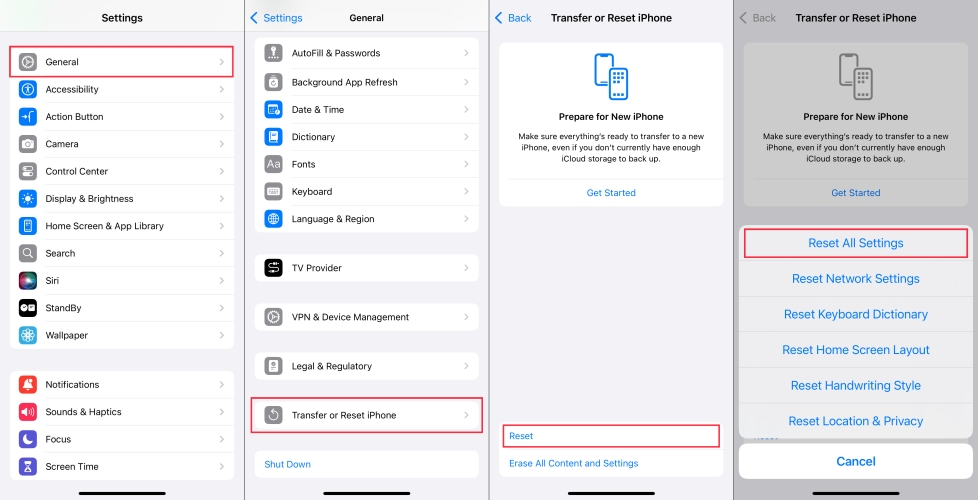
Step 1. Fire up the Settings app and tap General.
Step 2. Scroll down to the bottom and tap Transfer or Reset iPhone.
Step 3. Tap Reset and select Reset All Settings.
Step 4. Enter the screen passcode and tap Reset to confirm.
Part 3. Ultimate Solution to iPhone Auto-Lock Greyed Out
Basic adjustments, from turning off Low Power Mode to restarting your iPhone, can quickly restore control over the Auto-Lock feature. But if Auto-Lock on your iPhone remains greyed out, it may indicate a restriction you can't adjust directly. In situations where your iPhone is managed by an organization, and you don't know the passcode, specialized tools like MagFone iPhone Unlocker may help you regain access to these settings.
With the help of MagFone iPhone Unlocker, you can remove all MDM restrictions, including those non-removable restrictions on any iPhone, iPad, and iPod touch without password. When you can manually remove profiles on your iPhone to resolve the Auto-Lock greyed out issue, MagFone iPhone Unlocker can help you remove it without credentials. Here's a step-by-step guide on how to fix iPhone Auto-Lock greyed out with MagFone iPhone Unlocker.
MagFone iPhone Unlocker
Unlock various locks on iOS devices, including screen locks, MDM, Apple ID, and Activation Lock without needing a password.
Step 1 Run MagFone iPhone Unlocker and Connect iPhone
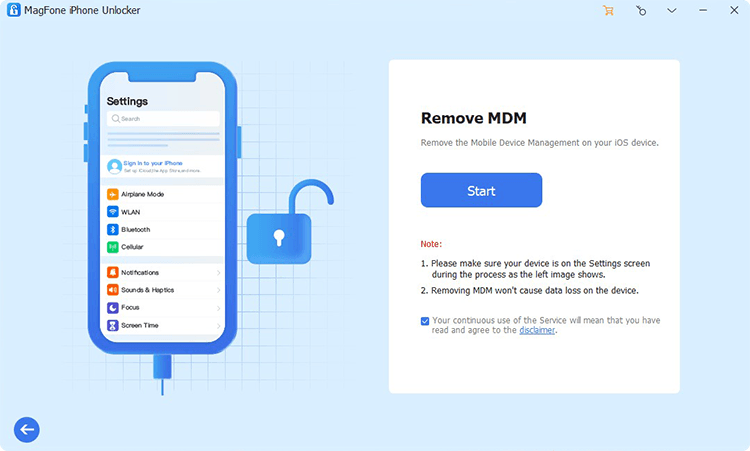
Download and open MagFone iPhone Unlocker on your computer, then connect your iPhone to the computer through a USB cable. Navigate to Remove MDM > Next.
Step 2 Start to Fix Auto-Lock Greyed Out on iPhone

Then you can click the Start button to remove device management from your iPhone. After removing the restriction, your device will restart and check the Auto-Lock setting.
Part 4. Conclusion
The issue of iPhone Auto-Lock greyed out can be frustrating, but it is typically straightforward to resolve with the right approach. By identifying the root cause and applying the appropriate solution, you can quickly and efficiently resolve the issue. If the issue is caused by device management restrictions, but you cannot remove them, you can try using MagFone iPhone Unlocker to get rid of restrictions without passcode and fix the issue.

Teresa Miller
Editor in chief