
Apple prides itself on various features on its operating systems with quick and easy management to their devices, and Content & Privacy Restrictions in Screen Time is no exception. With this feature, parents can block or limit specific apps and features on their child's device. You can also restrict the settings for explicit content, purchases and downloads, and privacy by putting restrictions on your iPhone. It's easy to put restrictions on an iPhone, but how to disable restrictions on an iPhone? In this article, we are going to show you how to turn off Restrictions on iPhone. Let's check it out now.
- Part 1. How to Switch Off Restrictions on iPhone
- Part 2. How to Get Rid of Restrictions on Child's iPhone
- Part 3. How to Turn Off Restrictions on iPhone without Password
- Part 4. FAQs about Restrictions on iPhone
- Part 5. Conclusion
Part 1. How to Switch Off Restrictions on iPhone
The settings of Restrictions on the iPhone will limit access to apps, features, or content. It's easy to turn off Restrictions on the iPhone if you can remember the Screen Time passcode. Also, you can reset the Screen Time passcode to disable Restrictions when forgetting it. Let's take a look at how to remove Restrictions on iPhone.
Scenario 1. Disable Restrictions on iPhone When Knowing Passcode
If you can know the Screen Time passcode, you can directly disable Restrictions in the Settings app. Follow the steps below to turn off Restrictions on iPhone running different iOS versions.
Option 1. Switch Off Restrictions on iPhone in iOS 12 or Later
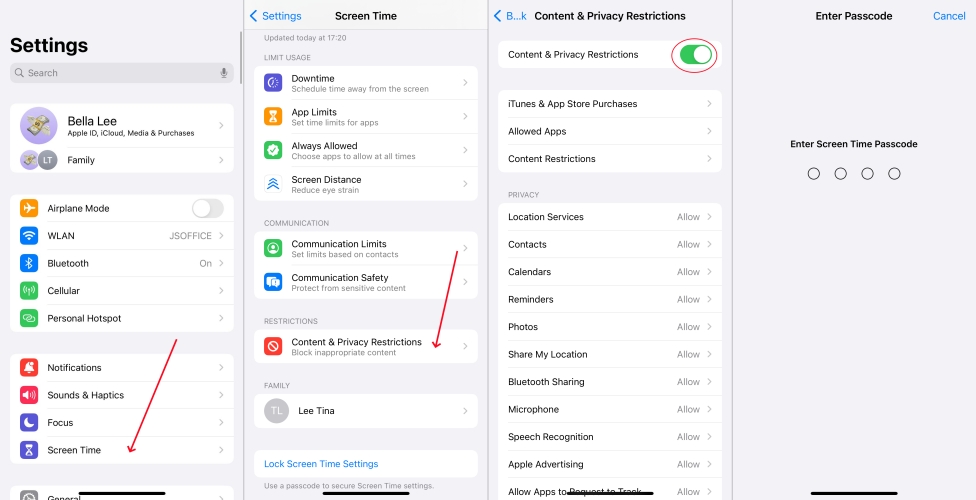
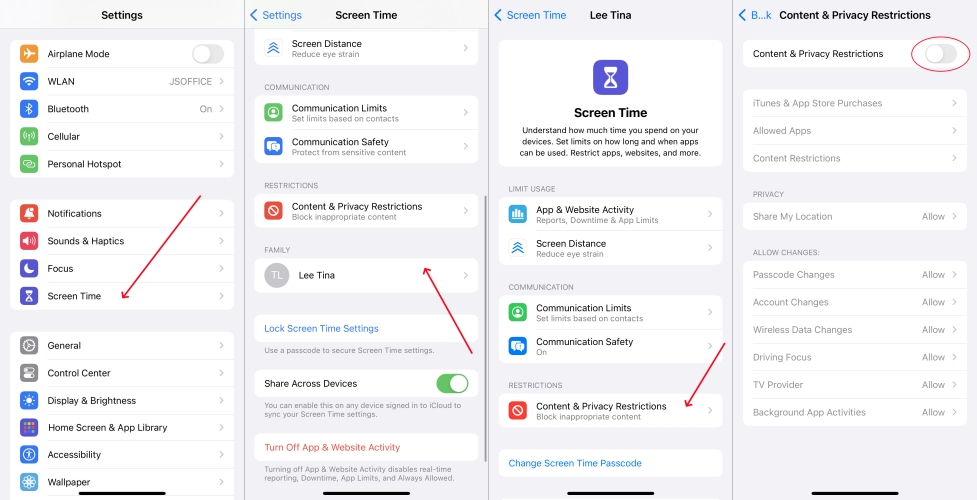
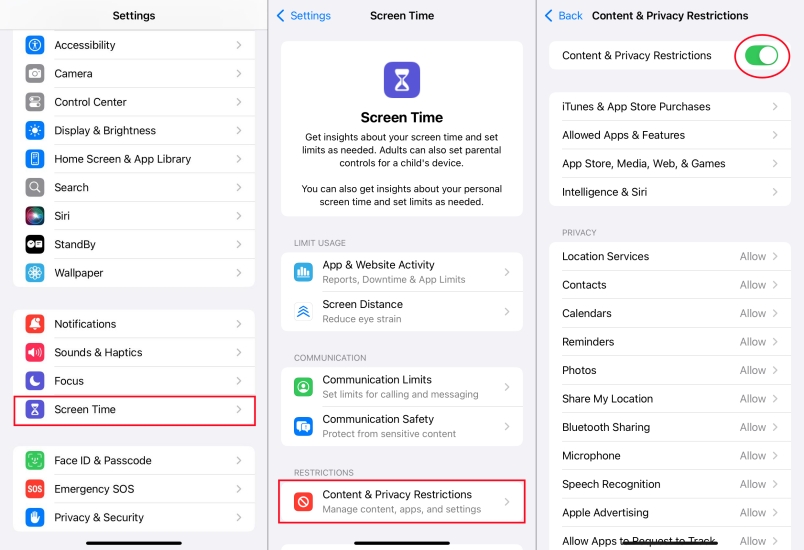
Step 1. Go to Settings on your iPhone and tap Screen Time.
Step 2. Under Screen Time, tap Content & Privacy Restrictions.
Step 3. Toggle off the switch next to Content & Privacy Reset.
Step 4. Enter the Screen Time passcode you've set to turn off Restrictions.
Option 2. Switch Off Restrictions on iPhone in iOS 11 or Earlier
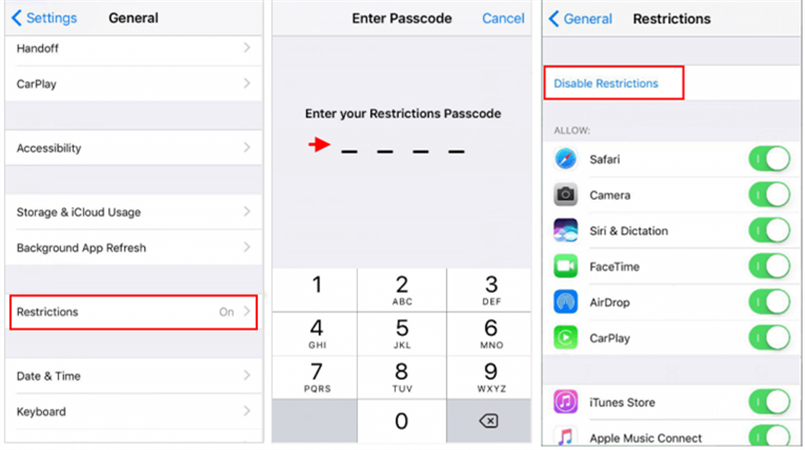
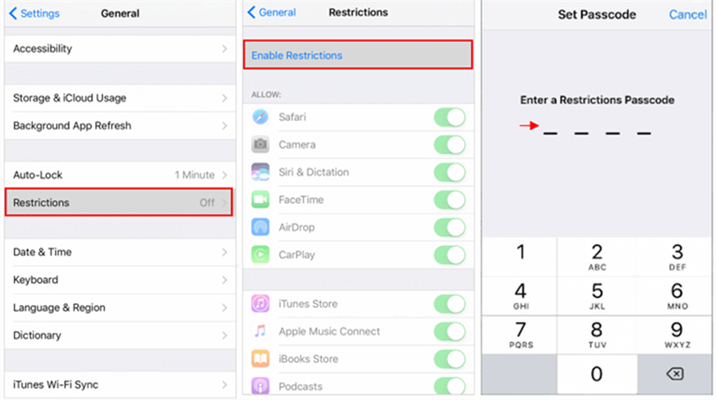
Step 1. Head to Settings on your iPhone and tap General > Restrictions.
Step 2. Enter the Restrictions passcode you've set previously.
Step 3. Tap Disable Restrictions, then enter the passcode again to confirm.
Scenario 2. Stop Restrictions on iPhone When Forgetting Passcode
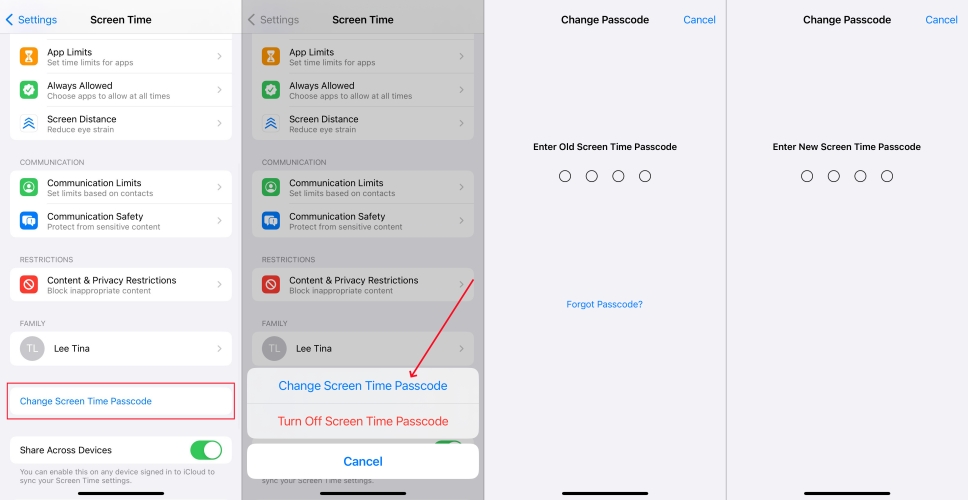
If you have forgotten your Restrictions or Screen Time passcode, you try resetting it with the Forgot Passcode? feature. Then you can disable Restrictions with the new passcode.
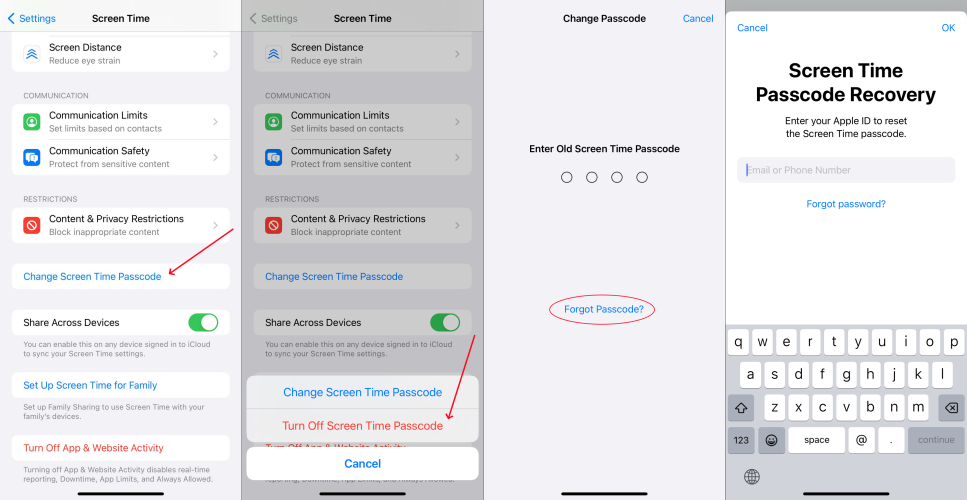
Step 1. Open Settings > Screen Time > Change Screen Time Passcode.
Step 2. Tap Forgot Passcode? in the pop-up window.
Step 3. Enter the Apple ID and password used to set up Screen Time.
Step 4. Set a new passcode and go back to tap Content & Privacy Restrictions.
Step 5. Enter the Screen Time passcode and toggle off Restrictions.
Part 2. How to Remove Restrictions on Child's iPhone
Most child's iPhone has Restrictions turned on, which brings lots of conveniences. On the one hand, the child cannot access specific features, apps, and content blocked by parental controls. On the other hand, the parent has more control and monitoring on the device usage. But there is still the demand to turn off Restrictions. Here's how to stop Restrictions on iPhone for child.
Option 1. Disable Restrictions on Child's iPhone in Screen Time
Step 1. Open Settings on your iPhone and tap Screen Time.
Step 2. Find and tap your child's iPhone under Family.
Step 3. Tap Content & Privacy Restrictions and enter the Screen Time passcode.
Step 4. Switch off Content & Privacy Restrictions to turn off Restrictions.
Option 2. Switch Off Restrictions on Child's iPhone via Family Sharing
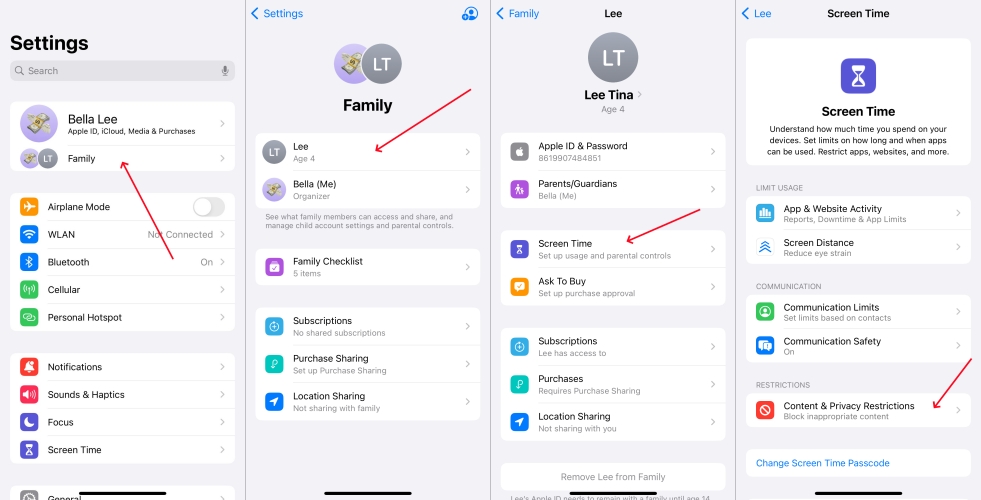
Step 1. Go to Settings on your iPhone and tap Family.
Step 2. Find and tap your child's name in Family.
Step 3. Tap Screen Time > Content & Privacy Restrictions.
Step 4. Enter the Screen Time passcode and toggle off Restrictions.
How to Turn Off Parental Controls on iPhone
Not find a way to help you turn off parental controls on iPhone? Our guide aims to show you how to remove parental controls on iPhone.
Read More >>Part 3. How to Turn Off Restrictions on iPhone without Password
It's easy to enable Restrictions on an iPhone through Settings if you don't forget your Screen Time passcode. But it is common that you forgot the passcode after a long time. Fortunately, there are several ways to help you disable Restrictions on your iPhone without password. Let's see how to turn off Restrictions on iPhone without password.
Option 1. Get Rid of Restrictions on iPhone via iTunes [Data Loss]
Using iTunes is another approach to restore your iPhone, then you can set it up again and recover all the data from a backup. Now go to restore your iPhone in recovery mode.
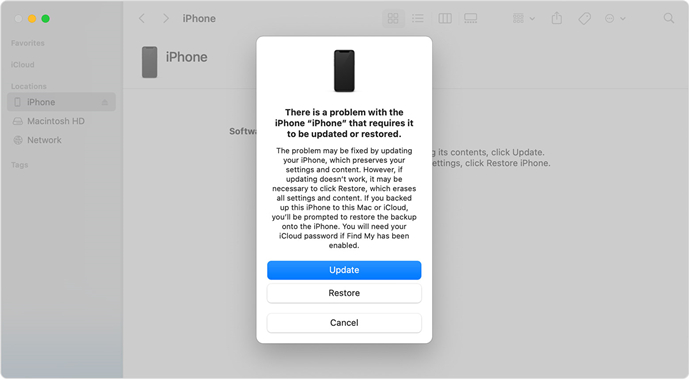
Step 1. Turn off your iPhone and connect it to your computer then put it in recovery mode.
Step 2. Launch iTunes on a PC or Finder on a Mac that your device is connected to.
Step 3. Locate your iPhone in iTunes or in the Finder and choose Restore in the pop-up window.
Step 4. Wait for the process to finish and disconnect your device from the computer then set it up.
Option 2. Take Off Restrictions on iPhone at iCloud.com [Data Loss]
If you can remember your Apple ID account and password, then you can remotely erase all the settings, including the Screen Time passcode on your iPhone at iCloud.com.
Step 1. Open iCloud.com in a web browser and log into your Apple ID account.
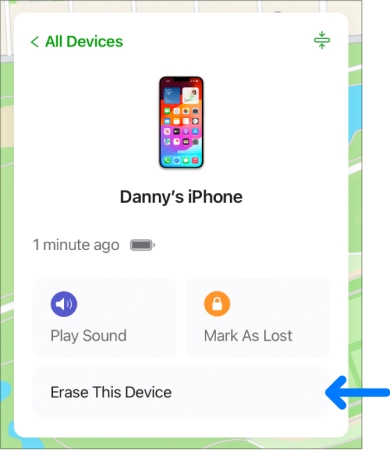
Step 2. At iCloud.com, click Find Devices and select your iPhone in the All Devices list.
Step 3. Click Erase This iPhone and enter your Apple ID password in the pop-up window.
Step 4. Click Erase iPhone to confirm. Then your device will be erased remotely.
Option 3. Stop Restrictions on iPhone via Find My App [Data Loss]
When forgetting your Screen Time passcode, you can reset your iPhone to factory settings for removing Restrictions through the Find My app. It can erase both the Screen Time passcode and Restrictions on your device.
Step 1. Turn on your iPhone and launch the Find My app.
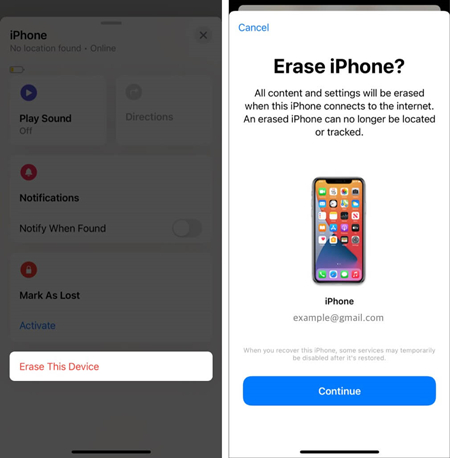
Step 2. Scroll down to find your iPhone where you need to turn off Restrictions.
Step 3. Select your device and tap Erase This iPhone.
Step 4. Enter your Apple ID password, tap Erase iPhone, and wait for your device to erase.
Option 4. Undo Restrictions on iPhone via a Screen Time Remover [No Data Loss]
With the above methods, you are able to disable restrictions on your iPhone without passcode. But those ways will cause data loss and you cannot restore your device from a backup. The best solution to turn off Restrictions on iPhone is to use a Screen Time passcode unlocker. Here we highly recommend MagFone iPhone Unlocker to you.
MagFone iPhone Unlocker is specially designed for helping Apple users to disable Restrictions on iPhone, iPad, and iPod touch. It also can unlock various screen locks like Touch ID and Face ID and remove Apple ID and MDM restrictions on all iOS and iPadOS devices. We'll guide you through the process of removing restrictions in our steps below.
MagFone iPhone Unlocker
Unlock various locks on iOS devices, including screen locks, MDM, Apple ID, and Activation Lock without needing a password.
Step 1 Launch MagFone iPhone Unlocker
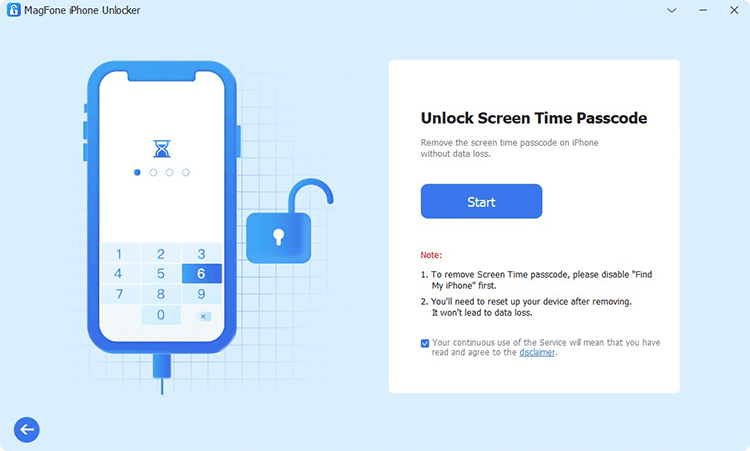
Go to connect your iPhone to your computer by using a USB cable and then launch MagFone iPhone Unlocker on the computer. After your device is detected by MagFone software, select the Unlock Screen Time Passcode option from the home screen of MagFone software.
Step 2 Remove Restrictions on iPhone
To start removing restrictions, confirm that you have disabled the Find My iPhone feature. When the Find My iPhone feature is enabled, go to Settings > Your Device > Find My and toggle the Find My iPhone feature off. Then you can click the Start button to bypass Screen Time passcode on your device.
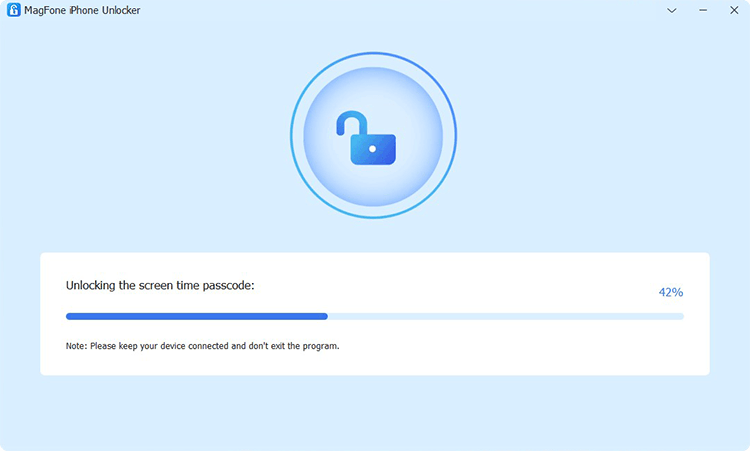
Step 3 Go to Set up iPhone Again
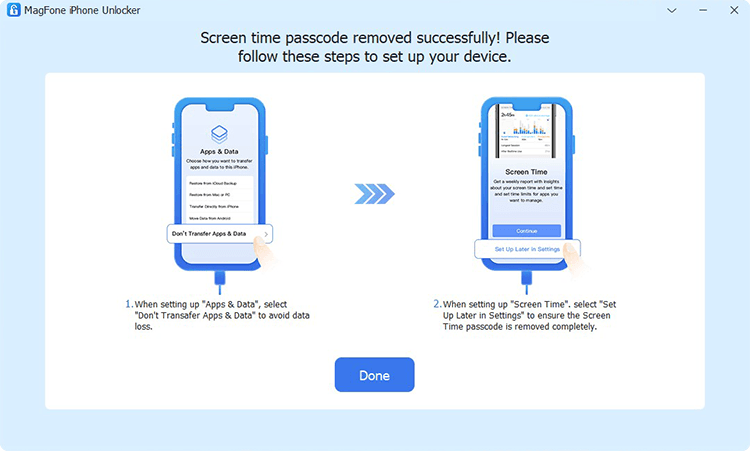
After successfully removing the settings of Screen Time, you have to set up your device by following the on-screen instructions. In the Apps & Data page of your device, choose Don't Transfer Apps & Data. Then tap the Set Up Later in Settings button to finish the whole process of removing restrictions on your device.
Part 4. FAQs about Restrictions on iPhone
How to put Restrictions on iPhone?
After knowing the functions of Content & Privacy Restrictions, then you can go to set it up on your iPhone or your child's iPhone. How to enable Restrictions on an iPhone? Doing this is pretty easy. Follow the steps below to put Restrictions on your iPhone running different versions of iOS.
Option 1. Enable Restrictions on iPhone in iOS 11 or Earlier
Step 1. Go to Settings on your iPhone and tap General.
Step 2. Select Restrictions, then tap Enable Restrictions.
Step 3. Set a Restrictions passcode and enter it again to confirm.
Option 2. Enable Restrictions on iPhone in iOS 12 or Later
Step 1. On your iPhone, open the Settings app and tap Screen Time.
Step 2. Scroll down to tap Content & Privacy Restrictions.
Step 3. Switch on the toggle next to Content & Privacy Restrictions.
How to restrict certain apps on iPhone?
Once enabling Restrictions on your iPhone, you can restrict apps you want. Just perform the below steps to block certain apps on your iPhone.
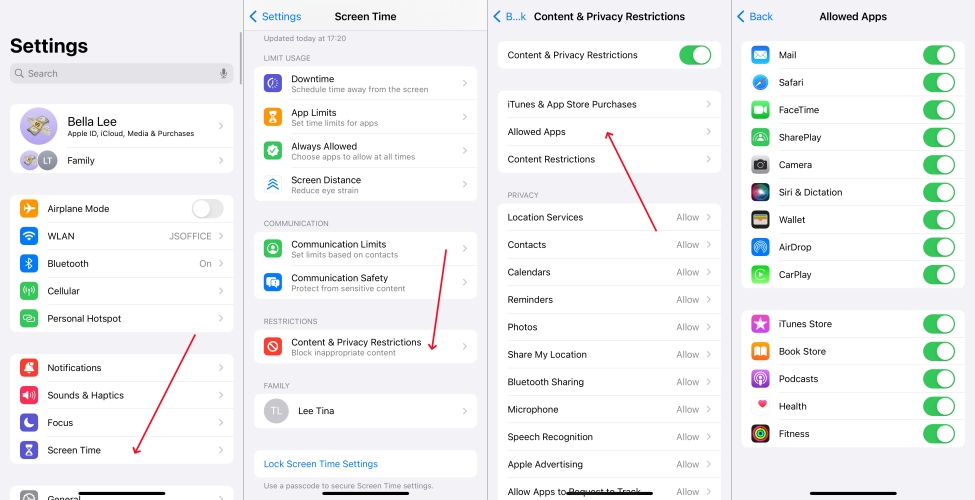
Step 1. Head to Settings > General > Content & Privacy Restrictions.
Step 2. Enter your Screen Time passcode, then tap Allowed Apps.
Step 3. Select the built-in apps like Podcasts to disallow.
How to reset Restrictions passcode on iPhone?
If you want to reset Restrictions passcode on your iPhone, you can directly do it in Settings. Here's how to reset Restrictions passcode on your iPhone with the original passcode.
Step 1. In Settings on your iPhone, tap Screen Time > Change Screen Time Passcode.
Step 2. Select Change Screen Time Passcode and enter the old Screen Time passcode.
Step 3. Continue to enter the new Screen Time passcode you want to set twice.
How to get around Parental Restrictions on iPhone without password?
In fact, it is impossible to directly get past Parental Restrictions on iPhone without password. If you want to get past Parental Restrictions on your iPhone without password, you can use a third-party tool like MagFone iPhone Unlocker to remove Parental Restrictions.
Part 5. Conclusion
In this guide, you will know how to turn off Restrictions on iPhone. And you can remove it either with or without Screen Time passcode. The better choice is to use MagFone iPhone Unlocker to disable Restrictions on your iPhone or your child's iPhone without password and data loss. Hope MagFone iPhone Unlocker helps you out. Leave a comment below and share your tips or struggles.

Dylan Jones
Editor in chief