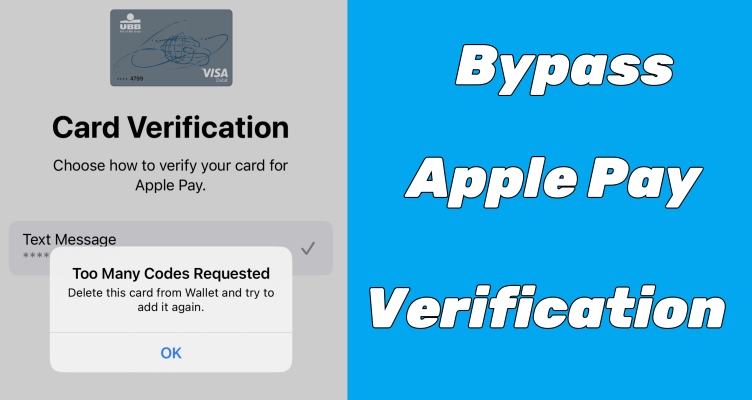
Apple Pay has revolutionized the way we handle transactions, offering a seamless and secure method to pay for goods and services. But as with all digital payment systems, there are security protocols in place to protect users. One such protocol is Apple Pay verification, which can sometimes be a hassle. When adding a card to Apple Pay, there may be an Apple Pay verification failure. This article aims to explore various methods to complete verification for Apple Pay and fix Apple Pay verification not working.
- Part 1. Why Is Verification Required for Apple Pay?
- Part 2. How to Complete Verification for Apple Pay
- Part 3. How to Fix Apple Pay Verification Not Working
- Part 4. Bonus Tip: Bypass Apple ID Verification without PasswordHOT
- Part 5. FAQs about Apple Pay Card Verification
- Part 6. Conclusion
Part 1. Why Does Apple Pay Need Verification?
The verification of Apple Pay is a security measure implemented by Apple to ensure that the person adding a card or making a transaction is indeed the rightful owner of the card. This verification process typically involves confirming the card details with the issuing bank and may require additional steps like entering a verification code sent to your phone or email. You may be asked to verify your Apple Pay on your iPhone in the following scenarios.
Scenario 1. Add a New Card
Whenever you add a new card to Apple Pay, you will be prompted to verify the card. This is to ensure that the card belongs to you and is not being added without your permission.
Scenario 2. Make a High-level Purchase
For larger transactions, Apple Pay may require additional verification to confirm that you authorize the payment, providing an extra layer of security for significant purchases.
Scenario 3. Use Apple Pay on a New Device
When you set up Apple Pay on a new device, verification is necessary to link your payment methods securely to the new device.
Part 2. How to Complete Verification for Apple Pay
It's easy to complete Apple Pay verification on iOS devices. When you encounter an Apple Pay verification on iPhone, you can follow the methods below to bypass the verification.
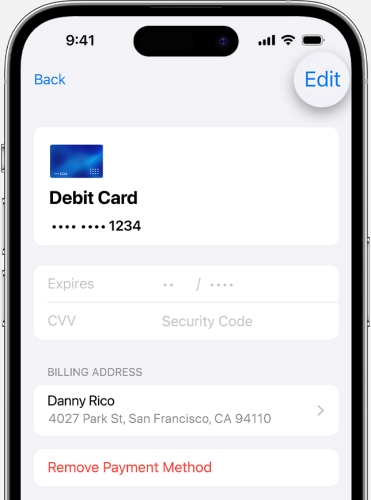
Method 1. Update an Expired Payment Method
Changes in payment methods are important to Apple Pay. When there is a change in your credit or debit card, you have to update your payment method in time. In most cases, the information cannot be updated automatically on its own. So, you can change or update your expired payment method, which can help you get past Apple Pay verification sometimes. Follow the steps below.
On an iPhone or iPad
Step 1. Go to Settings > your Apple ID name on your iPhone.
Step 2. Tap Payment & Shipping, then enter with your Face ID or Touch ID.
Step 3. Select a payment method you're using and tap Edit.
Step 4. Update the information of your payment method.
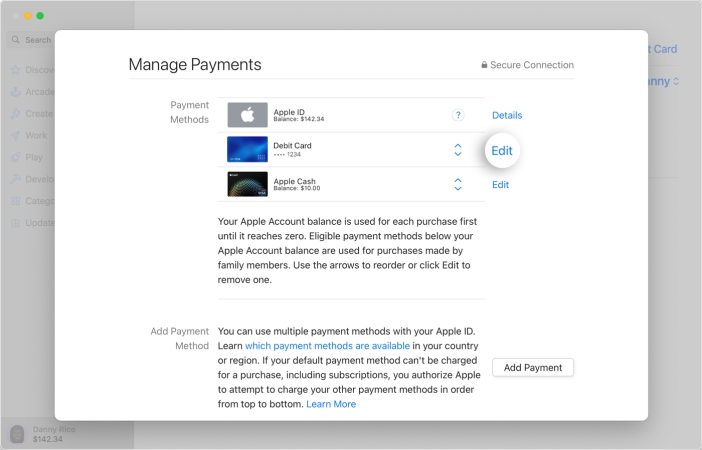
On a Mac
Step 1. In the App Store app on your Mac, click your Apple ID name.
Step 2. Click Account Settings, then sign into Apple ID with your account details.
Step 3. Next to Payment Information, click Manage Payments.
Step 4. Find a payment method to edit and click Edit.
Step 5. Fill out the latest information of your payment method.
On a Windows PC
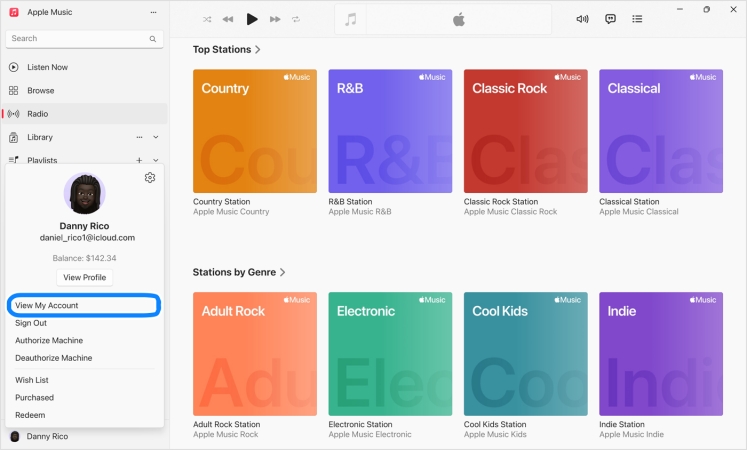
Step 1. In iTunes, click Account > View My Account from the menu bar.
Step 2. Click Manage Payments next to Payment Information.
Step 3. Select a payment method and click Edit.
Step 4. Enter your new payment information, then click Done.
Method 2. Clear out Unpaid or Outstanding Balance
When there is any unpaid or outstanding balance for your previous purchases and subscription, you will be constantly asked to verify your Apple Pay on your iOS device. The only way to bypass this verification is to complete the unpaid or outstanding balance on your device. Here's how to pay your unpaid or outstanding balance on your iPhone.
In App Store of iPhone
Step 1. Open the App Store app, then tap your profile image.
Step 2. Tap Purchase History to check your balance on your iPhone.
Step 3. Pay the unpaid or outstanding balance.
In Settings of iPhone
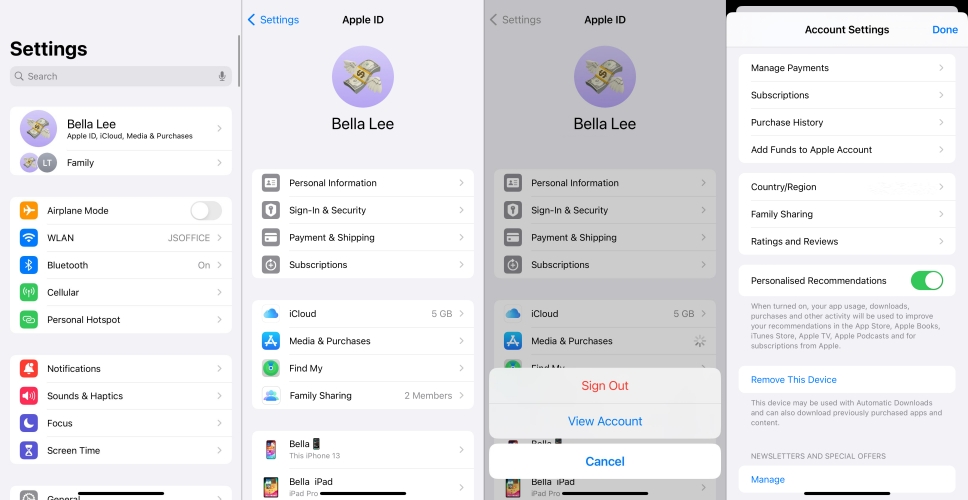
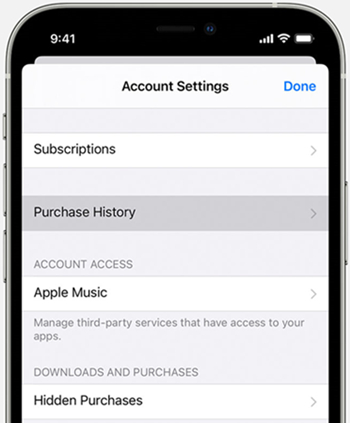
Step 1. Launch the Settings app, then tap your Apple ID name.
Step 2. Tap Media & Purchase > View Account to view the Account Settings page.
Step 3. Tap Purchase History and complete the unpaid balance.
Method 3. Verify Identity in Settings
Some banks and card issuers require an additional one-time identity verification before activating Apple Pay on a new device or after a security update. This typically involves confirming your details directly through the Settings app or via a code sent to your registered phone number or email.
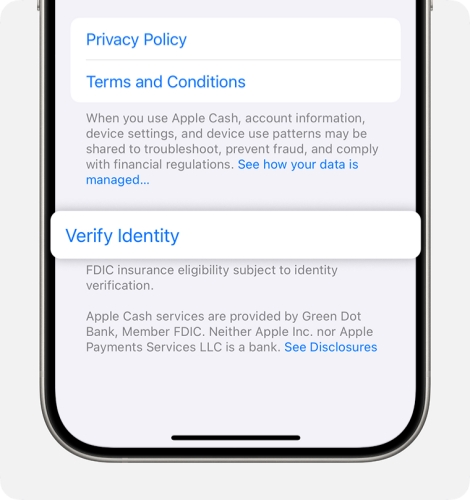
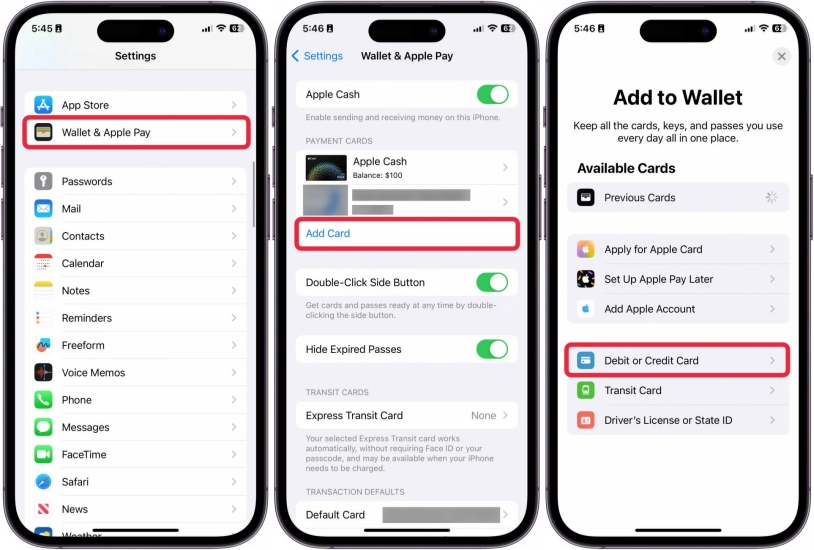
Step 1. Open Settings on iPhone and tap Wallet & Apple Pay.
Step 2. Tap your Apple Cash Card, then tap Verify Identity at the bottom.
Step 3. Follow the on-screen instructions to complete the verification.
Method 4. Add Card to Apple Wallet from Bank App
In some cases, adding your card directly through your bank's official app, rather than through the Wallet app, can bypass verification friction caused by mismatched account data. Most major banks offer an Add to Apple Wallet button within their app. You can open the bank app to check your card.
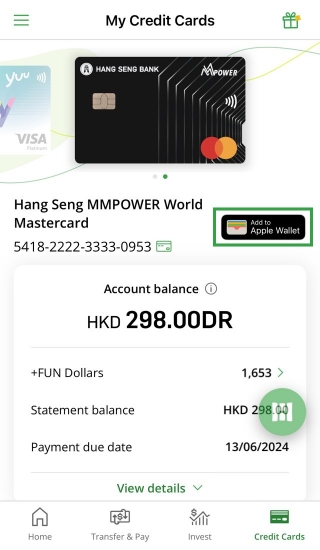
Step 1. Log in to the bank mobile app and access the card you want to add to Apple Wallet.
Step 2. Tap Add to Apple Wallet option, then verify your identity.
Step 3. Once your identity is verified, your iPhone will switch to the Wallet app. Tap Next > Agree to complete adding a card for Apple Pay.
Part 3. How to Fix Apple Pay Verification Not Working
However, many users may encounter Apple Pay verification failure during the verification process. These issues can be frustrating and hinder your ability to use Apple Pay efficiently. Verification can fail for several reasons, including network issues, outdated software, or discrepancies in the information provided. If you have the issue of Apple Pay verification not working, you can fix it with the following solutions.
Method 1. Re-add Card for Apple Pay
Sometimes a card's data can become corrupted or out of sync within the Wallet app, causing verification to fail repeatedly. Removing the card entirely and adding it back fresh forces Apple Pay to reinitiate the verification process from scratch. Make sure your card details are on hand before removing it.
Step 1. Go to iPhone Settings > Wallet & Apple Pay.
Step 2. Tap Add Card and choose a card type.
Step 3. Then choose correspondent option on the screen to add a card to your Apple Pay.
Method 2. Verify Apple ID Region
Apple Pay availability and card support are tied to your Apple ID's country or region setting. If your Apple ID region doesn't match the country where your card was issued, verification will fail. Go to your Apple ID settings and confirm that your region matches your card's country of issue before attempting verification again.
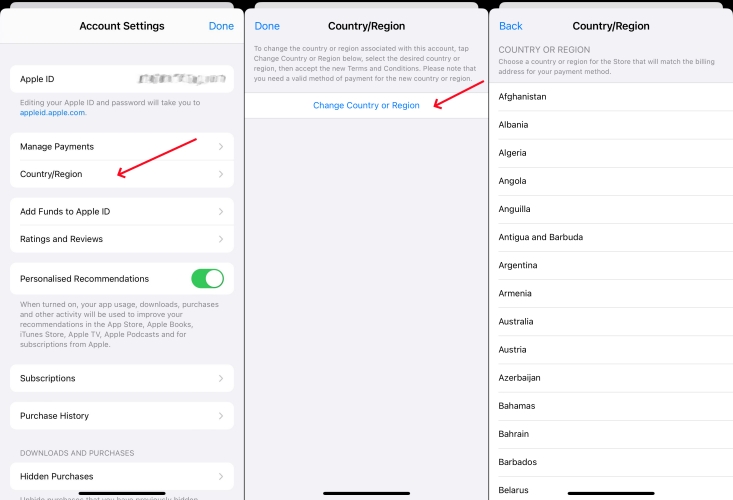
Step 1. Go to iPhone Settings > Apple ID > Media & Purchases > View Account.
Step 2. Check the Country/Region information. If it doesn't match the card, change the region.
Method 3. Restart the Device
Some users have attempted to bypass verification by resetting the iPhone and setting up Apple Pay from scratch. This may work temporarily, but usually leads to more significant issues down the line. Simply restart your iPhone to fix Apple Pay verification not working.

Step 1. Open Settings on iPhone and tap General.
Step 2. Scroll to the bottom and tap Shut Down.
Step 3. Drag the slider to power off the iPhone. Then long-press the power button to restart it.
Method 4. Ensure the Latest iOS System
Keeping your iOS updated is critical. If your device is running an outdated version, then you would encounter the Apple Pay verification not working issue. In this case, you can update your iPhone to the latest iOS version. Here's how to update it.
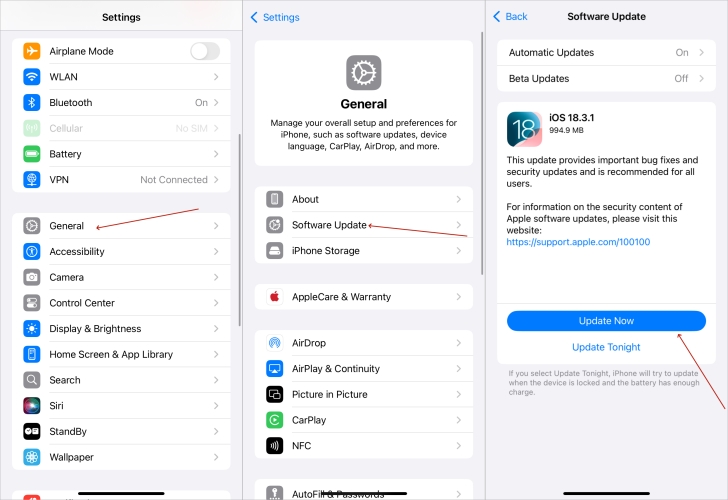
Step 1. Go to Settings > General > Software Update.
Step 2. If an update is available, tap Download and Install.
Step 3. Tap Install Now and enter your passcode to update.
Step 4. Once updated, try verifying your card again.
Method 5. Sign Out and Sign Back into the Apple ID
If your Apple ID session has encountered an error or authentication conflict, it can prevent Apple Pay from completing verification successfully. Signing out and signing into Apple ID on an iOS device can resolve most issues related to the Apple ID. Here you can sign out of your Apple ID by following the steps below if you can remember your Apple ID password.
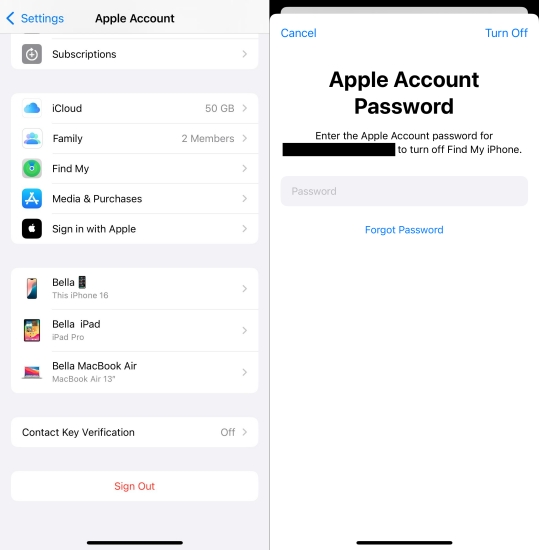
Step 1. Locate Settings on your iPhone and tap your Apple ID name.
Step 2. Scroll down to tap Sign Out and enter your Apple ID password.
Step 3. Tap Turn Off to confirm, then go back to sign into with your Apple ID.
Method 6. Contact the Bank Service
If none of the above fixes resolve the issue, the problem may be on your bank's end rather than your device. It's time to contact your bank. Sometimes, banks require additional steps for verification or may have flagged the card for security reasons.
Part 4. Bonus Tip: Bypass Apple ID Verification without Password
If you are using a second-hand iPhone, and the previous owner's information triggers the Apple Pay verification, you can't remove it unless you know the Apple ID password. In this case, you can consider an Apple ID removal.
As an amazing tool packed, MagFone iPhone Unlocker can help you bypass the Apple Pay Verification Required issue on your iPhone, iPad, and iPod touch. By using this tool, you can remove Apple ID from your iPhone without a password. Beyond that, this tool supports deleting forgotten Screen Time passcodes and screen lock passcodes, as well as MDM restrictions. Here are the steps to follow.
MagFone iPhone Unlocker
Unlock various locks on iOS devices, including screen locks, MDM, Apple ID, and Activation Lock without needing a password.
Step 1 Link iPhone and Run MagFone iPhone Unlocker
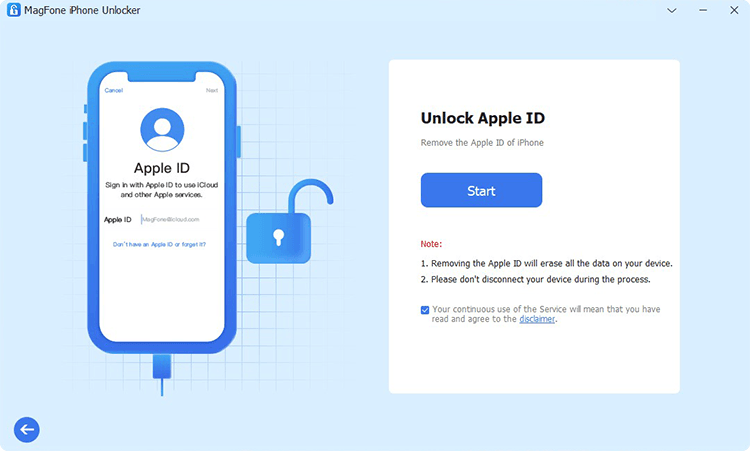
Download and run MagFone iPhone Unlocker on your computer. When launched, click Remove Apple ID on the main interface of the software. Then connect your iPhone to the computer with a USB cable.
Step 2 Download the Firmware Package for iPhone
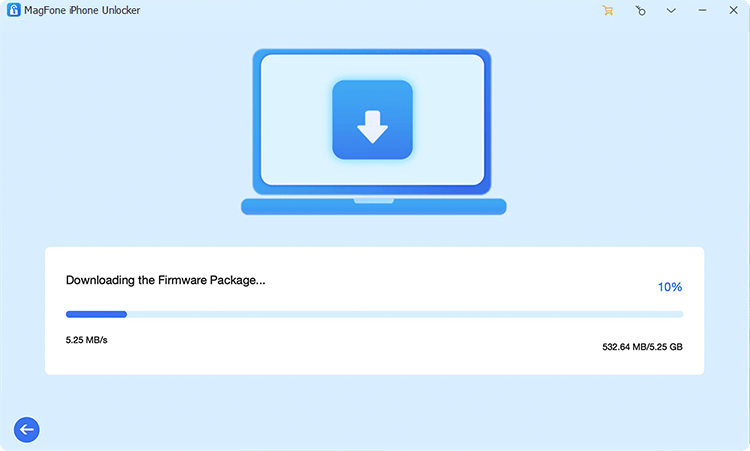
After your device is detected by the software, you can check the device information on the screen. Then select the version of the firmware and click the Download button to download the firmware package.
Step 3 Start to Bypass Apple ID Verification Required
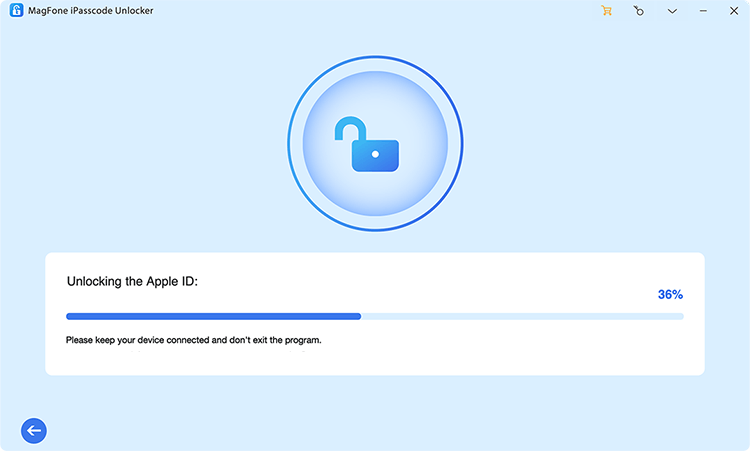
Once the firmware download is complete, continue to unzip and verify the firmware package. Then you can click the Start Remove button to remove the Apple ID from your device. Keep your device connected to the computer.
Part 5. FAQs about Apple Pay Card Verification
Can you use Apple Pay without verification?
No, you can't use Apple Pay without verification. As long as you add a card to Apple Pay, you'll be required to verify it. After the verification, you can use Apple Pay without further verification.
How long does Apple Pay verification take?
It only takes a few minutes to complete the verification of Apple Pay on your iPhone. And the process of verifying your Apple Pay is pretty easy.
How to add card to Apple Pay without verification?
No, it is not possible to add a card to Apple Pay without verification. When you add a card to Apple Pay, you will be required to enter a verification code.
Part 6. Conclusion
While the verification of Apple Pay is essential for securing your transactions, it can sometimes be inconvenient. By following the methods we introduce in this guide, you can complete verification for Apple Pay successfully and fix the Apple Pay verification not working issue. If you are prompted with the previous owner's Apple Pay verification, consider MagFone iPhone Unlocker to remove the Apple ID from your device.

Dylan Jones
Editor in chief