








Ever tried connecting your Android phone to a computer, only to find the two devices just won't "talk" properly? Nine times out of ten, the missing piece is USB debugging. This guide walks you through enabling it on nearly every major Android brand, along with solutions for those tricky situations when your screen is cracked, locked, or completely unresponsive. Follow along to enable USB debugging on Android without the usual hassle or confusion.
- Part 1. Notes for Enabling USB Debugging on Android
- Part 2. How to Enable USB Debugging on Android in Settings
- Part 3. How to Enable USB Debugging on Android from Computer
- Part 4. Bonus Tip: How to Bypass Screen or FRP Lock on Android
- Part 5. Conclusion
Part 1. Notes for Enabling USB Debugging on Android
People usually need to switch on USB debugging when flashing firmware, transferring files through ADB, running diagnostic tools, or troubleshooting a misbehaving app. If your phone still turns on normally and you can navigate its menus, you can simply follow the Settings-based steps in Part 2. But if the screen is locked, cracked, or unreachable, you'll need to enable the feature from a computer instead, which is covered later in Part 3.
Part 2. How to Enable USB Debugging on Android in Settings
Most Android phones bury this option inside a hidden Developer menu, and the exact path shifts slightly from one manufacturer's skin to another. Below are the steps for the most common brands, so find the one that matches your device.
01Enable USB Debugging on Samsung
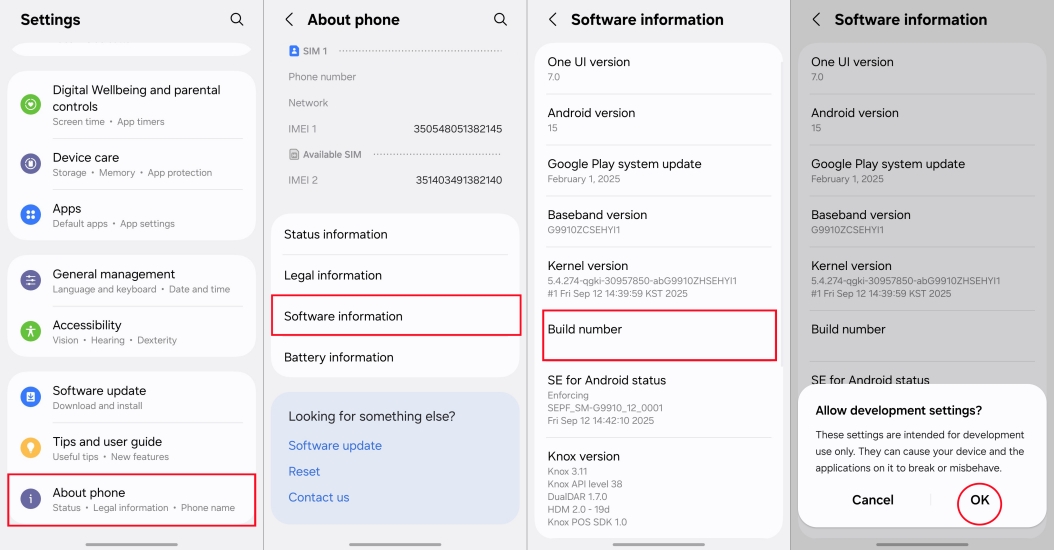
Step 1. Open Settings and tap About phone.
Step 2. Scroll to Software information and tap Build number seven times until Developer mode unlocks.
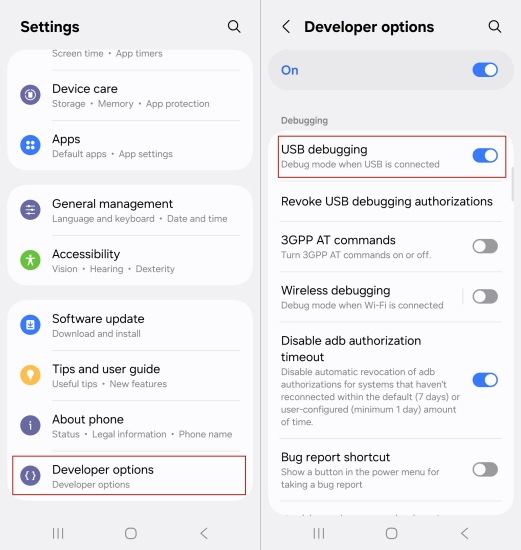
Step 3. Go back to Settings, open Developer options, and flip the USB debugging switch on.
Step 4. Confirm the prompt that appears by tapping OK.
02Enable USB Debugging on Huawei
Step 1. Head into Settings, then About phone.
Step 2. Tap Build number several times in a row until a notification appears saying "You are now a developer."
Step 3. Go back to the main Settings page, open System & updates, and access Developer options.
Step 4. Toggle USB debugging on and accept the confirmation dialog.
03Enable USB Debugging on Mi
Step 1. Launch Settings and navigate to About phone.
Step 2. Tap the MIUI version option repeatedly until Developer options are enabled.
Step 3. Return to Settings, open Additional settings, and select Developer options.
Step 4. Switch on USB debugging and tap OK when asked to confirm.
04Enable USB Debugging on Oppo
Step 1. Launch Settings and tap About device.
Step 2. Find the Version entry and tap it repeatedly to activate Developer mode.
Step 3. Return to Settings, tap Additional settings, then Developer options.
Step 4. Enable the USB debugging toggle and confirm the pop-up.
05Enable USB Debugging on Realme
Step 1. Launch Settings and navigate to About phone.
Step 2. Tap the Version field multiple times until Developer options unlocks.
Step 3. Return to the previous menu, select Additional settings, and enter Developer options.
Step 4. Turn on USB debugging and select OK on the confirmation prompt.
06Enable USB Debugging on Vivo
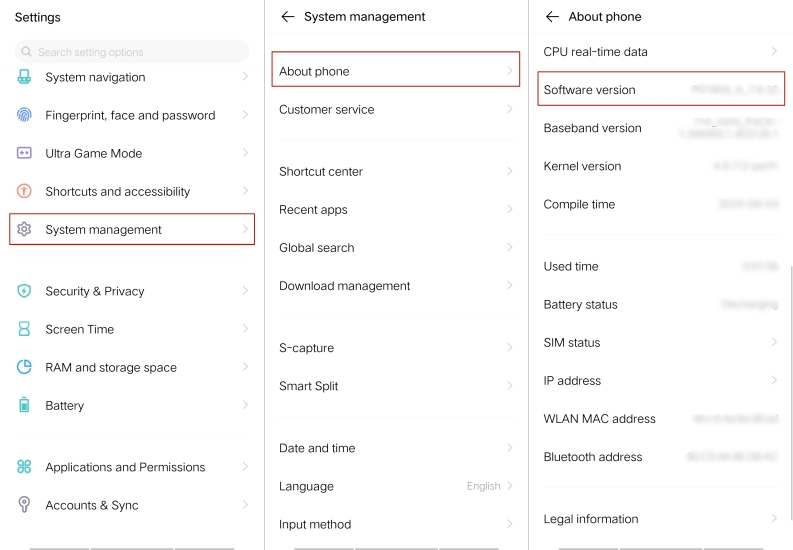
Step 1. Open Settings and tap System management, then About phone.
Step 2. Tap Software version repeatedly to enable Developer mode.
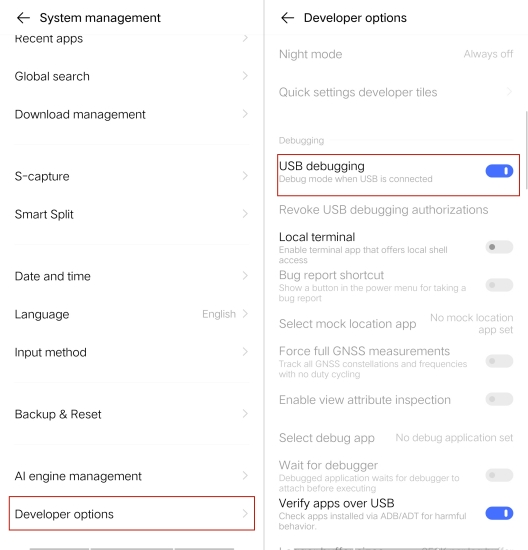
Step 3. Return to System Management, then tap on Developer options.
Step 4. Switch USB debugging on and confirm when prompted.
07Enable USB Debugging on LG
Step 1. Open Settings and scroll to General > About phone.
Step 2. Tap Build number several times until the developer message pops up.
Step 3. Go to General > Developer options.
Step 4. Toggle USB debugging on and tap OK to finish.
Part 3. How to Enable USB Debugging on Android from Computer
If your phone is locked, stuck in recovery mode, or showing a black screen, enabling USB debugging through Settings may not be possible. In these cases, you can attempt to activate USB debugging remotely from a PC using either ADB commands or a USB OTG adapter paired with a mouse.
01Enable USB Debugging on Android Using ADB Commands
This approach only works if USB debugging was already switched on before the phone got locked and your computer was previously trusted by the device. If neither condition is met, ADB generally can't reach a locked screen.
Step 1. Get the Android SDK Platform Tools package and set it up on your computer.
Step 2. Use a USB cable to establish a connection between your Android device and the PC.
Step 3. Open a command prompt or terminal window and run adb devices to confirm the phone is detected.
Step 4. If recognized, run adb shell settings put global development_settings_enabled 1 followed by adb shell settings put secure usb_debugging_enabled 1.
Step 5. Check your phone's Developer options menu to confirm USB debugging is now active.
02Enable USB Debugging on Android Using USB OTG
This method is handy when the touchscreen is cracked or unresponsive but the display itself still shows an image. Pairing a USB OTG adapter with a mouse lets you click through menus as if you were tapping the screen.
Step 1. Get a USB OTG adapter compatible with your phone's charging port.
Step 2. Plug a standard USB mouse into the OTG adapter, then connect the adapter to your phone.
Step 3. Use the mouse cursor on your screen to open Settings and navigate to About phone.
Step 4. Click Build number repeatedly to unlock Developer options.
Step 5. Open Developer options and click the USB debugging toggle to switch it on.
Part 4. Bonus Tip: How to Bypass Screen or FRP Lock on Android
If your real problem is a forgotten screen lock or a Google FRP verification screen rather than USB debugging itself, MagFone Android Unlocker provides a more direct solution. It's designed to remove PIN, password, and pattern locks, as well as FRP restrictions, without requiring your original credentials. Below, you'll learn how to use it to remove an FRP lock and regain access to your device with a few simple steps and minimal hassle involved.

MagFone Android Unlocker
Remove multiple kinds of screen locks on over 5000 Android devices and delete Google FRP lock without a password.
Step 1 Launch the Tool and Connect Your Phone
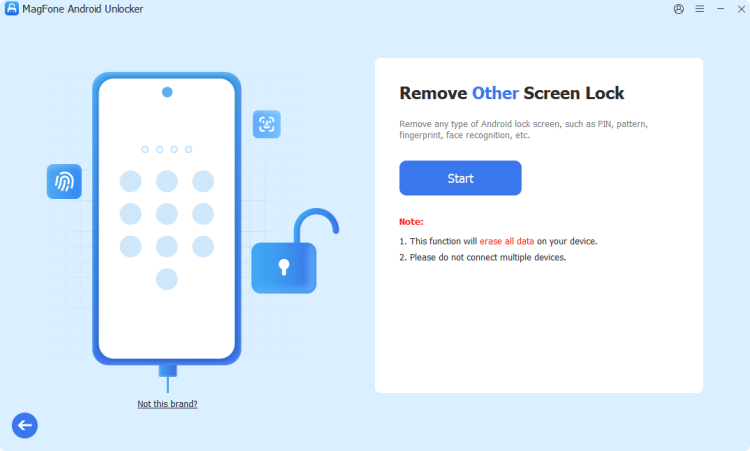
Download MagFone Android Unlocker onto your computer and open the program. Plug your Oppo device into the PC with a working USB cable, then click Remove Google FRP Lock on the main screen and pick your device brand to get started.
Step 2 Verify Your Device Info Before Bypassing
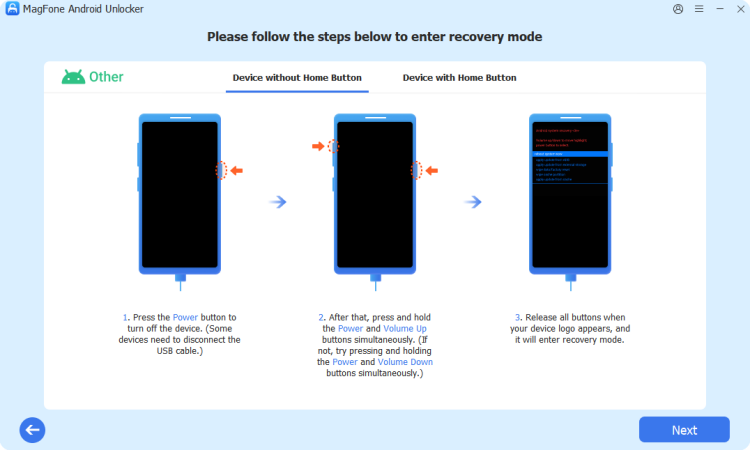
Once connected, the software usually detects your phone automatically. If it doesn't, manually pick your Oppo model from the list, double-check the details, and move forward.
Step 3 Complete the FRP Removal Process
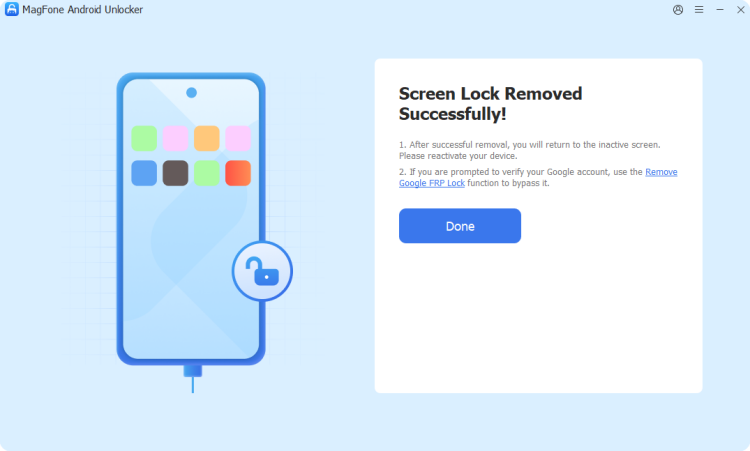
MagFone will generate a set of tailored instructions for your specific device. Carefully carry out each action on both your phone and the computer as directed. Once every step is done, the program will confirm that the FRP lock has been successfully cleared.
Part 5. Conclusion
USB debugging opens the door to deeper Android functions, from data recovery to firmware fixes, but the right method depends on whether your phone is accessible, locked, or damaged. When the goal is really just clearing a lock screen or FRP verification, a dedicated tool like MagFone Android Unlocker often gets you there faster and with less technical hassle.

Teresa Miller
Editor in chief




