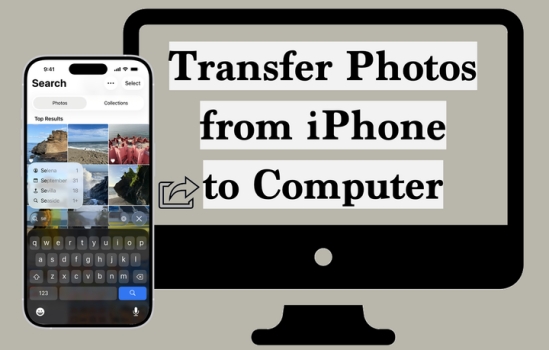
Transferring photos from iPhone to computer is one of the best ways to free up storage, create backups, and keep your favorite memories organized. Whether you use a Windows PC or a Mac, there are several simple methods available, from direct USB transfers and built-in photo apps to wireless options like AirDrop and iCloud Photos. In this guide, we'll compare the most practical ways to move photos from an iPhone to a computer, walk you through step-by-step solutions for both Windows and Mac, and share an extra tip for transferring photos across iOS devices more easily.
- Part 1. How Do You Transfer Photos from iPhone to Computer? [Comparison Table]
- Part 2. How to Transfer Photos from iPhone to PC Computer
- Part 3. How to Transfer Photos from iPhone to Mac Computer
- Part 4. Bonus Tip: Transfer iPhone Photos to Computer Hassle-Free
- Part 5. Conclusion
Part 1. How Do You Transfer Photos from iPhone to Computer [Comparison Table]
Depending on your transfer needs and the type of computer you use, there are several ways to transfer photos from your iPhone to a computer. Here, we compare each method so you can quickly choose the one that best suits your needs by reviewing the comparison table. In the following sections, we will explain how to transfer photos from an iPhone to a Windows PC and a Mac separately.
| Method | Computer | Data Cable | Operation | Best For |
|---|---|---|---|---|
| File Manager | Windows | ✔️ | Moderate | Selective photos transfer |
| Windows Photos | Windows | ✔️ | Easy | Selective photos transfer |
| AirDrop | Mac | ❌ | Easy | Small batches of photos |
| Mac Photos | Mac | ✔️ | Easy | Selective photos transfer |
| Image Capture | Mac | ✔️ | Easy | Selective photos transfer |
| iCloud Photos Website | Windows & Mac | ❌ | Complex | Transfer photos without iPhone nearby |
| MagFone | Windows & Mac | ✔️ | Easy | Selective or batch photos transfer |
Part 2. How to Transfer Photos from iPhone to Windows PC
If you use a Windows PC, you have several convenient ways to import photos from your iPhone. Below, we'll walk through three common options so you can choose the one that matches your preferences.
Option 1. Transfer Photos from iPhone to Computer Using File Manager
Using File Manager is one of the simplest and most convenient ways to transfer photos from your iPhone to a PC. Once your device is connected and trusted, you can easily access your iPhone's media files and copy the photos you want to your computer.
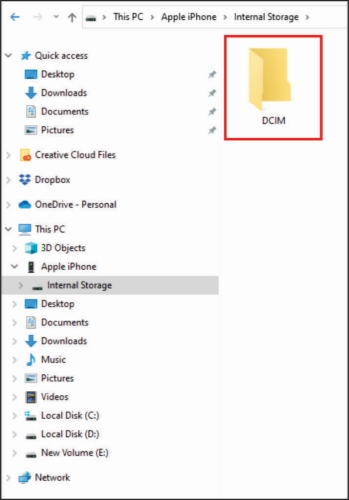
Step 1. Use a data cable to connect your phone to the Windows PC, then open the File Manager on the computer.
Step 2. Click your iPhone device in the left directory.
Step 3. Go to the path: Internal Storage > DCIM > Photos.
Step 4. You can see photos categorized by month. You can select the photos you want, copy and paste them to your computer.
Option 2. Transfer Photos from iPhone to Computer Using Windows Photos
The Windows Photos app provides a way to transfer iPhone pictures to your computer. You can connect your iPhone to the Windows PC and import photos from the connected iPhone selectively.

Step 1. Open Photos on your Windows computer, and use a data cable to connect your iPhone to the computer.
Step 2. Click the Import icon and click your iPhone device.
Step 3. Select the photos you want and click Import to transfer them to the computer.
Option 3. Transfer Photos from iPhone to Computer Using iCloud Photos Website
If you have enabled iCloud Photos on your iPhone, you can view all your synced photos on the iCloud website and download them to your computer. This method is especially useful if you want to transfer photos wirelessly without using a USB cable.

Step 1. Go to the iCloud Photos website in Safari and log in to your Apple ID account.
Step 2. Lock the Command key to select photos from the Library, then click the Download icon to download the photos.
Step 3 You can go to Downloads in Finder to check the downloaded photos and move them to a location you want.
Note:
Since photos downloaded from the iCloud Photos website are automatically saved to the Downloads folder on your Mac, this method can be a little less flexible than the others in this guide. If you want the downloaded photos to be saved to a specific location, you can change the file download destination in Safari Preferences beforehand.
Part 3. How to Transfer Photos from iPhone to Mac
Because iPhone and Mac are both part of the Apple ecosystem, transferring photos between them is usually easier and offers more options than on Windows. You can choose from wireless methods like AirDrop and iCloud Photos or use built-in tools such as Image Capture and the Photos app for direct transfers. Below, we'll introduce each practical way to move photos from your iPhone to a Mac and help you choose the one that best fits your needs.
Option 1. Transfer Photos from iPhone to Mac Using AirDrop
AirDrop is one of the most convenient ways to transfer photos from your iPhone to a Mac wirelessly. It is a great option for sending a small number of photos quickly without using a cable or signing in to any website. Just make sure your iPhone and Mac are nearby to AirDrop successfully.

Step 1. Open Photos on your iPhone.
Step 2. Tap Select to choose photos and tap the Share icon.
Step 3. Tap AirDrop and choose your Mac in the device list.
Step 4. Click Accept on your Mac to receive the iPhone photos.
Option 2. Transfer Photos from iPhone to Mac Using Mac Photos
The Photos app on Mac provides a way to transfer iPhone photos to Mac. Once your iPhone is connected to the Mac via a data cable, you can access iPhone photos in the Photos app, and you can import photos from iPhone to Mac.
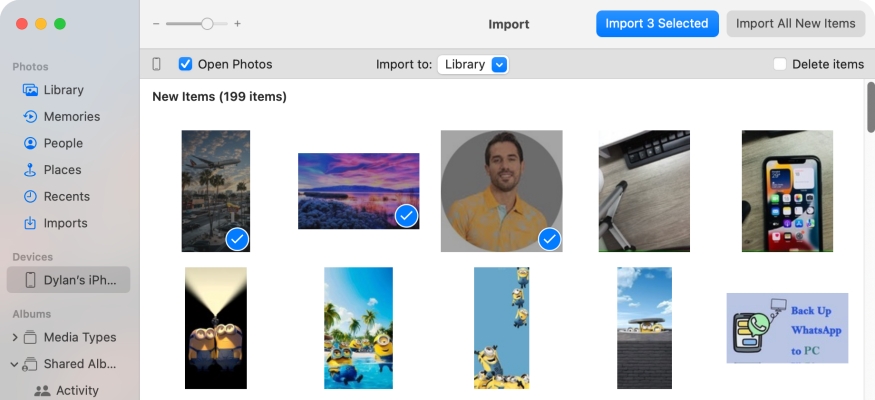
Step 1. Open Photos on Mac and use a data cable to connect your iPhone to the Mac.
Step 2. Click your device in the left Devices stack and unlock your iPhone.
Step 3. Check Open Photos in the upper-left area.
Step 4. Click the photos that you want to transfer, choose where to import them, and click Import Selected to import them to your Mac.
Option 3. Transfer Photos from iPhone to Mac Using Image Capture
Image Capture is a built-in macOS tool that allows you to import photos from your iPhone through a USB connection. With Image Capture, you can download photos from iPhone to a certain folder on your Mac.
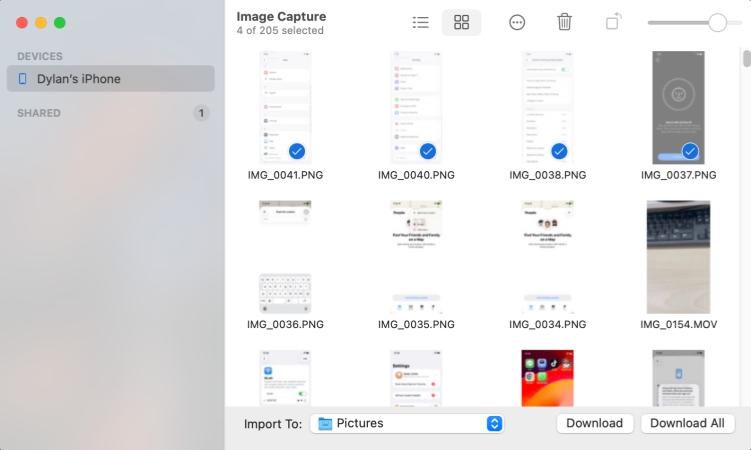
Step 1. Use a data cable to connect your iPhone to your Mac.
Step 2. Open Image Capture on your Mac, and unlock your iPhone.
Step 3. Click the photos you want to transfer and choose a location you want to store them, then click Download All to import photos from iPhone to your Mac.
Option 4. Transfer Photos from iPhone to Mac Using iCloud Photos Website
You can also follow the steps we have introduced before to transfer photos from iPhone to Mac via the iCloud website. Besides, you can also enable iCloud Photos sync on your iPhone, so you can check the synced iPhone photos on your Mac.
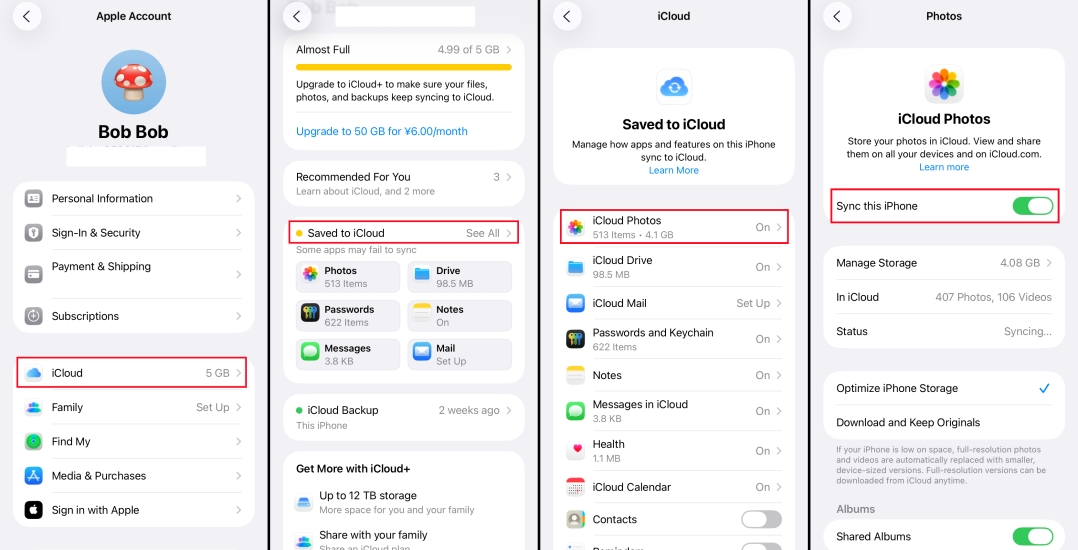
Step 1. Open Settings on your iPhone and tap your name at the top.
Step 2. Tap iCloud > Saved to iCloud > iCloud Photos.
Step 3. Enable Sync this iPhone.
Part 4. Bonus Tip: Transfer iPhone Photos to Computer Hassle-Free
If you want to transfer photos from your iPhone to a computer in their original quality and at high speed, MagFone iPhone Data Recovery can be a useful option to consider. In addition to helping manage iPhone data, this tool allows you to transfer files from iPhone to computer, recover lost or deleted data, and keep important content available for backup and restoration. It is compatible with both Windows and Mac, making it a convenient solution for users who want an easier way to move iPhone photos.
MagFone iPhone Data Recovery
Extract and Transfer iPhone Photos from Your Device or Backup in Minutes.
Step 1 Download and Install MagFone iPhone Data Recovery

First, download and install MagFone iPhone Data Recovery on your computer. Then use a data cable to link your iPhone to the computer. Click iPhone/iPad Data Recovery from the main interface.
Step 2 Scan Photos from iPhone
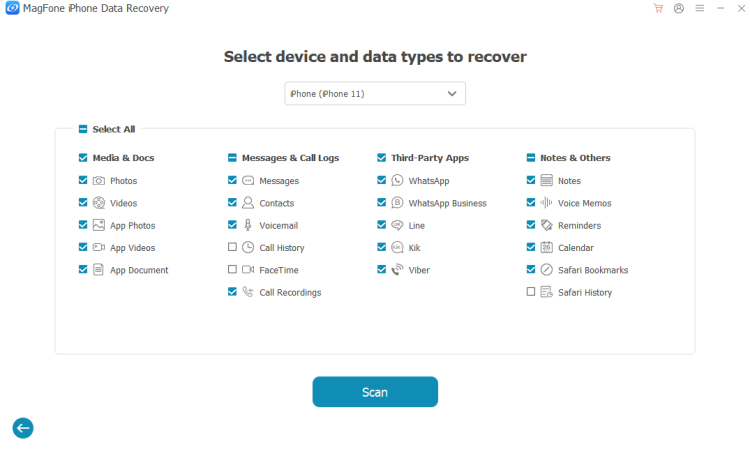
Select Photos and click Scan to scan your iPhone photos. Enter your iPhone passcode if you are required to. And keep your device connected during scanning.
Step 3 Transfer Photos from iPhone to Computer

After scanning, choose photos and click Recover to PC or Recover to Mac to selectively transfer photos from your iPhone to the computer.
Part 5. Conclusion
In this guide, you've learned seven effective ways to transfer photos from your iPhone to a computer. Whether you prefer using built-in tools on Windows and Mac or a more advanced solution like MagFone iPhone Data Recovery, you can choose the method that best matches your needs for speed, convenience, and photo quality. With the right option, transferring iPhone photos to your computer can be simple and efficient.

Edgar Davis
Editor in chief