








In daily use, you may take countless screenshots or save large numbers of photos while surfing the internet, gradually using up your available storage. If you want to free up space without permanently losing your pictures, transferring photos from iCloud to PC is an effective solution. After transferring photos, you can safely delete them from iCloud while keeping a backup on your computer for future viewing and use. This guide will explain five ways to transfer photos from iCloud to PC and will also cover two ways to transfer photos from PC to iCloud.
- Part 1. How Do I Transfer Photos from iCloud to PC?
- Part 2. How to Transfer Photos from iCloud to PC
- Part 3. How to Transfer Photos from PC to iCloud
- Part 4. Conclusion
Part 1. How Do I Transfer Photos from iCloud to PC?
If you don't want random photos to occupy your iCloud storage, transferring photos to your PC can help create more free space without permanently deleting them. There are several ways you can choose from, depending on whether you want to download selected photos, move an entire collection, or just save a large amount of photos. The following methods can help you choose the most suitable option.
| Methods | Maximum Photos | Operation | Best for | Note |
|---|---|---|---|---|
| iCloud Photos Website | Up to 1000 at once | Moderate | Transfer iCloud photos at any time | / |
| iCloud for Windows | Up to 1000 at once | Moderate | iCloud for Windows users | / |
| iCloud Link | Up to 1000 at once | Easy | Quick and instant transfer | iCloud link expires after 30 days |
| Apple Privacy Copy | All iCloud Photos | Moderate | Archive iCloud photos | It may take a long time to request for a copy. |
| MagFone iPhone Data Recovery | No limitation | Easy | Selective and massive transfer | / |
Part 2. How to Transfer Photos from iCloud to PC
Once you decide to move your photos from iCloud to your computer, you can choose from several practical methods. Check the detailed steps below to get photos from iCloud to your PC.
Option 1. Download from iCloud Photos Website
The iCloud Photos website allows you to access and download pictures directly from any PC with an internet connection. However, you can download up to 1000 photos at one time, and you may need to repeat the process in batches.
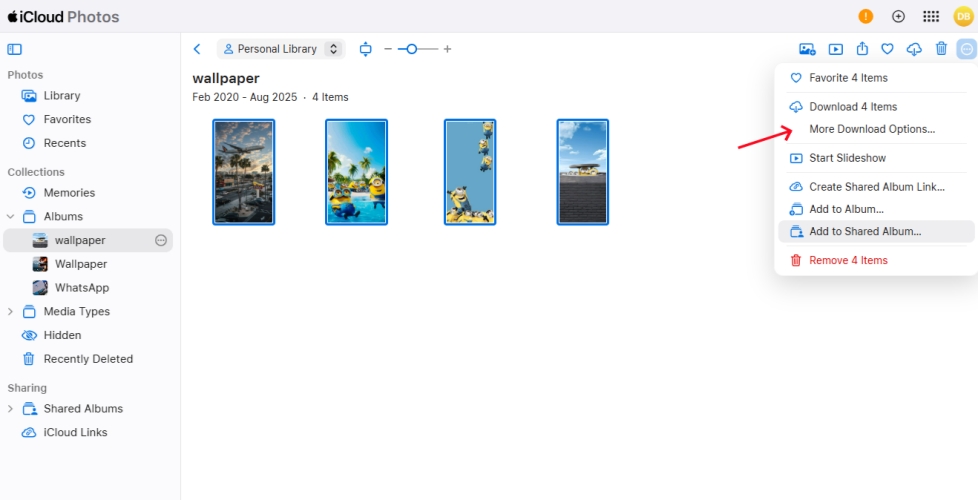
Step 1. Open the iCloud Photos website on your computer and log in to your Apple Account.
Step 2. Select the photos you want to transfer, then click the triple-dot icon.
Step 3. Click More Download Options, then choose your option and click the Download button to download selected photos to your computer.
Option 2. Download from iCloud Photos for Windows
iCloud for Windows can sync your iCloud Photos library with your PC, allowing you to access and download photos through File Explorer. You can copy the photos from iCloud to local folders and manage them directly on your PC.
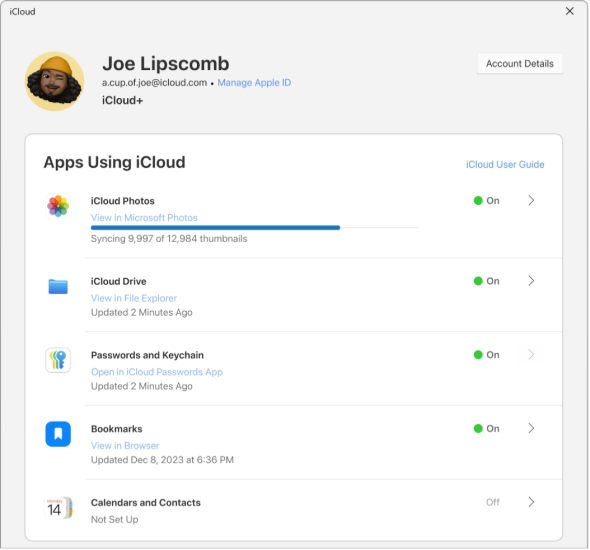
Step 1. Download iCloud for Windows on the computer.
Step 2. Open iCloud for Windows and log in to your Apple Account.
Step 3. Click the arrow next to iCloud Photos, turn on iCloud Photos, and click Done.
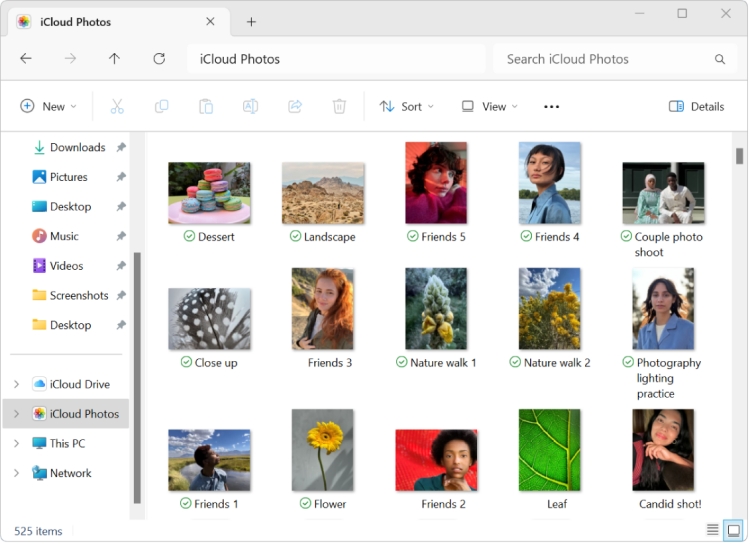
Step 4. Open File Manager, click iCloud Photos folder in the left directory.
Step 5. Select the photos you want to transfer, copy and paste them to a location where you want to store them.
Option 3. Transfer via iCloud Link
If you only need to transfer a few photos or if you want to transfer photos from iCloud to someone else's computer but don't want to leave login credentials, creating an iCloud link can be a quick and convenient solution. Then others can download photos shared via this iCloud link.
Create iCloud Link on iCloud Photos Website:
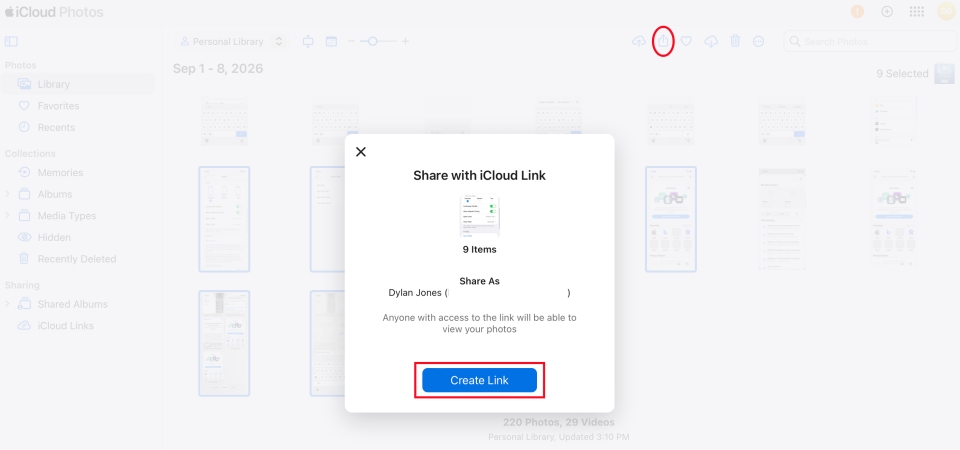
Step 1. Log in to the iCloud Photos website on your computer.
Step 2. Select the photos you want to transfer and click the Share button.
Step 3. Click Create Shared Album Link and load the link to the computer you want to transfer to.
Create iCloud Link on iOS devices:
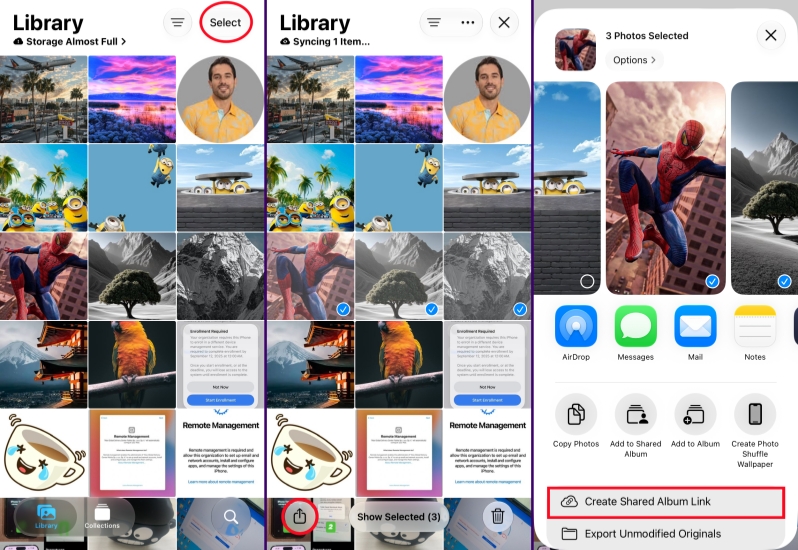
Step 1. Open the Photos app on your iPhone.
Step 2. Tap Select to select the photos you want to transfer.
Step 3. Tap the Share button and choose Create Shared Album Link.
Step 4. Load the Shared Album link on your computer, press ctrl + A to select all photos, and click the Download button to transfer them to your computer.
Option 4. Request A Copy of Photos via Apple Privacy
Apple's Data and Privacy website allows you to request a copy of your photos and other account data. This process may take longer than other methods in this guide. For those who want to archive a copy of their iCloud photos, this can be a feasible option.
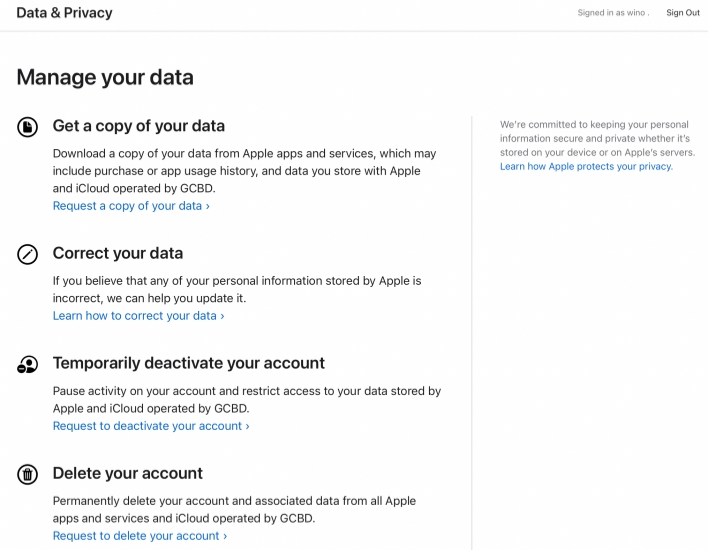
Step 1. Load the Apple Data & Privacy website and log in to your Apple Account.
Step 2. Access the link under Get a copy of your data.
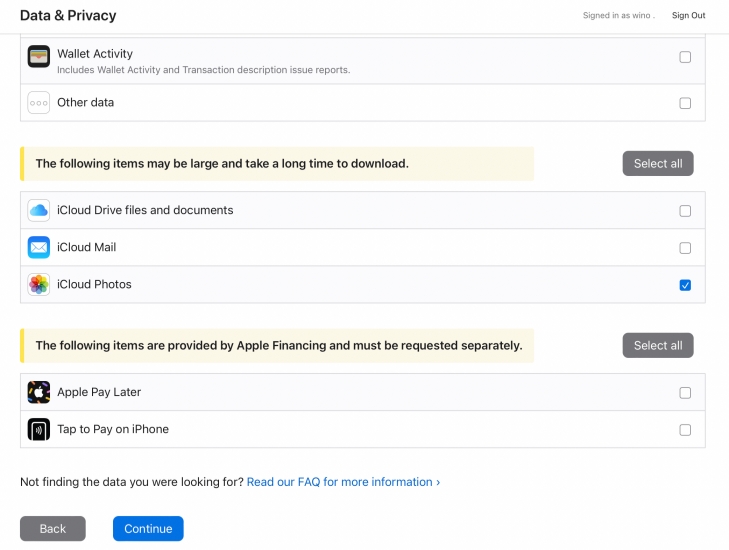
Step 3. Select iCloud Photos and click Continue.
Step 4. Choose the maximum file size and click Complete request.
Option 5. Transfer iCloud Photos with MagFone
If you are concerned about data loss when using the methods above, MagFone iPhone Data Recovery provides a safer alternative for transferring photos from iCloud to your PC. This tool allows you to download photos from an iPhone, iPad, iTunes backup, or iCloud without affecting the existing data on your device or in iCloud Photos.
MagFone allows you to transfer or download an unlimited number of photos at once. Follow the steps below to download your iCloud photos and save them to your computer.

MagFone iPhone Data Recovery
Extract and Transfer iPhone Photos from Your Device or Backup in Minutes.
Step 1 Install MagFone iPhone Data Recovery on Computer
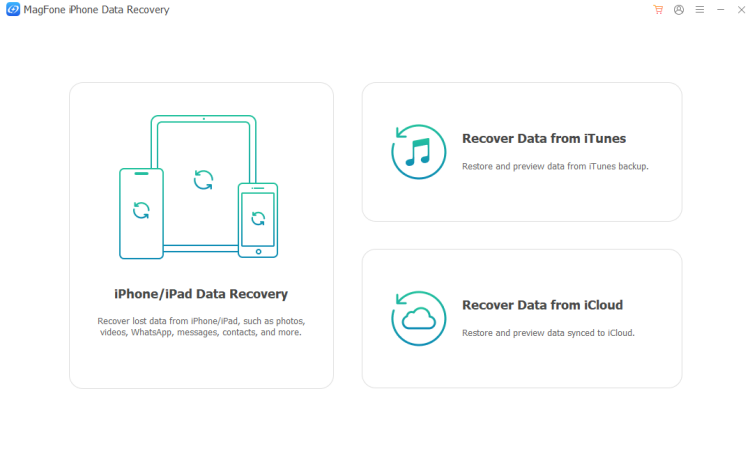
First, download and install MagFone iPhone Data Recovery on your computer. Then use a data cable to link your iPhone to the computer.
Step 2 Scan iCloud Photos
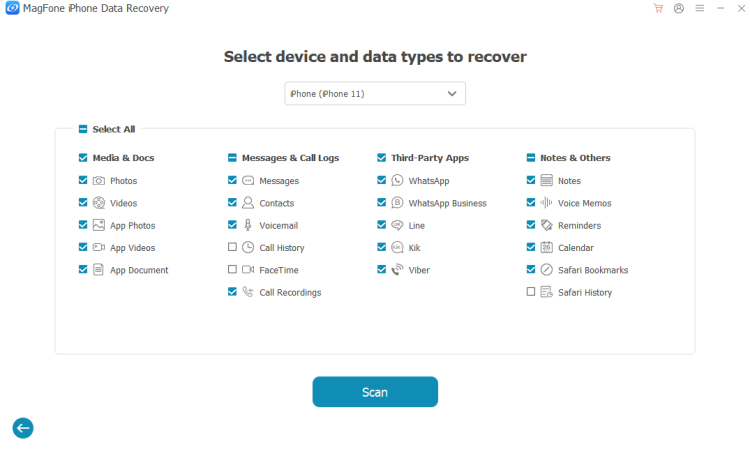
Choose iPhone/iPad Data Recovery from MagFone's interface, select Photos, and click Scan to scan photos on your iPhone.
Step 3 Transfer iCloud Photos to PC
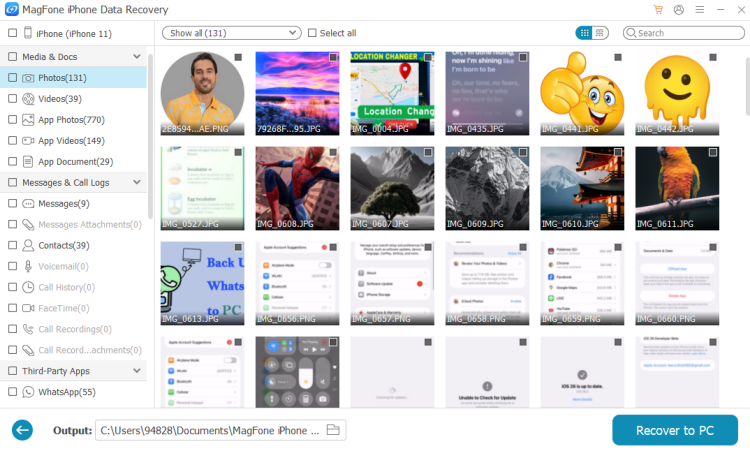
After scanning, you can select photos and click Recover to PC or Recover to Mac to download these photos from iCloud to your computer.
Part 3. How to Transfer Photos from PC to iCloud
Apart from transferring photos from iCloud to PC, users may have photos to be transferred from PC to iCloud. In this section, we will also introduce how to upload photos from your computer to iCloud, so you can also access these photos anytime. Before uploading, ensure there is enough iCloud storage to store photos.
Option 1. Upload Photos on iCloud Photos Website
Besides downloading photos from the iCloud Photos website to your computer, you can also upload photos to iCloud from a OC. Once the upload is completed, the photos can be accessed from other devices connected to the same Apple Account.
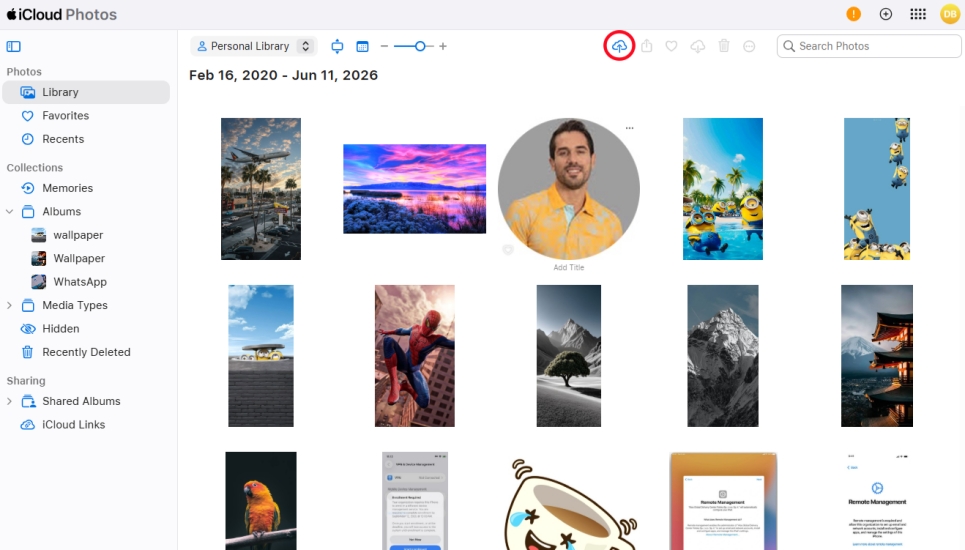
Step 1. Open the iCloud Photos website on your computer, and log in to your Apple Account.
Step 2. Click the Upload icon and select photos from your computer.
Step 3. Click Open, and the photos will be transferred to iCloud.
Option 2. Upload Photos via iCloud for Windows
With iCloud for Windows, you can add photos from your PC to the iCloud Photos folder and allow the application to sync them automatically. After synchronization, the uploaded photos should become available on your other iCloud-connected devices.
Step 1. Open File Manager on your computer.
Step 2. Click the iCloud Photos folder in the Navigation pane.
Step 3. Select the photos you want to transfer to iCloud, and drag them to the iCloud Photos folder. Once the photos are synced, you can check them on the iCloud Photos website.
Part 4. Conclusion
Transferring photos from iCloud to a PC can help you manage your storage, back up important pictures, and access your photo library more conveniently. For a few photos, the iCloud website or an iCloud Link may be the simplest choice, while iCloud for Windows is better suited to regular or larger transfers. If you need a complete data archive or a more specialized transfer process, Apple's privacy service and MagFone provide additional options.

Edgar Davis
Editor in chief





