








Moving notes between your iPhone, iCloud, and computer can help keep important information accessible across devices and reduce the risk of losing it. Whether your notes are stored locally, linked to a third-party account, or already saved in iCloud, the transfer process is easy across devices and iCloud. In this guide, we will explain how to transfer notes from iPhone to iCloud, and how to transfer notes from iCloud to iPhone.
- Part 1. How to Transfer Notes from iPhone to iCloud
- Part 2. How to Transfer Notes from iCloud to iPhone
- Part 3. Bonus: Transfer Notes from iPhone/iCloud to Computer
- Part 4. Conclusion
Part 1. How to Transfer Notes from iPhone to iCloud
If your notes are currently stored on your iPhone or linked to another account, moving them to iCloud can make them easier to access across Apple devices. Before transferring anything, enable iCloud Notes and confirm that your iPhone is signed in to the correct Apple Account.
Option 1. Move Notes from On My iPhone to iCloud
Notes saved under On My iPhone account are stored locally and will not appear on your other Apple devices. You can transfer the notes to iCloud so they will sync with other devices using the same Apple Account.
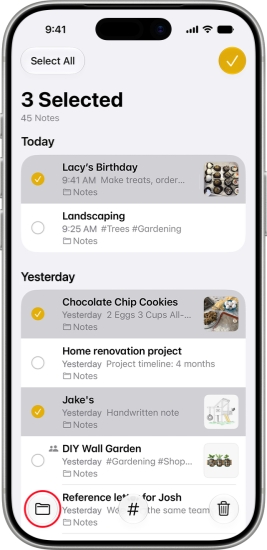
Step 1. Open the Notes app and enter the On My iPhone folder.
Step 2. Tap the triple-dot icon and tap Select Notes to select the notes you want to transfer to your iCloud account.
Step 3. Tap the Folder icon and choose a folder in iCloud to move these notes to.
Option 2. Move Notes from Third-party Accounts to iCloud
If your notes are connected to accounts such as Gmail, Yahoo, or another email provider, you can also move them to iCloud on your iPhone. First, add the third-party account to Notes accounts, then move notes inside the Notes app.
Add Account to Notes:
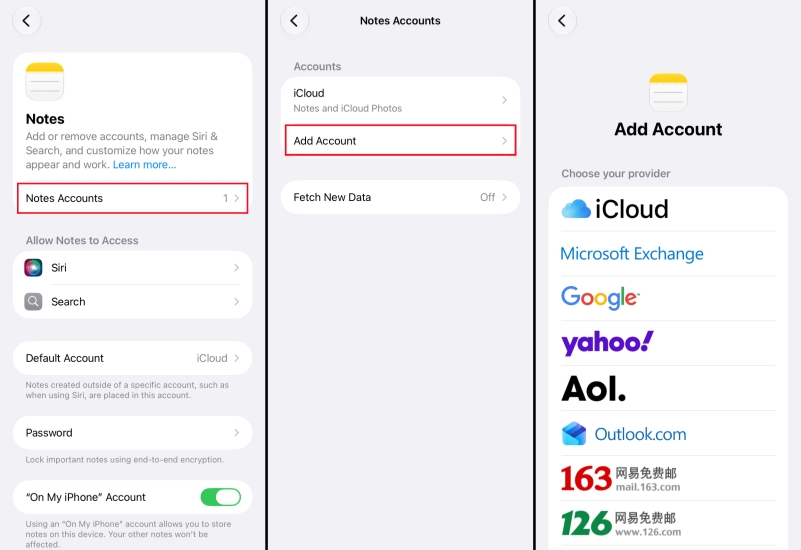
Step 1. Go to iPhone Settings > Apps > Notes.
Step 2. Tap Accounts > Add Account.
Step 3. Choose the provider and enter your email credentials to add the account to Notes. Afterwards, the notes will sync on your iPhone.
Move Notes to iCloud:
Step 1. Open the Notes app and open the Notes folder in the third-party account.
Step 2. Tap Edit and select the notes you want to transfer to iCloud.
Step 3. Tap the Folder icon and choose an iCloud folder to move these notes to iCloud.
Part 2. How to Transfer Notes from iCloud to iPhone
For users who need to transfer notes from an iCloud account to an iPhone local account, there are two scenarios you may encounter. Whether you need to transfer notes from iCloud to another iPhone or want to transfer notes from an iCloud account to a local account, we will show you the detailed steps below.
Scenario 1. Sync Notes to Another iPhone
If you need to download your iCloud notes to another iPhone, you can first log in to your Apple ID on the iPhone, then follow the steps below to sync iCloud notes to your iPhone.
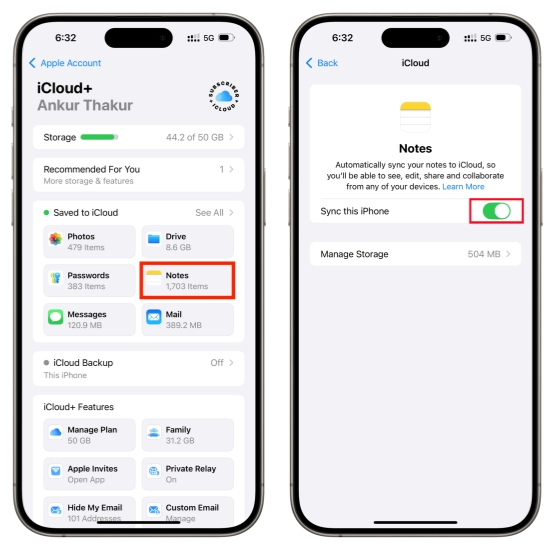
Step 1. Go to Settings > iCloud > Save to iCloud.
Step 2. Tap Notes and enable Stnc this iPhone, and wait a moment; the iCloud notes will sync on your iPhone.
Scenario 2. Move Notes from iCloud to On My iPhone Account
If you want to transfer notes from an iCloud account to the On My iPhone account, you need to first make sure the On My iPhone Account is enabled on your iPhone, then move the notes smoothly.
Enable On My iPhone Account:
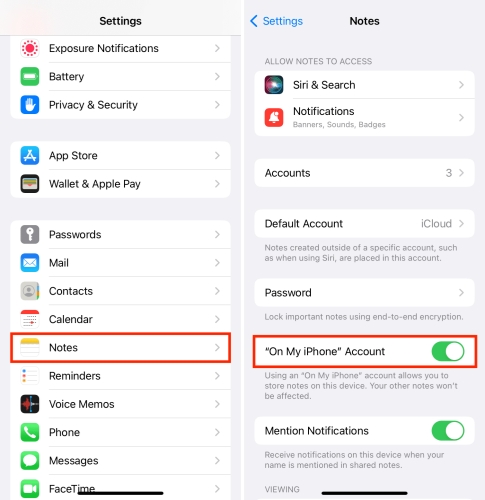
Step 1. Go to Settings > Apps > Notes.
Step 2. Enable "On My iPhone" Account; then this folder will appear in the Notes app.
Move Notes from iCloud to iPhone:
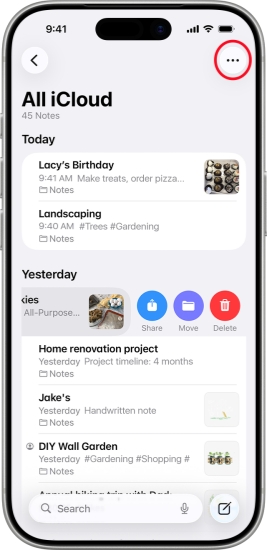
Step 1. Open the Notes app and enter the iCloud folder.
Step 2. Tap the triple-dot icon and tap Select Notes to select the notes you want to transfer.
Step 3. Tap the Folder icon and select a local folder you want to transfer the notes to.
Part 3. Bonus: Transfer Notes from iPhone/iCloud to Computer
Apart from transferring notes between iPhone devices and iCloud, we'd like to share a way to transfer notes from your iPhone or iCloud to a computer. MagFone iPhone Data Recovery is a data transfer tool for iPhone and iPad users. It's designed to manage data for Apple users, offering solutions to recover deleted data on iPhone, extract data from iTunes backup, recover data from iCloud, and back up or restore iPhone data. This tool allows you to transfer data across your devices without data loss or hassle.

MagFone iPhone Data Recovery
Extract and transfer iPhone Notes from Your Device or Backup in Minutes.
Step 1 Install MagFone iPhone Data Recovery
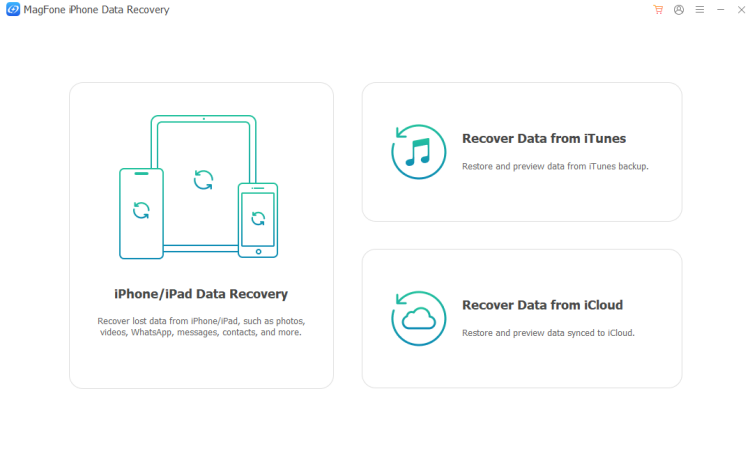
First, install MagFone iPhone Data Recovery on your computer. Then use a data cable to connect your iPhone to the computer and launch this tool.
Step 2 Scan for Notes on iPhone
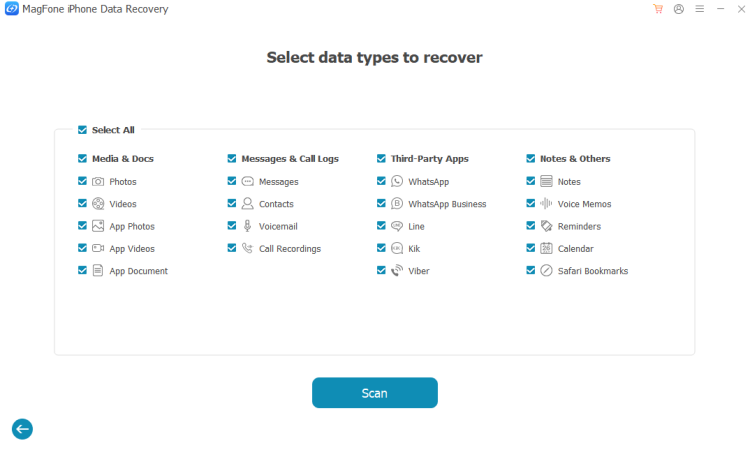
Click iPhone/iPad Data Recovery on the main interface, select Notes, and click Scan to allow this tool to scan your data.
Step 3 Transfer Notes from iPhone to Computer
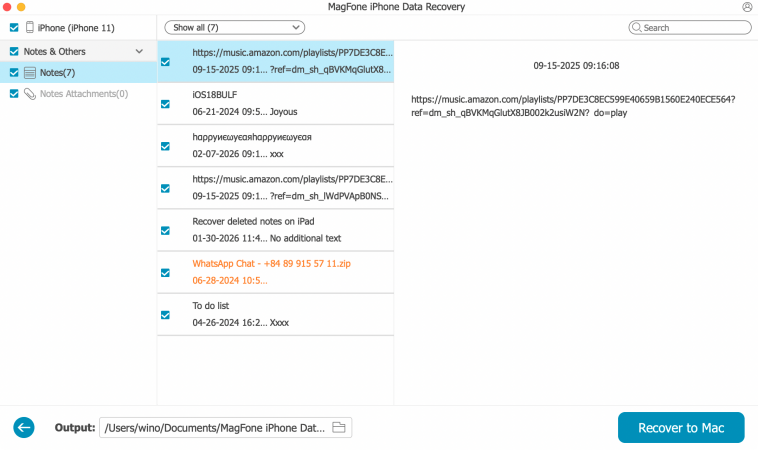
After scanning, you can see all your iPhone notes on the computer. You can select the one you need to transfer or select all and click Recover to PC or Recover to Mac to transfer them to your computer.
Part 4. Conclusion
No matter whether you want to transfer notes from iPhone to iCloud, transfer notes from iCloud to iPhone, or transfer notes from iPhone to computer, this guide offers you clear instructions. Now you can transfer your notes efficiently and access your notes more conveniently. By the way, if you want to transfer notes from iCloud or iPhone to a computer, MagFone iPhone Data Recovery can simplify the process.

Edgar Davis
Editor in chief





