








Is there a way to export my notes or files from my Iphone to my windows pc without Icloud? I have a lot of important information saved to my notes app where the formatting (underline, bolds, highlights, etc) are necessary to be kept."
——From Reddit
Do you have important formatting like bold text, underlines, and highlights for your notes on iPhone? If you are heavily relying on the Notes app in daily life, when it comes to exporting notes from iPhone, finding the right method is essential. In this guide, we will explore a range of practical options for exporting notes from iPhone. Whether you're looking to back up your notes or move them for other access, you will find a way here.
- Part 1. Methods Overview of Exporting Notes from iPhone
- Part 2. How to Export Notes from iPhone
- Part 3. How to Export Notes from iPhone to Computer
- Part 4. FAQs about Exporting Notes from iPhone
- Part 5. Conclusion
Part 1. Methods Overview of Exporting Notes from iPhone
No matter if you want to export a single note or multiple notes from your iPhone, there are several methods available to suit your needs. The table below summarizes all the options for exporting notes, whether you prefer saving them as different file formats or transferring them directly to your computer. In the following sections, you'll find step-by-step guides on how to export iPhone notes as PDF, Markdown, or TXT files, as well as how to move your notes from your iPhone to your computer. Simply choose the method that best fits your situation to get started.
| Export as/to | Options | Notice |
|---|---|---|
| Export Notes as files | Export Notes to PDF/Markdown/TXT file | Export individual note |
| Export Notes from iPhone to Computer | AirDrop | Export individual note |
| Email Account | Sync notes to computer via email account | |
| MagFone iPhone Data Recovery | Export notes selectively |
Part 2. How to Export Notes from iPhone
You can export iPhone notes to some format directly on your iPhone. Whether you need a shareable PDF, a clean Markdown file, or a simple TXT document, the following options will guide you through each process. But note that you can only export one note at a time.
Option 1. Export iPhone Notes to PDF
Exporting your notes as a PDF is ideal if you want to preserve formatting such as bold, underline, and highlights. This method ensures your notes look exactly the same on any device, making it perfect for sharing or printing.
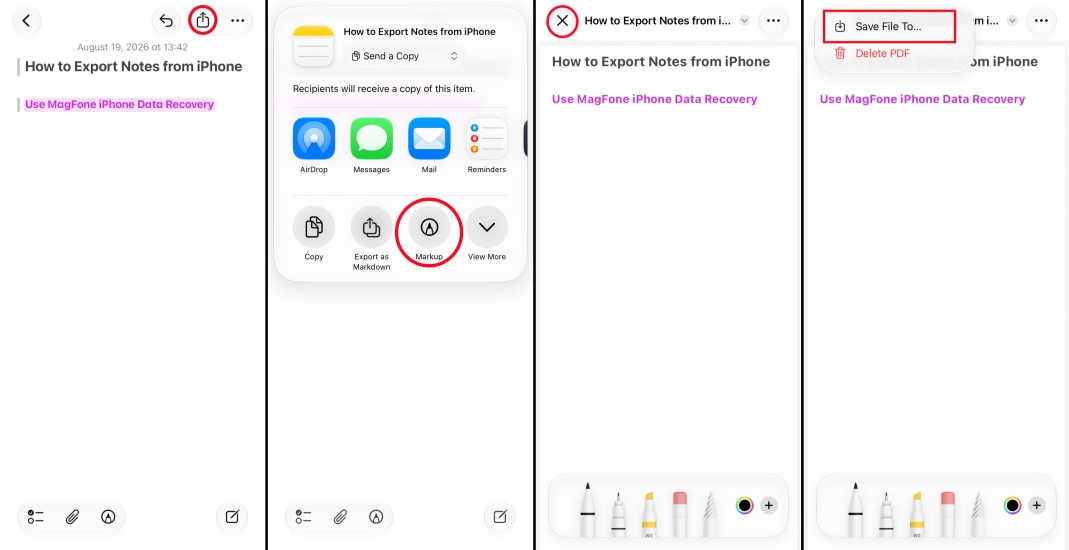
Step 1. Open the Notes app and open the note you want to export.
Step 2. Tap the Share icon and choose Markup.
Step 3. Tap Done and save the exported note to a location you want.
Option 2. Export iPhone Notes to Markdown File
If you prefer a lightweight format that's great for editing and compatible with many note-taking apps, exporting your notes to a Markdown file is a smart choice. The Markdown file allows you to continue working with your notes on other platforms or tools.
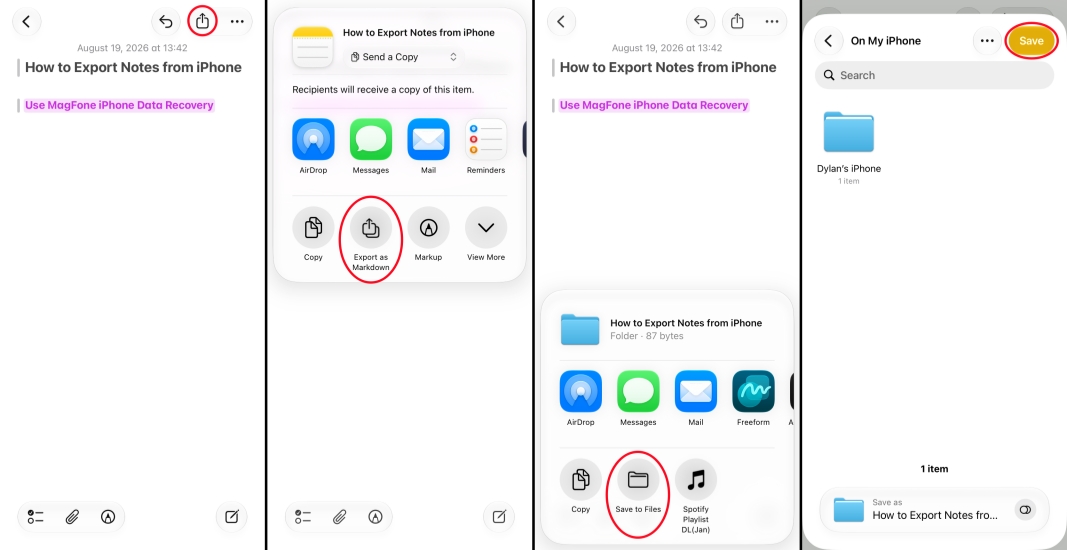
Step 1. Open the Notes app and open the note you want to export.
Step 2. Tap the Share icon and choose Export as Markdown.
Step 3. Select where to save it and tap Done.
Option 3. Export iPhone Notes to TXT File
For those whose notes are plain text content, exporting notes as a TXT file is the most straightforward solution. Then you can copy the TXT content anywhere you want for further editing.
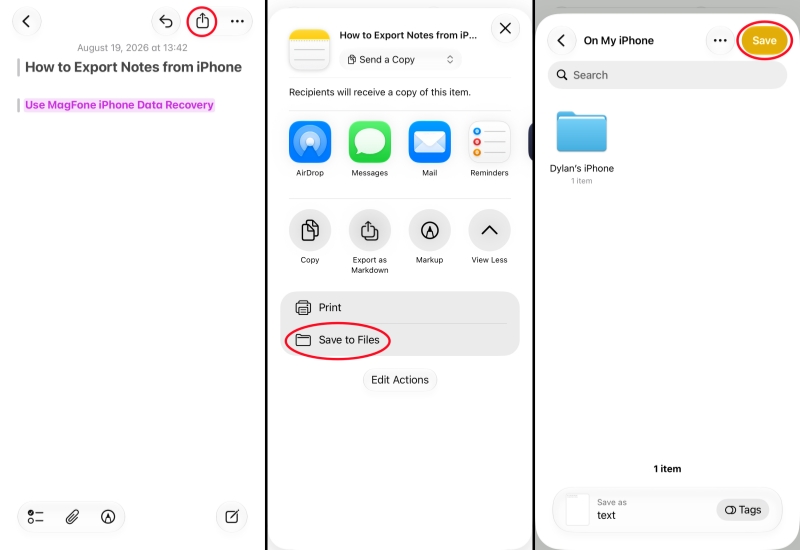
Step 1. Open the Notes app and open the note you want to export.
Step 2. Tap the Share icon and choose Save to Files.
Step 3. Choose the location in Files and tap Done.
Part 3. How to Export Notes from iPhone to Computer
Besides exporting your notes as files, some may also want to export their notes to a computer for backup or further use. Here are several convenient ways to move your iPhone notes to either a Mac or a Windows PC, with or without iCloud.
Option 1. Export iPhone Notes to Mac via AirDrop
For iPhone and Mac users, one of the easiest ways to export notes is via AirDrop. You can instantly transfer individual notes while preserving their formatting.
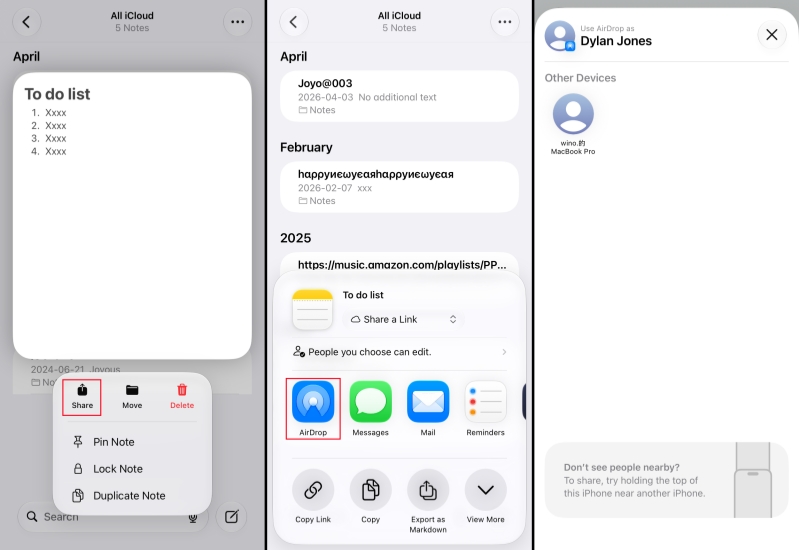
Step 1. Open the note you want to export to your computer from your iPhone.
Step 2. Tap the Share icon and tap AirDrop.
Step 3. Choose your Mac and wait for the notes to be transferred.
Option 2. Export iPhone Notes to Computer with Email Account
Another convenient way to export your iPhone notes to your computer is by using an email account. By enabling notes for your chosen email account, you can store and sync your notes across devices, making them easily accessible from your computer.
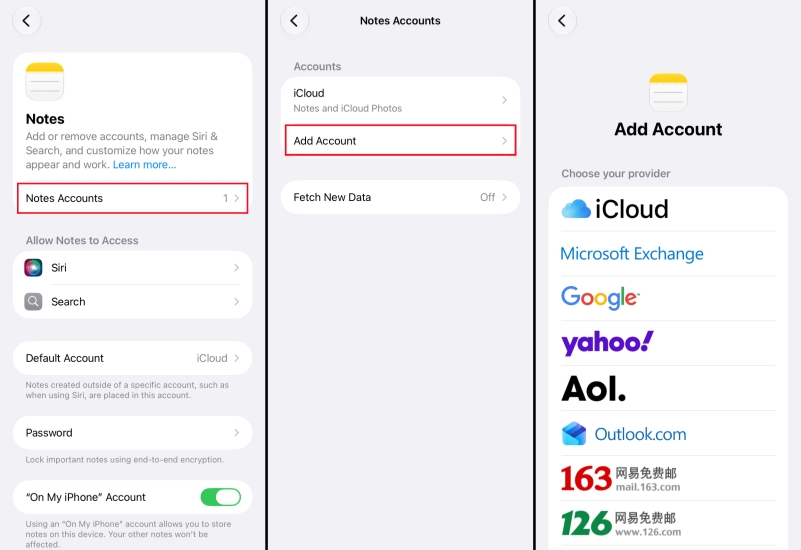
Step 1. Go to Settings > Apps > Notes.
Step 2. Tap Notes Accounts > Add Account, and choose the provider to add your email account on iPhone.
Step 3. After adding the email account, tap the account and enable Notes.
Step 4. Then you can go to the Notes app to move your notes to the mail account.
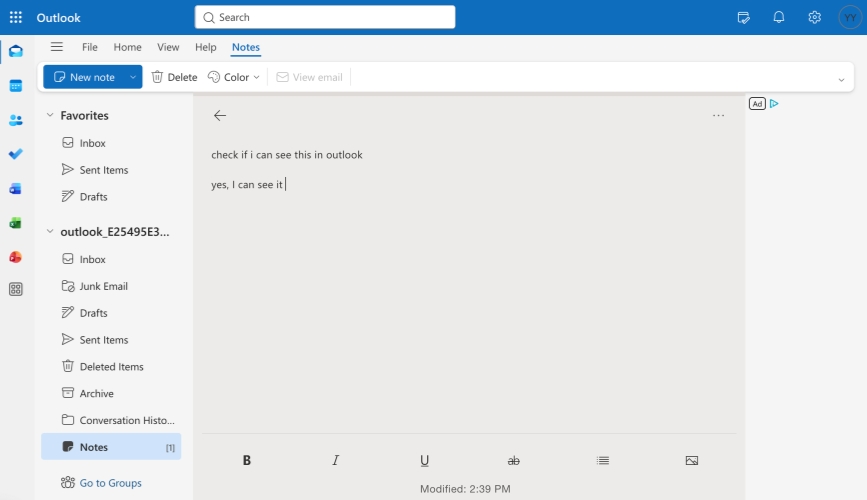
Step 5. Log into your email account on your computer, and the notes will sync. In this way, you can read and edit the notes on your computer, but you can't export the notes as a file format directly.
Note:
If you're using a Mac, you can add the same email account to the Notes app on your Mac. This allows your notes to sync seamlessly, and you can then export them to various file formats directly from your Mac.
Step 1. Open the Notes app on your Mac.
Step 2. Click Notes from the Menu bar and click Accounts.
Step 3. Choose the mail provider and add your mail account on Mac.
Step 4. After adding your email account, check Notes so your notes will sync on your Mac.
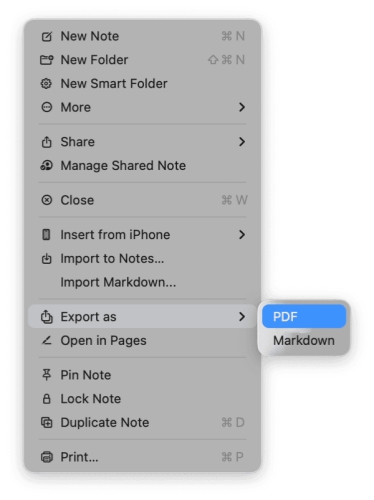
Step 5. Open the note you want to export, click File > Export as, and choose to export the note as a PDF file or a Markdown file.
Option 3. Export iPhone Notes to Computer with MagFone
While the previous methods allow you to export one note at a time, this can be tedious and inefficient if you need to transfer multiple notes in bulk. That's where MagFone iPhone Data Recovery comes in. MagFone iPhone Data Recovery is a specialized tool designed for iOS data management. It lets you recover iPhone data, extract content from iTunes backups, and back up or restore your iPhone. Most importantly, it enables you to selectively export any readable data, including notes, directly from your iPhone. This makes it an excellent choice for users who want a fast and flexible way to export multiple notes at once.
If you need to export all notes from your iPhone or selectively export notes from your iPhone, just follow the steps below.

MagFone iPhone Data Recovery
Extract and transfer iPhone Notes from Your Device or Backup in Minutes.
Step 1 Download and Install MagFone iPhone Data Recovery
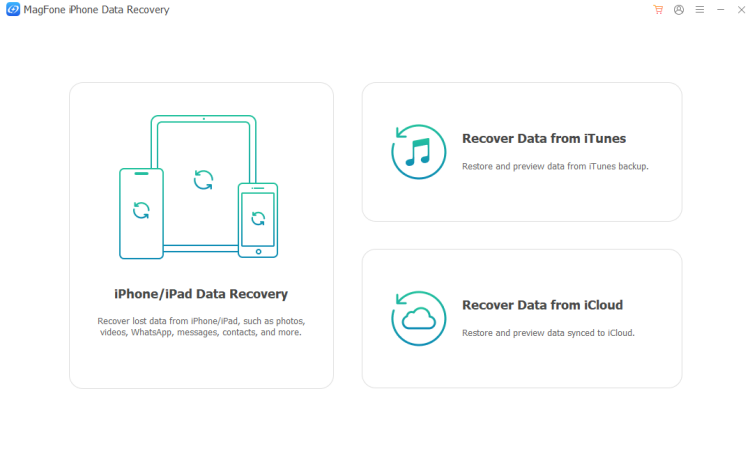
Click to download MagFone iPhone Data Recovery on your computer, install the tool, and run it. Then use a data cable to connect your iPhone to the computer.
Step 2 Scan Notes on iPhone
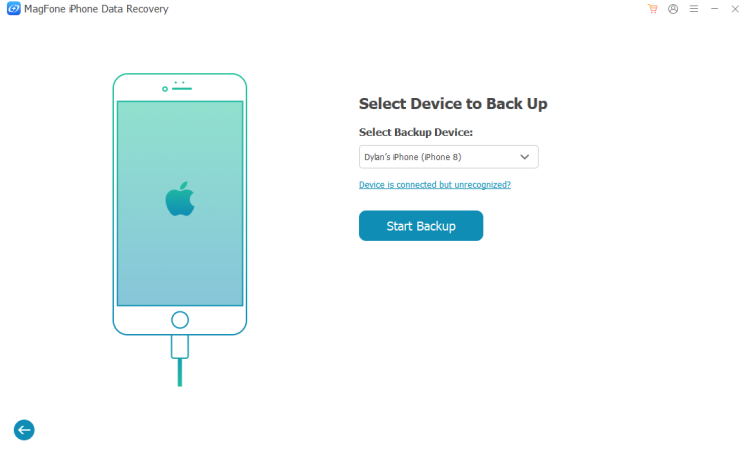
Choose iPhone/iPad Data Recovery from MagFone's interface. Select Notes and click Scan. When prompted, enter the passcode on your iPhone to give full permissions.
Step 3 Export Notes from iPhone to Computer
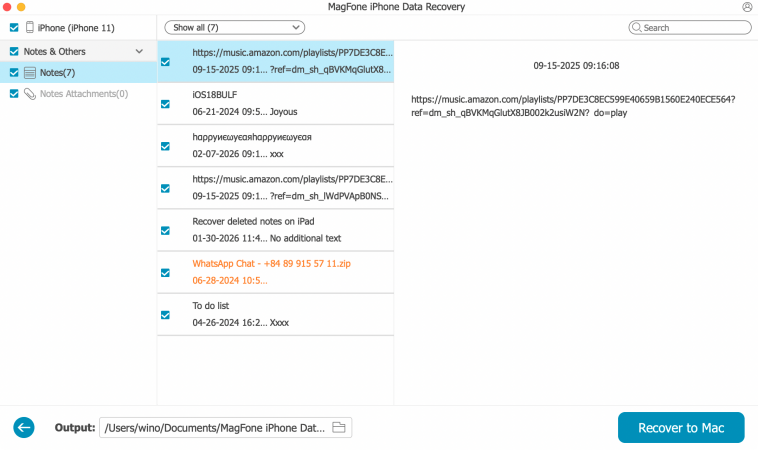
After scanning, select the notes you need to export and click Recover to PC or Recover to Mac to export them to your computer. Afterwards, you can share and store them anywhere you want.
Part 4. FAQs about Exporting Notes from iPhone
How to convert notes to PDF on iPhone?
You can convert notes to PDF on iPhone via the Markup feature or the Print feature.
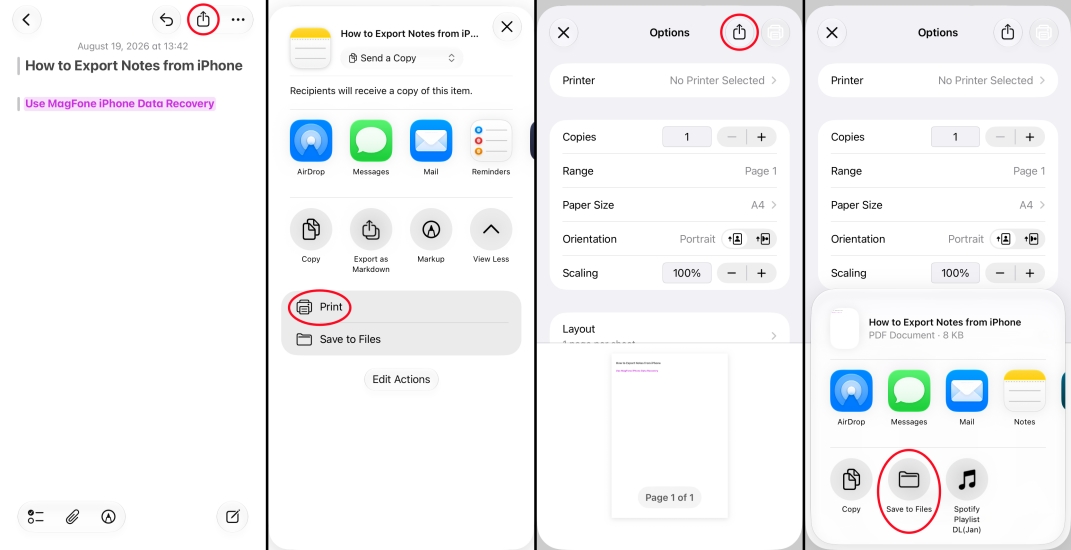
Step 1. Open the note you want to convert in the Notes app.
Step 2. Tap the Share icon and choose Print.
Step 3. Tap the Share icon and choose Save to Files. Then you can check the PDF file in the Files app.
How to export scanned documents from Notes?
You can save the note to the Files app, and in this way the scanned documents will also be saved to the Files app separately.
How to export bulk notes from iPhone?
If you need to export bulk notes from iPhone or export all notes from iPhone, MagFone iPhone Data Recovery can be a good option.
Part 5. Conclusion
Reading here, exporting your notes from iPhone is quite easy now. Whether you need to preserve formatting, move a single note, or transfer your entire notes. With the methods outlined above, you can choose the option that best fits your workflow and device. By following these steps, you'll ensure your important information is safely and conveniently available wherever you need it.

Edgar Davis
Editor in chief





