








Notes app is pretty powerful and convenient for iPhone users. And it usually stores a lot of important information, from study materials and work files to passwords and personal information. Backing up iPhone notes is quite essential for frequent users. In this guide, we will show you different ways to back up notes on iPhone, whether you prefer using the Cloud platform or a computer, so you can always access your notes when you need them.
- Part 1. How Do I Back Up Notes on My iPhone?
- Part 2. How to Back Up iPhone Notes to iCloud
- Part 3. How to Back Up iPhone Notes to Computer
- Part 4. Conclusion
Part 1. How Do I Back Up Notes on My iPhone?
Whether you store notes in the On My iPhone account, iCloud, or in third-party mail accounts, your data can be synced and backed up to other places. Based on your needs for notes backup and where you store your notes, here are different options for you. Here, we'll briefly walk through the main backup methods available on your iPhone, so you know which one fits your needs.
| Method | Notes Scope | Readable | Export | Restore to iPhone |
|---|---|---|---|---|
| iCloud Notes | Notes in iCloud account | ✔️ | ❌ | ❌ |
| iCloud Backup | All notes on iPhone | ❌ | ❌ | Yes, but require restore your iPhone |
| Third-Party Email Account | Notes in email account | ✔️ | ✔️ | ❌ |
| iTunes/Finder Backup | All notes on iPhone | ❌ | ❌ | Yes, but require restore your iPhone |
| MagFone Notes Data Recovery | All notes on iPhone | ✔️ | ✔️ | Yes, and restore selectively |
Part 2. How to Back Up iPhone Notes to iCloud
One of the most convenient choices to back up notes on iPhone is to use Apple's built-in iCloud service. With iCloud, your notes are synced in the background and stay updated across all your Apple devices. In this part, we'll show you two easy ways to back up iPhone notes using iCloud, depending on how you prefer to manage your data.
Option 1. Back Up iPhone Notes via iCloud Notes
iCloud Notes is built directly into the Notes app. Once you enable Notes in iCloud on your iPhone, every note you create or edit is automatically uploaded to your iCloud account. You can then access the same notes on iCloud.com or on any other Apple device signed in with the same Apple ID.
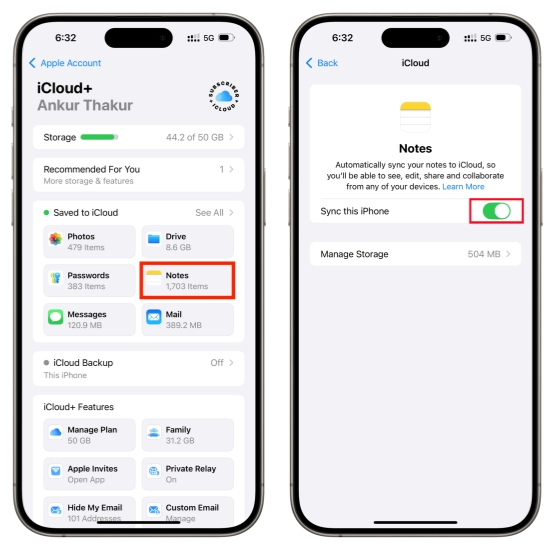
Step 1. Head to iPhone Settings and tap your Apple ID.
Step 2. Tap iCloud > Saved to iCloud > Notes.
Step 3. Enable Sync this iPhone so your iPhone notes will sync on your Mac that is linked with the same Apple ID.
Step 4. Then you can view and edit iCloud notes from the iCloud Notes website or on a linked Apple device.
Option 2. Back Up iPhone Notes to iCloud
Besides syncing only your iCloud notes, you can also protect them as part of a full iCloud backup of your iPhone. When iCloud Backup is turned on, your device regularly backs up important data, including all notes stored on your iPhone, to your iCloud storage when it's connected to Wi‑Fi and power.
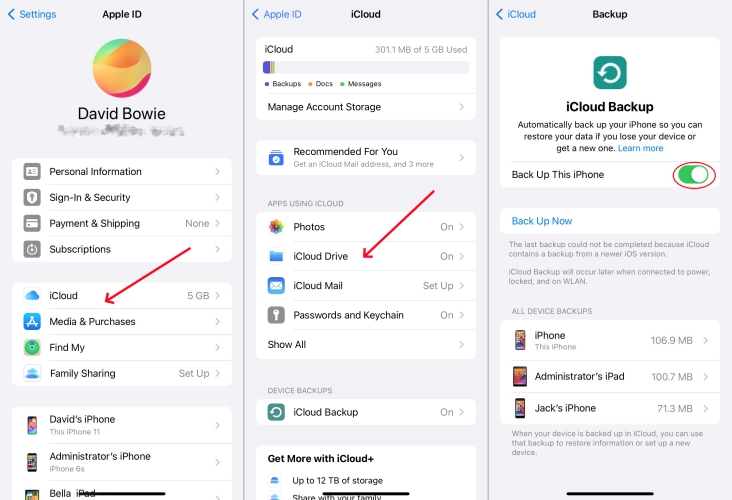
Step 1. Head to iPhone Settings and tap your Apple ID profile.
Step 2. Tap iCloud > iCloud Backup.
Step 3. Enable Back Up This iPhone.
Part 3. How to Back Up iPhone Notes to Computer
Cloud backups are convenient, but many users still prefer having a local copy of their notes on a computer. A computer backup can be useful when your iCloud storage is limited, or your internet connection is unstable, or you simply feel safer keeping data offline. In this part, we'll cover several ways to transfer and back up iPhone notes to a computer using email, iTunes or Finder, and a professional tool.
Option 1. Back Up iPhone Notes to Computer via Third-Party Email Account
If you are using services like Gmail, Outlook, or Yahoo in the Notes app, you can also back up your notes through a third‑party email account. After adding the email account to your iPhone and enabling Notes for it, any notes stored under that account will sync to the server and appear in the Notes folder when you open the same email account on your computer.
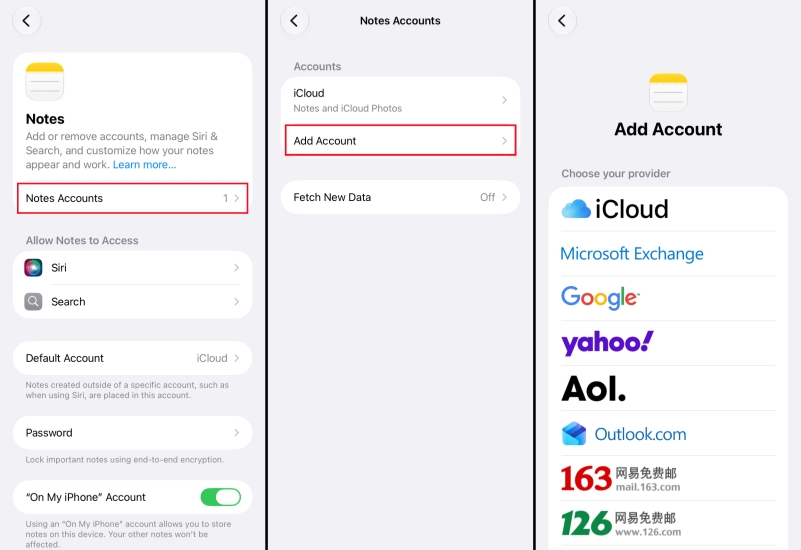
Step 1. Go to iPhone Settings > Apps > Notes.
Step 2. Tap Notes Accounts > Add Account and choose the email account provider you want to add.
Step 3. Enter the required account information to add the email account to your iPhone.
Step 4. Go to the Notes app and move the notes to the added email account.
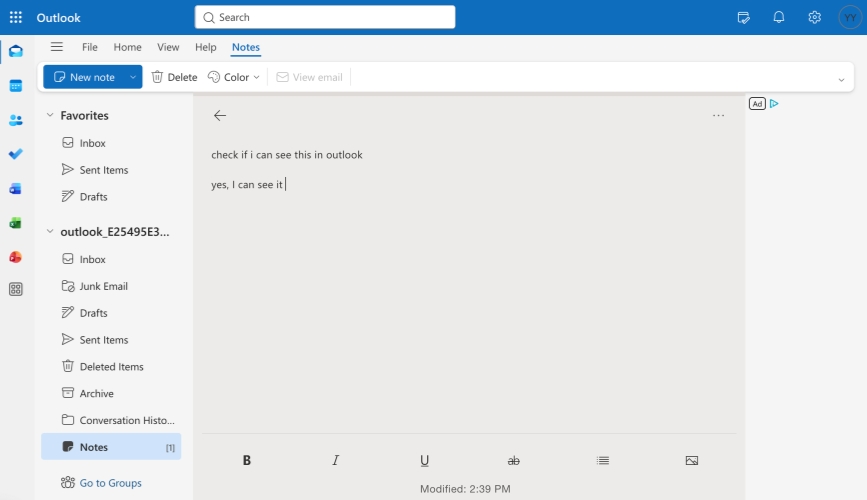
Step 5. Load the email account on your computer and find the Notes folder. So you can view all your notes on the computer.
Option 2. Back Up iPhone Notes to Computer with iTunes or Finder
iTunes or Finder offers an official way to create a complete backup of your iPhone to computer. If you create a local backup with iTunes or Finder, your notes are included along with other data such as photos, messages, and app information.
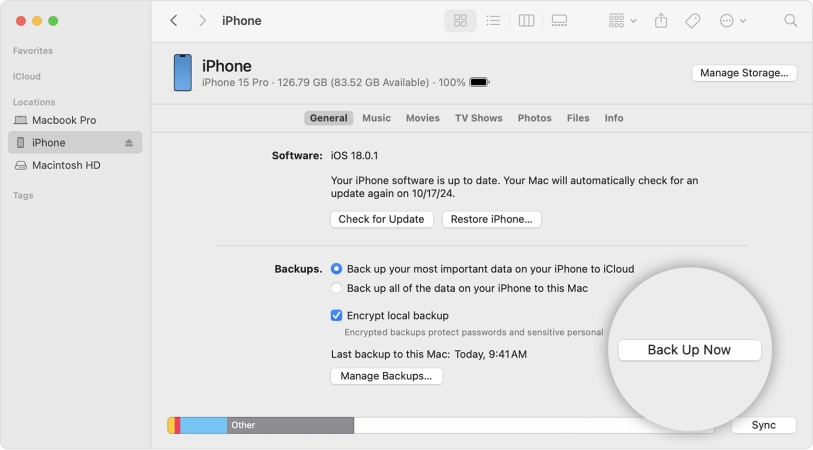
Step 1. Connect your iPhone to the computer using a data cable, and open iTunes or Finder.
Step 2. Click the device icon and click Summary or General.
Step 3. Click Back Up Now to back up your iPhone data, including iPhone notes, to the computer.
Option 3. Back Up iPhone Notes to Computer with MagFone
If you want a more flexible way to back up iPhone notes to computer, you should consider MagFone iPhone Data Recovery. It provides more control over how you back up and restore notes. With MagFone iPhone Data Recovery, you can create a backup on your computer and later preview, export, or selectively restore notes from that backup. In addition, it can help recover iPhone notes when you accidentally deleted them. This option is quite helpful if you need to recover specific notes without resetting your iPhone and if you prefer a more visual way to browse and manage your notes on a computer.

MagFone iPhone Data Recovery
Back up and transfer iPhone Notes from Your Device to computer in Minutes.
Just follow the steps below to back up your iPhone notes to computer.
Step 1 Install MagFone iPhone Data Recovery
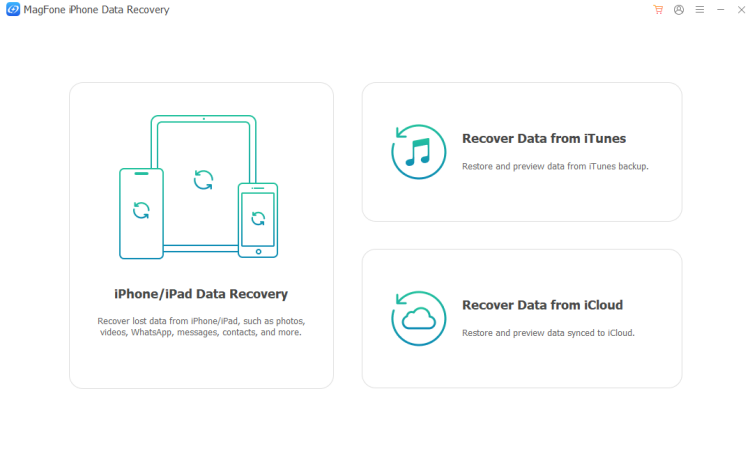
First, download and install MagFone iPhone Data Recovery on your computer. Then link your iPhone to the computer via a data cable. When all is ready, launch this tool to start.
Step 2 Back Up iPhone Notes to Computer
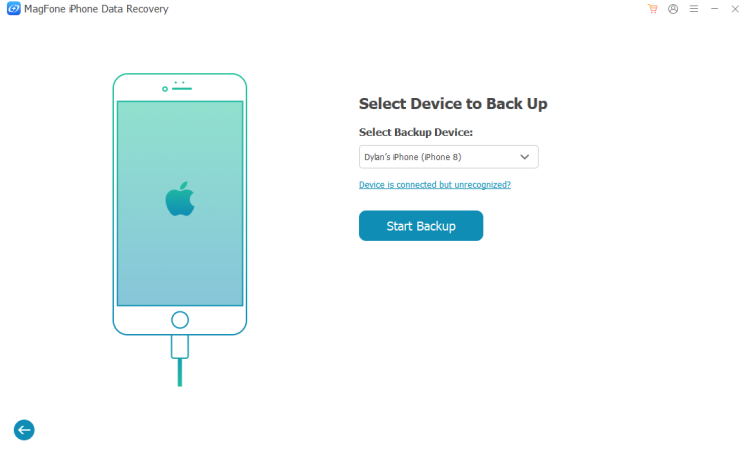
Click iOS Backup & Restore from the main interface. Click iOS Backup. If your iPhone is detected successfully, click Start Backup to back up your iPhone data, as well as notes data, to the computer.
Step 3 Read iPhone Notes on Computer
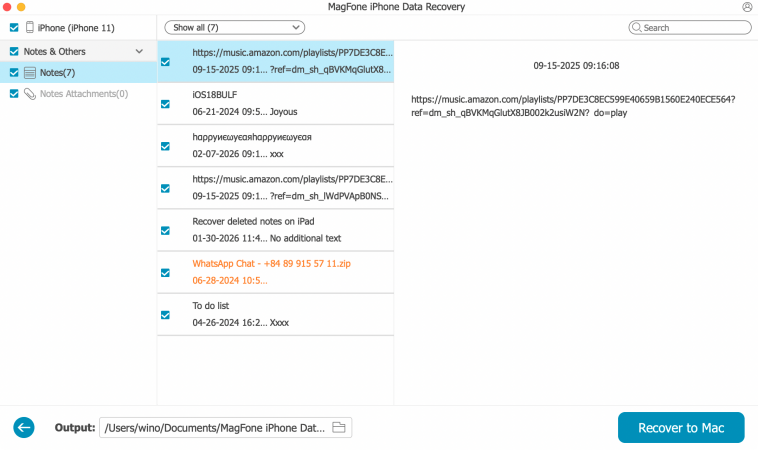
Now you have a local backup of your iPhone on the computer. And you can export or restore the notes if you need. You can go back to choose Recover Data from iTunes on the main interface, choose the backup, click Next > Scan to view the notes on your iPhone.
Part 4. Conclusion
No matter which method you choose, the most important thing is that your notes data are safely backed up. iCloud sync, iCloud backup, email accounts, computer backups with iTunes or Finder, and tools like MagFone all offer different levels of convenience and control. Pick the one fit your situation, and you can always make sure your ideas and important information stay safe and easy to restore whenever you need them.

Edgar Davis
Editor in chief





