









Keeping your personal photos secure on your iPhone is essential in today's digital age. Whether you want to protect sensitive images or keep private memories away from prying eyes, learning how to lock photos on your iPhone can add an extra layer of protection. In this comprehensive guide, we'll explore step-by-step instructions and provide detailed insights into securing your photos efficiently. Go to see how to lock photos on your iPhone now!
- Part 1. Can You Lock Photos on iPhone?
- Part 2. How to Lock Photos on iPhone with iPhone Passcode
- Part 3. How to Lock Photos on iPhone with Different Passcode
- Part 4. FAQs about Locking Photos on iPhone
- Part 5. Conclusion
Part 1. Can You Lock Photos on iPhone?
Yes, you can lock photos on your iPhone. With iPhones becoming essential for capturing everyday moments, it's common for users to store private images on their devices. However, without proper protection, these photos could be easily accessed by anyone handling your phone. Locking photos safeguards them from unauthorized access, providing peace of mind when sharing your device or using it in public.
So, how to lock photos on your iPhone? Apple offers multiple ways to secure your photos, including built-in tools and third-party applications. Keep on reading, and find a way to lock photos on your iPhone.
Part 2. How to Lock Photos on iPhone with iPhone Passcode
Your iPhone passcode is the first line of defense for your photos. By using features tied directly to your device passcode or Face ID/Touch ID, you can keep curious eyes from casually browsing your images. Below are two simple ways to use your existing iPhone passcode to protect your photos.
Option 1. Lock Photos App on iPhone
The direct way to lock your photos on your iPhone is to lock the Photos app. Locking apps is a new feature on the iPhone, which prevents someone else from getting into the app. Once the Photos app is locked on the iPhone, opening the Photos app requires Face ID, Touch ID, or the passcode. But those photos are locked on the iPhone only, not cross-platform.
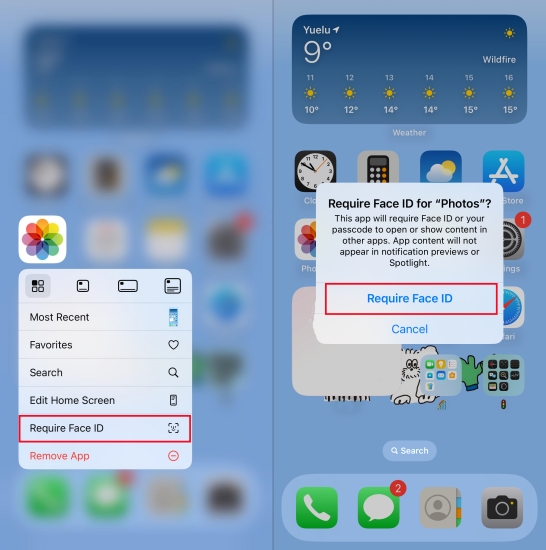
Step 1. Go to the Home Screen and find the Photos app.
Step 2. Touch and hold the app icon until the quick actions menu opens.
Step 3. Tap Require Face ID or Require Passcode, then tap your choice again.
Step 4. Authenticate with your iPhone passcode, Face ID, or Touch ID, and tap Done.
Option 2. Move Photos to Hidden Album
The built-in Photos app on the iPhone offers a straightforward method to hide and secure photos. If you don't want to make your photos public, you can hide them and then lock your hidden photos in the Photos app. This ensures that only authorized users can access the hidden album with biometric authentication. Follow these steps to utilize this feature.
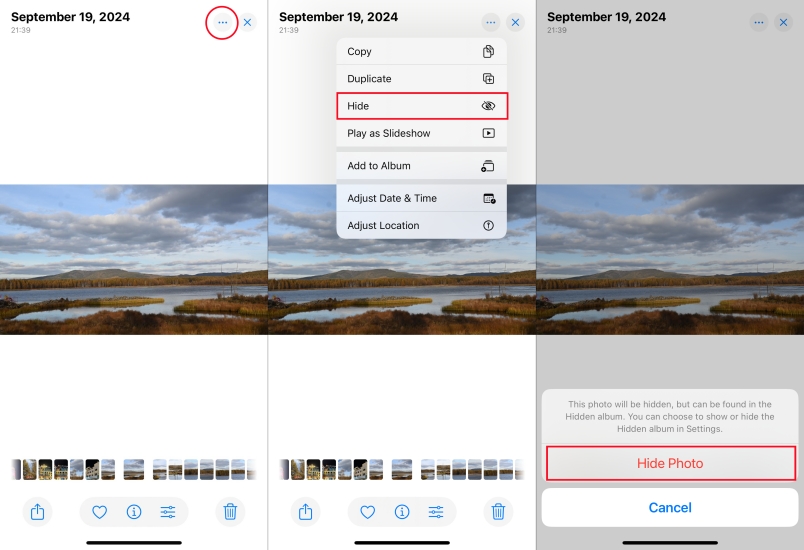
Step 1. Open Photos and select the photo you want to hide.
Step 2. Tap the three-dot icon at the top right corner, then tap Hide.
Step 3. Tap Hide Photo to confirm that you want to hide the photo.
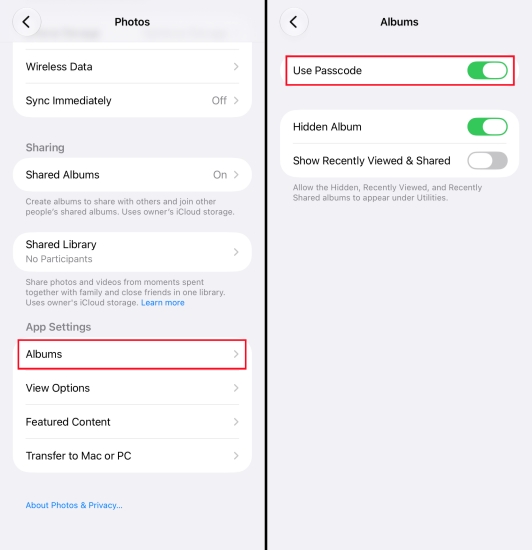
Step 4. Access the Settings app and scroll down to tap Photos.
Step 5. Tap Albums under App Settings and enable Use Passcode or Use Face ID to lock the Hidden album on your iPhone.
Part 3. How to Lock Photos on iPhone with Different Passcode
If you share your iPhone passcode with someone or just want an extra guarantee of action, using a different passcode for photo access can be helpful. iOS features like Guided Access, Screen Time, Notes, and third‑party vault apps allow you to protect photos separately from your main device passcode.
Option 1. Lock Photos App on iPhone with Guided Access Passcode
Guided Access lets you lock your iPhone into a single app and control what can be tapped or viewed, protected by its own passcode. By configuring Guided Access for Photos, you can hand your phone to someone while restricting where they can navigate and what they can open, keeping the rest of your library off‑limits.
Set Up Guided Access:
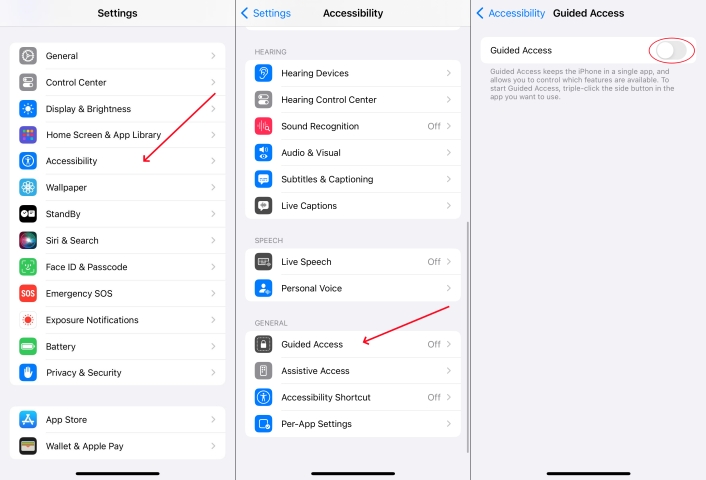
Step 1. Go to iPhone Settings > Accessibility > Guided Access.
Step 2. Enable Guided Access and tap Passcode Settings to set a Guided Access passcode.
Step 3. Also, enable Accessibility Shortcut so you can trigger Guided Access once you triple-click the power button.
Lock Photos Using Guided Access:
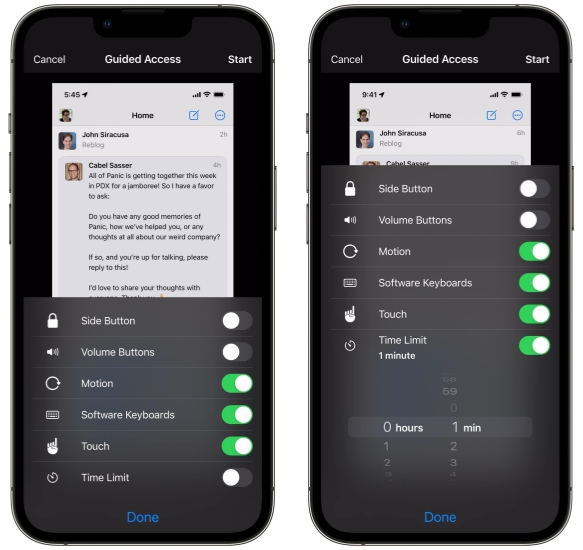
Step 1. Triple-click the Power button to trigger Guided Access.
Step 2. You can tap Session Settings to set the time limit or some other features during the Guided Access session.
Step 3. Tap Start to start the Guided Access session.
Step 4. When you need to exit, triple-click the Power button and enter the Guided Access passcode to exit.
Option 2. Lock Photos App on iPhone with Screen Time Passcode
Besides Guided Access, you can also set a time limit for the Photos app with a Screen Time passcode. If you have enabled Screen Time on your iPhone, you can use the App Limits feature to lock the Photos app on your iPhone. The Photos app can be used within a time limit only, and for further usage, you need to enter a passcode.
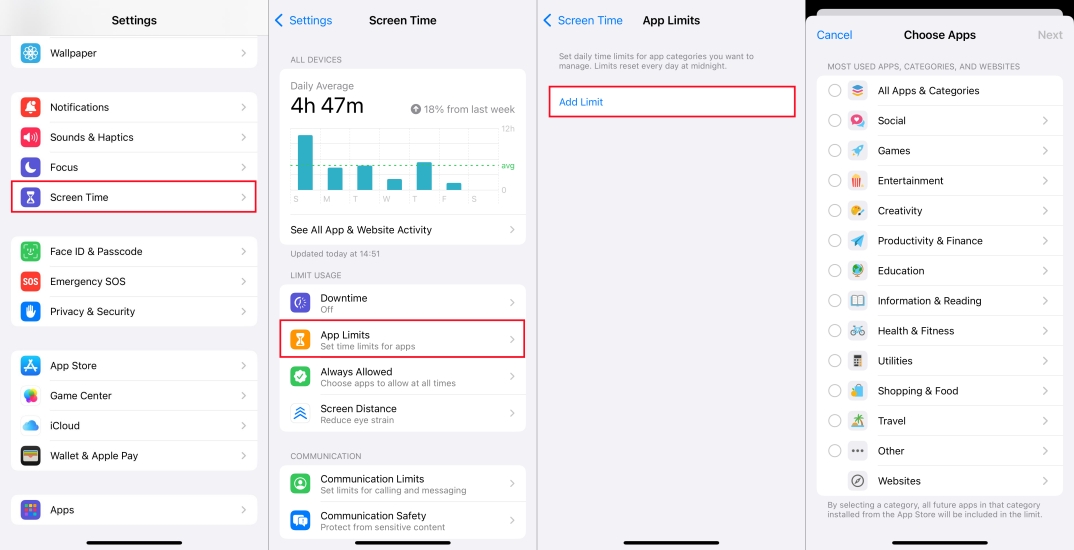
Step 1. Access the Settings app and tap Screen Time > App Limits.
Step 2. Tap Add Limit > Creativity and select Photos.
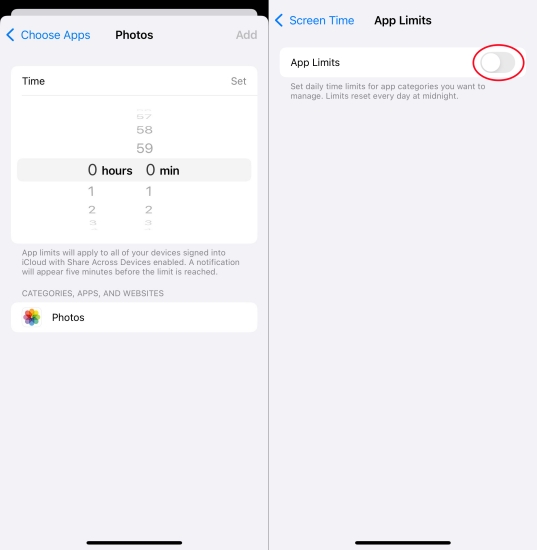
Step 3. Tap Next and set a time limit for Photos.
Step 4. Tap Add, then go back to enable App Limits.
Option 3. Lock Photos on iPhone with Notes
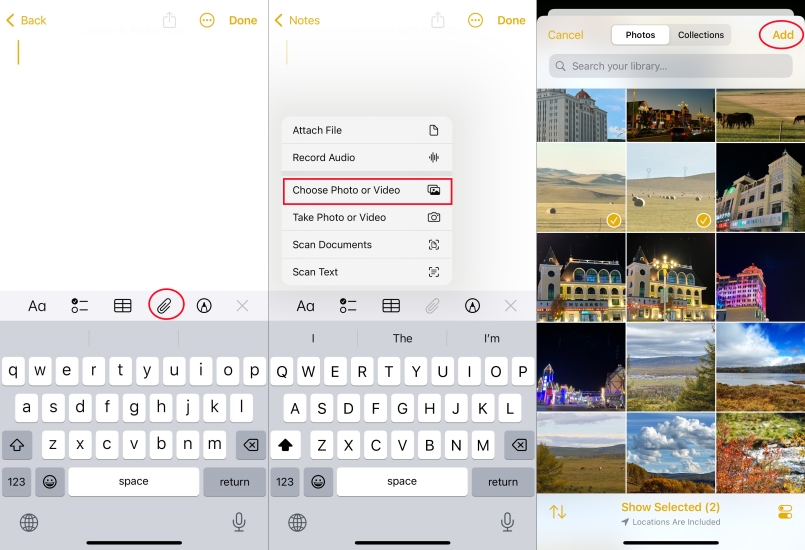
Most users know that the Notes app is useful for taking notes, but ignore that it's another powerful tool for locking photos. This method allows you to secure individual images or collections with Face ID, Touch ID, or a passcode. With the Notes app, instead of storing your photos within the Photos app, you can save your photos into a single note or several notes.
Step 1. Open Notes and create your note.
Step 2. Tap the Attachment button and select the Choose Photo or Video option.
Step 3. Select the photos you want to lock, then tap Add to add them to a note.
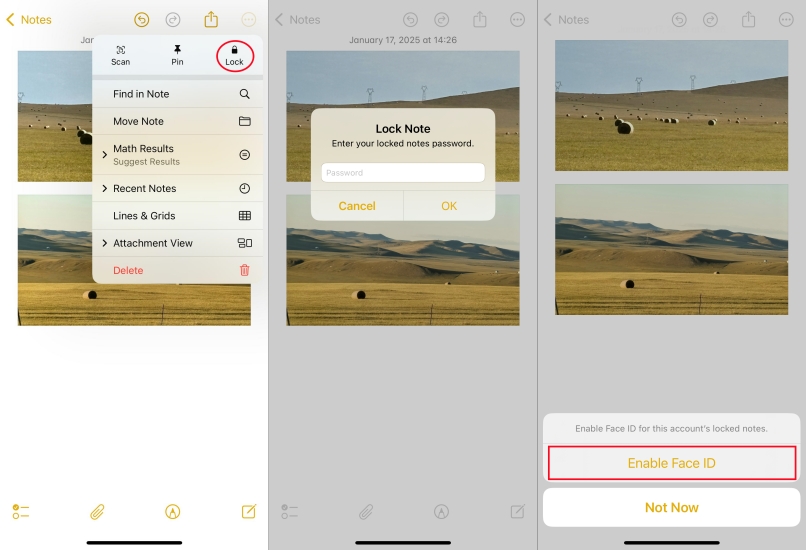
Step 4. After saving the photos, tap the three-dot icon and tap Lock.
Step 5. Set up a password and tap Enable Face ID to lock the note.
Option 4. Lock Photos on iPhone with Safe Lock
If you require additional features or a higher level of security, third-party apps provide excellent options for locking photos on your iPhone. There are lots of popular apps like Safe Lock. Safe Lock has seven types of passworssd, including Face ID, numeric, PIN-code, and more. It ensures your hidden photo album remains locked and inaccessible to prying eyes.

Step 1. Download and install Safe Lock from the App Store on your iPhone.
Step 2. Import your photos from the Photos app.
Step 3. Secure them with a PIN or biometric authentication.
Part 4. FAQs about Locking Photos on iPhone
How to view hidden photos on iPhone?
To view hidden photos on iPhone, follow the steps below:
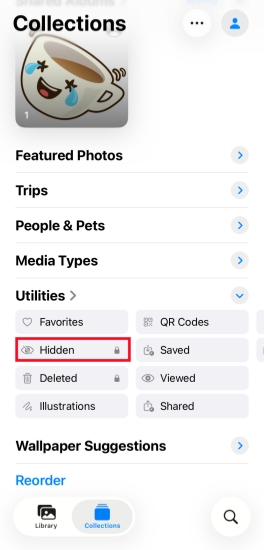
Step 1. Open the Photos app and tap Collections.
Step 2. Find the Hidden album under Utilities.
Step 3. Tap the Hidden album and tap View Album, then use your iPhone passcode, Face ID, or Touch ID to view hidden photos on iPhone.
Can you lock a photo album on iPhone?
No, you can't lock a photo album in the iPhone Photos app. However, you can hide photos or use a third-party app to lock your photo album on your iPhone.
Is the Hidden Album in the Photos app secure?
The Hidden Album is secure if you enable biometric authentication in the Photos settings. Otherwise, it is only hidden from plain view. To make Hidden Album more secure, you can choose to hide it in the Photos settings.
Do third-party apps store my photos securely?
Reputable apps like Safe Lock use encryption to secure your photos. Always read user reviews and privacy policies before downloading any app on your device.
Part 5. Conclusion
Locking photos on your iPhone is a simple yet effective way to enhance your privacy and security. Whether you choose built-in options like Hidden Album or prefer third-party apps, you can ensure your photos are safe from unauthorized access. By following the steps outlined in this guide, you can easily manage locked photos on your iPhone.

Dylan Jones
Editor in chief





