Imagine that when you open the Gallery or Photos on your phone, many strange photos appear, and you don't even know the source. This may be related to the WhatsApp auto download feature. WhatsApp media auto download is a feature that will automatically save photos, videos, audios, and documents on your device.
If you have joined some active groups in WhatsApp, the default auto-download settings will lead to strange photos appearing in your gallery and occupying your storage space. And it can be very tricky to browse and delete the photos. Wonder how to disable WhatsApp auto download and avoid this issue? This guide will walk you through how to stop WhatsApp from saving photos automatically and a bonus tip to maximize your phone storage.

- Part 1. How to Stop WhatsApp from Saving Photos on Android
- Part 2. How to Stop WhatsApp from Saving Photos on iPhone
- Part 3. Bonus Tip: Save WhatsApp Photos to Computers
- Part 4. FAQs about WhatsApp Photo Save
- Part 5. Conclusion
Part 1. How to Stop WhatsApp from Saving Photos on Android
On Android phones, you can stop WhatsApp from saving pictures for all chats by adjusting the settings. However, it's not possible to disable auto-download for a specific chat. You can only turn off Media visibility to prevent automatically downloaded WhatsApp photos from appearing in your phone's gallery. You can find the photos in the WhatsApp Images folder in your phone's internal storage.
Stop WhatsApp Auto Save Photos for All Chats:
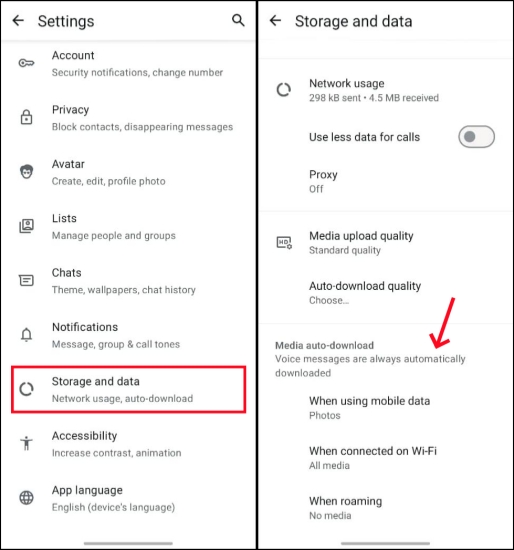
Step 1. Access WhatsApp and press the triple-dot icon for more options.
Step 2. Tap Settings > Storage and data and untick Photos under Media auto-download options.
Stop WhatsApp Auto-downloaded Photos from Appearing in Gallery:
Step 1. Open WhatsApp and open an individual or group chat.
Step 2. Tap the profile name to access the Contact Info or Group Info.
Step 3. Tap Media visibility and set it to No. Then Tap OK.
Part 2. How to Stop WhatsApp from Saving Photos on iPhone
On iPhone devices, the settings to stop WhatsApp from saving pictures are more direct. In WhatsApp, you can not only turn off the automatic download feature of all chats with one setting, getting rid of the invasion of useless pictures showing on your phone; you can also set separate media download permissions for specific chats or groups.
Stop WhatsApp Auto Save Photos for All Chats:
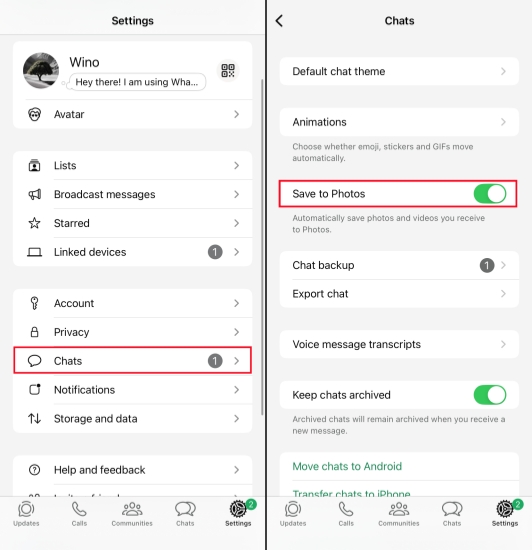
Step 1. Run WhatsApp and tap Settings at the bottom.
Step 2. Tap Chats and turn off Save to Photos. In this way, all WhatsApp photos won't be saved to your iPhone Photos anymore.
Stop WhatsApp Auto Save Photos for a Specific chat:
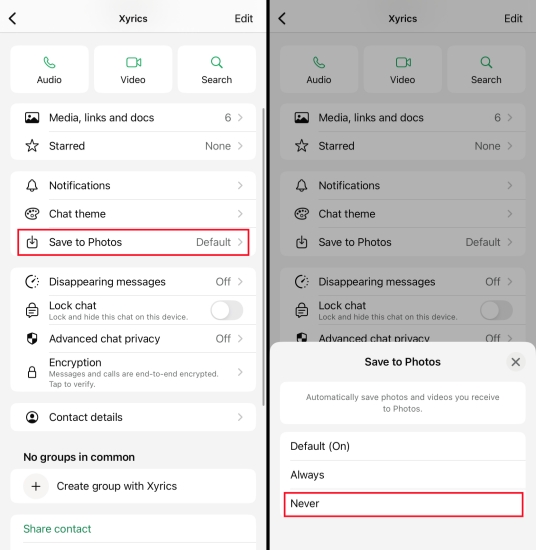
Step 1. Open WhatsApp and enter a one-to-one chat or group chat.
Step 2. Tap the profile pictures to enter the Contact Info or Group Info page.
Step 3. Tap Save to Photos and select Never. In this way, you can customize the WhatsApp auto-download setting for a certain chat.
Part 3. Bonus Tip: Save WhatsApp Photos to Computers
If you want to stop WhatsApp from automatically saving every photo to your phone but still keep important images, you can download them manually to your device. But if there is a large amount of precious WhatsApp photos, a great solution is to save selected WhatsApp photos directly to your computer. MagFone WhatsApp Transfer is a good management tool for selectively saving WhatsApp photos. It can back up your WhatsApp data to a computer, which is readable, exportable, and restorable. Here is how to save WhatsApp photos to a computer via MagFone Chats Transfer:
MagFone Chats Transfer
Efficiently back up your WhatsApp content without loss or hassle — everything moves with you, just as it was.
Step 1 Launch MagFone Chats Transfer

Download and install MagFone Chats Transfer on your computer. Then link your iPhone to your computer via a data cable. Launch the tool after installation.
Step 2 Back Up WhatsApp Data
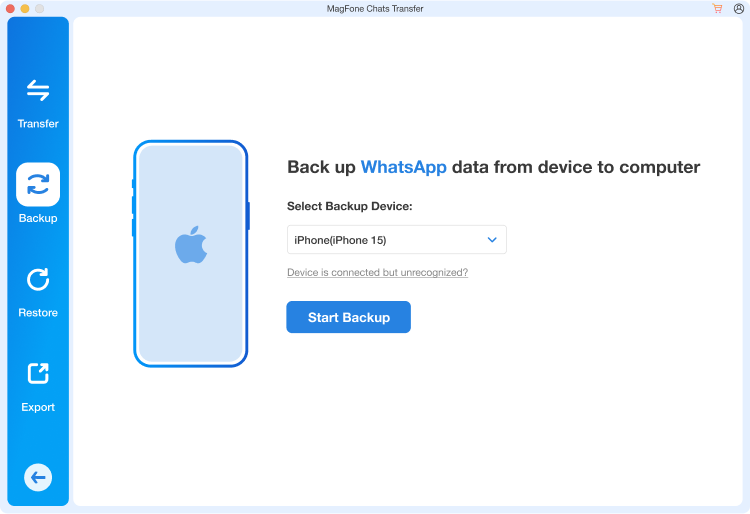
Click the WhatsApp button, and you will see four features on the next page. Click the Backup button in the left menu. Once your iPhone is detected by the tool successfully, click Start backup to back up your WhatsApp data.
Step 3 Save WhatsApp Photos to the Computer
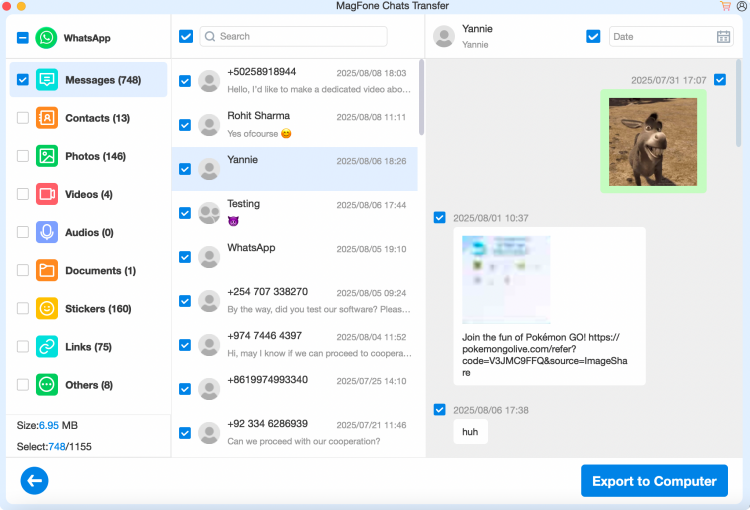
Click Done after the backup process. Then click the Export button on the left. Put your mouse on the backup file and click the View icon to check your WhatsApp photos. If you want to save them to your computer, just tick the wanted photos and click Export to Computer to export them to your computer.
📝How to Download Photos from Android to PC
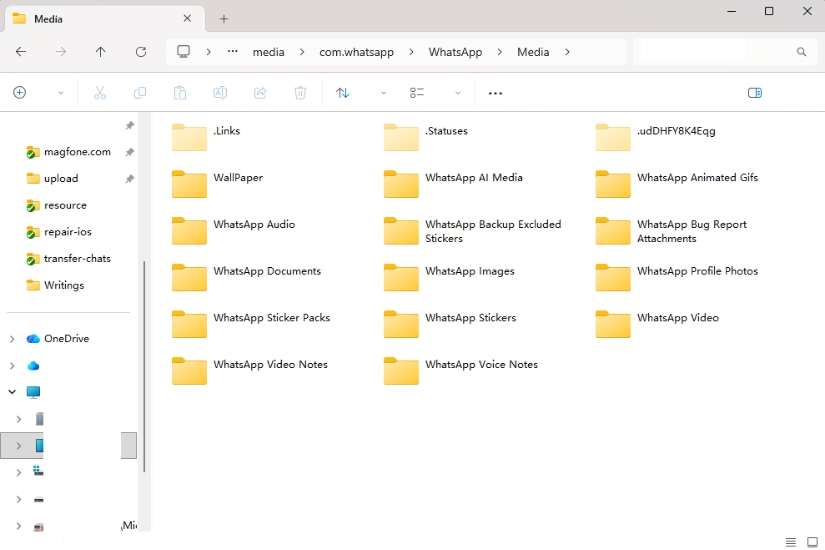
On Android devices, WhatsApp saves photos and other media files in a specific folder in the internal storage. So, you can also connect your Android device to your computer and selectively save WhatsApp photos to your computer.
Step 1. Connect your Android device to a computer using a data cable.
Step 2. Head for the path: Internal storage > Android > media > com.whatsapp > WhatsApp > Media > WhatsApp Images.
Step 3. Copy the entire folder or the wanted photos and then paste them into a location on your computer.
Part 4. FAQs about WhatsApp Photo Save
How do I change WhatsApp photo saving settings?
If you want to change WhatsApp photo saving settings, you can find Storage and data in WhatsApp settings. On this page, you can configure the photo auto-download quality and under which data to save photos automatically.
Why my WhatsApp images are not showing in gallery?
If your WhatsApp images are not showing in the gallery, this is due to Media visibility has been disabled. You can go to WhatsApp Settings > Chats and turn Media visibility back on. You can also go to a specific chat and enable the feature in the chat info page.
Does WhatsApp save photos after deleting?
Generally, WhatsApp photos will be saved to your device once you have received them under your configuration. It's an instant activity, so the photo being deleted will not affect the auto-download activity.
Part 5. Conclusion
Turning on Media auto-download in WhatsApp will occupy much unnecessary storage. After reading this guide, you will know how to stop WhatsApp from saving photos automatically. If you want to keep a backup and for further reference, then saving WhatsApp photos to computers via MagFone Chats Transfer or File Manager is recommended.

Olivia Wood
Editor in chief