
Guided Access on iPhone helps users focus on a particular app by temporarily restricting the device to a single app usage. It's especially useful for parents, educators, or when using the device in a kiosk-like environment. Unfortunately, there always happens the iPhone stuck in Guided Access issue. But even if your iPhone gets stuck in Guided Access mode, there are a number of ways you'll be able to fix this issue. We cover each method in this guide, so without further ado, let's find out how to fix iPhone stuck in Guided Access.
- Part 1. Why Is iPhone Stuck in Guided Access?
- Part 2. How to Turn Off Guided Access on iPhone
- Part 3. How to Fix iPhone Stuck in Guided Access
- Part 4. How to Avoid iPhone Stuck in Guided Access
- Part 5. FAQs about Guided Access on iPhone
- Part 6. Conclusion
Part 1. Why Is iPhone Stuck in Guided Access?
Guided Access is a powerful iOS feature designed to keep your device locked to a single app, perfect for parental control or focused work. However, when the "exit" command fails, it can feel like a digital soft-lock. In the Apple Community, many users complained that their iPhone gets stuck in Guided Access, but don't know why. Before diving into the fixes, it helps to know why this happens. Here are the primary reasons why your iPhone might be stuck in Guided Access.

Reason 1. Software Glitch
Sometimes, the Guided Access process simply crashes in the background, but the app is still running. This is usually due to a minor firmware bug or an outdated version of iOS.
Reason 2. Triple-Click Timing
To exit, you must click the Side button or Home button three times rapidly. When too slow, the phone interprets them as a single lock command or a double-click for Apple Pay.
Reason 3. Hardware Issues
If your Side or Home button is failing or if your iPhone screen has "dead zones," the phone may not register the triple-click or the passcode entry.
Reason 4. Accessibility Conflicts
If multiple features are assigned to the triple-click, a menu should pop up asking which one you want to use. Sometimes, the phone might be "confused" by the overlapping commands.
Part 2. How to Turn Off Guided Access on iPhone
It's easy to turn off Guided Access if you can enter your Guided Access passcode. The most prominent way to remove Guided Access from iPhone is to triple-click shortcut. By triple-clicking the Side or Home button, you can end a Guided Access session with a passcode. Following are the steps to turn off Guided Access on iPhone.
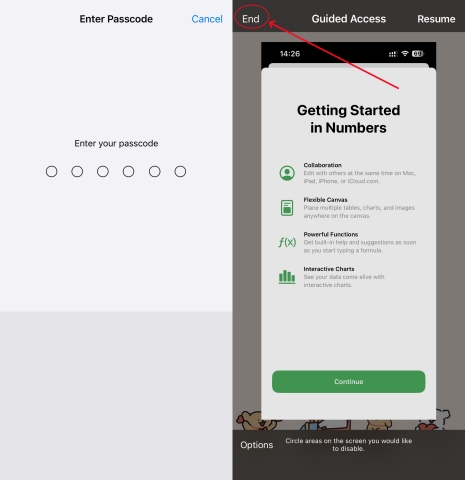
Step 1. On your iPhone, triple-click the Side or Home button.
Step 2. Enter your Guided Access passcode, then tap End.
If you have turned on Touch ID or Face ID for Guided Access, double-click the Side or Home button. Then you can get your iPhone and iPad out of Guided Access.
Part 3. How to Fix iPhone Stuck in Guided Access
Many users fail to exit Guided Access with triple-click shortcut. When you forget your Guided Access passcode and your iPhone gets stuck in Guided Access, you can then follow the steps below. There are several surefire ways to help you fix this issue. Let's dive into the details.
Method 1. Force Restart iPhone
A force restart can often solve minor glitches. If you cannot get your iPhone and iPad out of Guided Access by triple-clicking the Side or Home button, you can do a simple reboot, then go to disable Guided Access on your device.
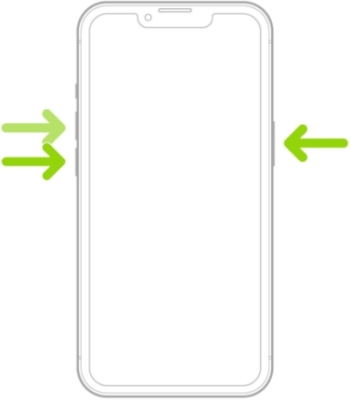
Step 1. Press and quickly release the volume up button.
Step 2. Press and quickly release the volume down button.
Step 3. Press and release the side button until you see the Apple logo.
Step 4. After restarting your device, go to Settings > Accessibility.
Step 5. Tap Guided Access, then toggle off the switch next to Guided Access.
Method 2. Use an iOS System Repairing Tool
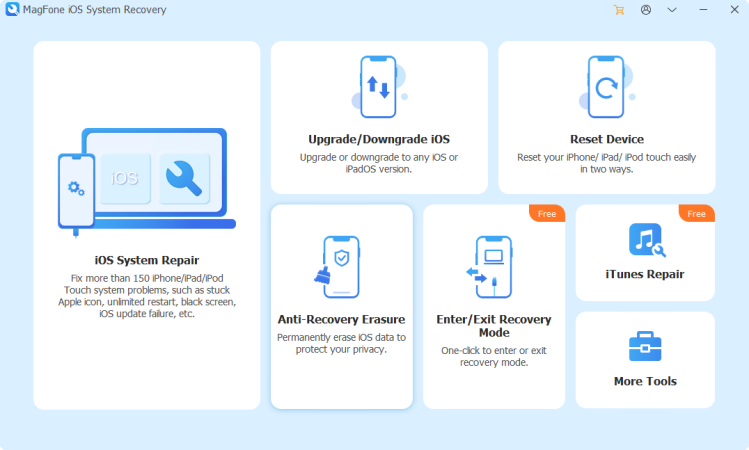
Using an iOS system repairing tool is another option to fix the iPhone stuck in Guided Access issue when you fail to fix this issue by triple-clicking the Side button or doing a simple force restart. MagFone iOS System Recovery is a top-rated system repairing tool for fixing various system issues on the iPhone, iPad, and iPod touch.
There are two repairing modes, including standard repair mode and deep repair mode, available for you to choose. Here you can fix iPhone stuck in Guided Access with the standard repair mode while not deleting any data and settings on your device. Here's how to get rid of Guided Access on iPhone via MagFone iOS System Recovery.
MagFone iOS System Recovery
Fix various iOS and iPadOS system issues, such as black screen, boot loop, frozen screen, or stuck on Apple logo, without data loss.
Step 1Open MagFone Software and Connect iPhone
After downloading and installing MagFone iOS System Recovery, open it on your computer, then connect your iPhone to the computer through a USB cable. Proceed to click iOS System Repair and select Standard Repair.
Step 2Go to Put iPhone into Recovery Mode
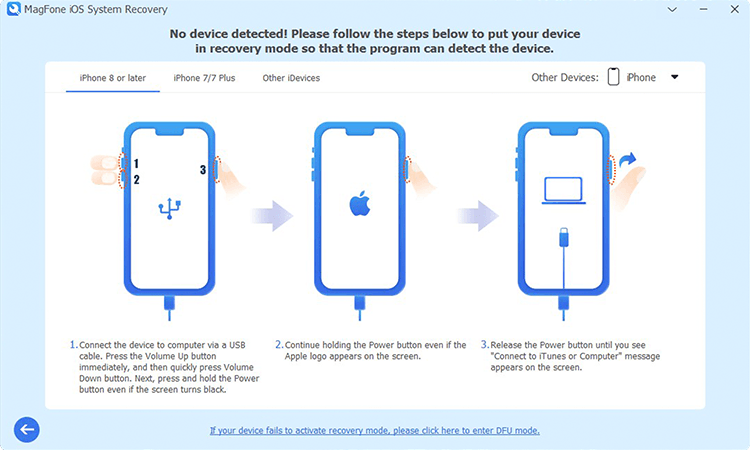
Make sure that you have turned your iPhone off. Then follow the onscreen instructions to put your iPhone into recovery mode. If your device fails to activate recovery mode, you can make your device into DFU mode.
Step 3Download the Firmware Package for iPhone
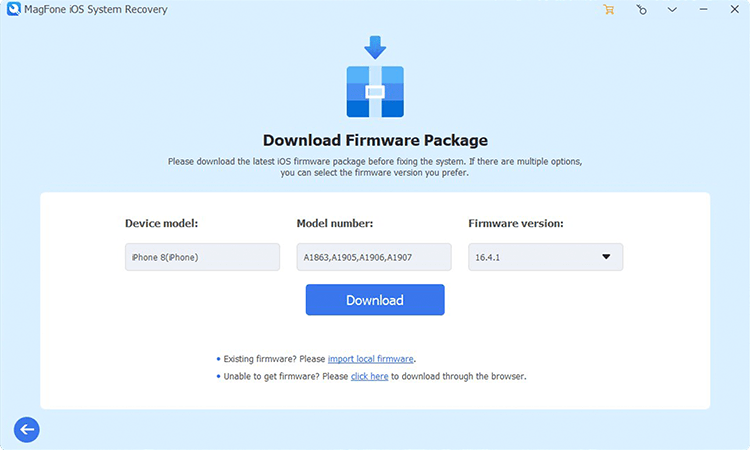
After placing your device into recovery mode, you can check the device information shown on the screen. Manually correct the device information and click the Download button to get the firmware package for your device.
Step 4Start to Fix iPhone Stuck in Guided Access
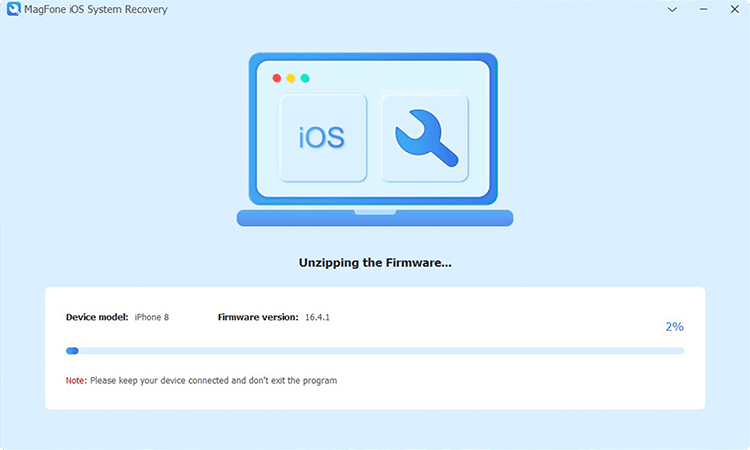
When the firmware package is downloaded to the computer, you can click the Repair button to initiate the process of fixing the iPhone stuck in Guided Access issue. Wait for a while, and your device will automatically restart.
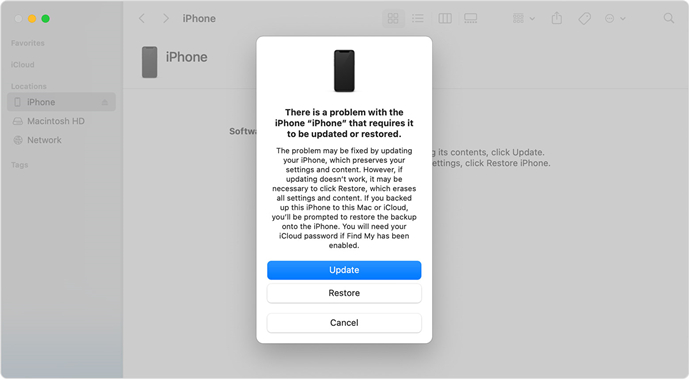
Method 3. Restore Guided Access with iTunes
If a restart doesn't work and you don't want to use a third-party repairing tool, you can connect your iPhone or iPad to a computer and use iTunes to restore the device. But this will erase your data. Go to back up your device first, then follow the steps below.
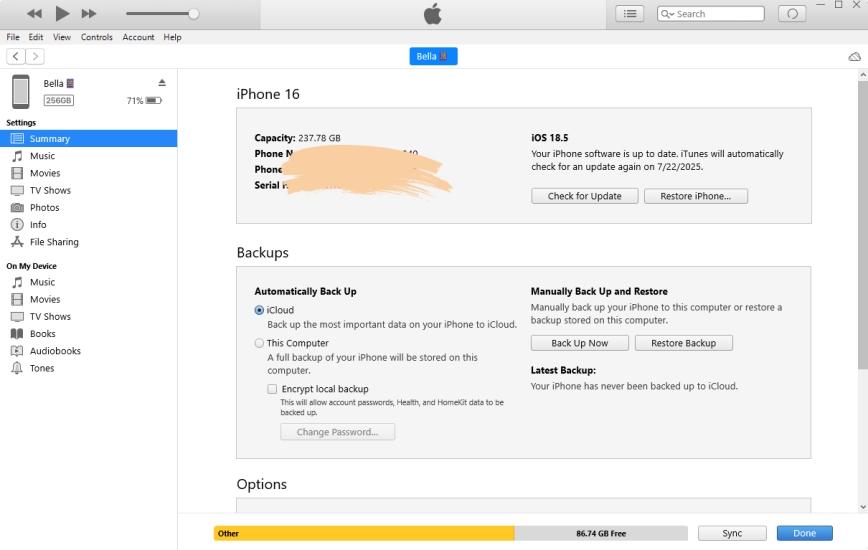
Step 1. Connect your iPhone to your computer via a USB cable, then open iTunes.
Step 2. Click the Device button near the top left of the iTunes window.
Step 3. Go to the Summary section and click the Restore button.
Method 4. Disable Guided Access via Find My App
Without using iTunes, you can use the Find My app to remotely erase your iPhone or iPad to the factory default settings, which can get rid of Guided Access. Make sure that Find My Device is enabled, then you can follow the steps below.
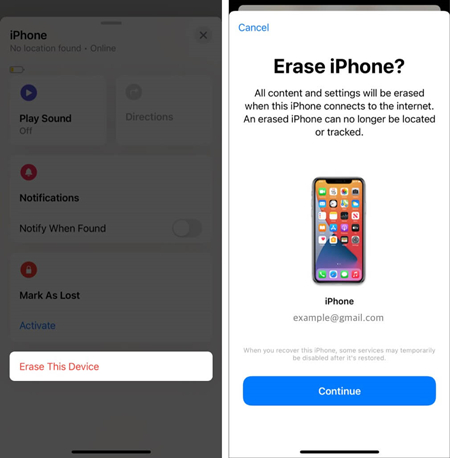
Step 1. Open the Find My app on your other Apple device and tap the Devices button at the bottom of the screen.
Step 2. Select your iPhone and tap Erase This Device. Then tap Continue > Erase.
Step 3. Enter your Apple ID password and tap Erase again to confirm this action.
Method 5. Turn off Guided Access at iCloud.com
In addition to using the Find My app, you can sign into iCloud with your Apple ID and password, then you can erase all the settings and content on your device to fix this issue. When you have turned on Find My, you can erase your device at iCloud.com.
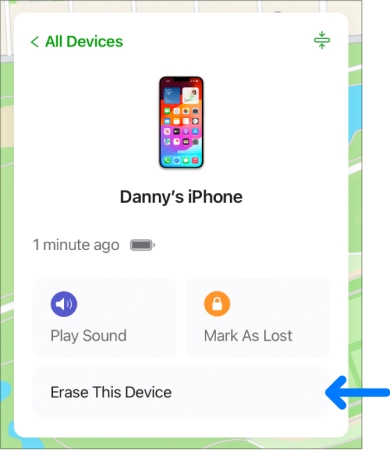
Step 1. Go to iCloud.com, then enter your Apple ID and password to sign in.
Step 2. Click Find Devices and select your iPhone in the All Devices list on the left.
Step 3. Click Erase This Device, enter your Apple ID password, and click Erase Now.
Method 6. Restore iPhone in Recovery Mode
If you've tried the above solutions without success, it might be time to restore your iPhone or iPad in recovery mode. Recovery mode can fix a number of system issues, including iPhone and iPad stuck in Guided Access. Try these steps to fix this issue.
Step 1. Power off your iPhone and connect it to a computer via a USB cable.
Step 2. Put your device into recovery mode, then open iTunes.
Step 3. Click Restore and wait for your iPhone to restore.
Part 4. How to Avoid iPhone Stuck in Guided Access
With the above steps, you can get rid of Guided Access on your iPhone. But to ensure your iPhone doesn't get stuck in Guided Access again, verify these settings once you are back in.
01Enable Biometrics
This is the single best way to prevent getting stuck. If the triple-click fails or you forget the passcode, you can just double-click the side button to exit using your biometrics.
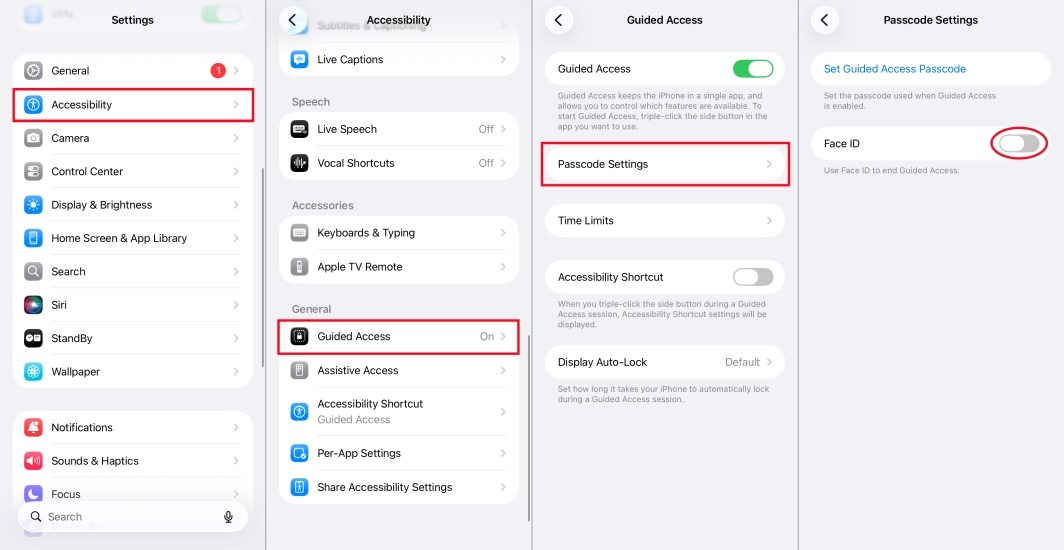
Step 1. Go to Settings > Accessibility > Guided Access.
Step 2. Tap Passcode Settings, then toggle on Face ID.
02Adjust Click Speed
If your triple-click isn't registering, it might be because the click speed is set too fast for the phone to recognize. You can make the iPhone "wait" longer for your clicks.
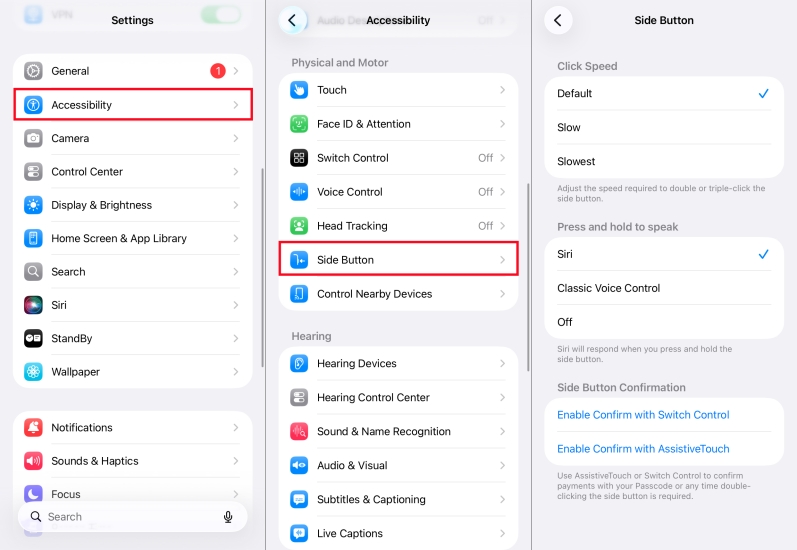
Step 1. Go to Settings > Accessibility > Side Button.
Step 2. Change the Click Speed to Slow or Slowest.
03Set an Accessibility Shortcut
Ensure Guided Access is the only thing assigned to your triple-click. If multiple items are checked, a menu pops up that can sometimes freeze under load.
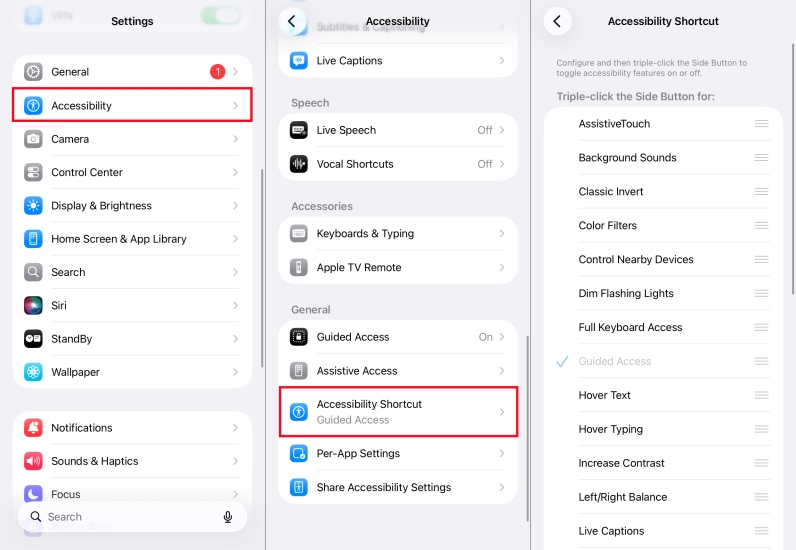
Step 1. Go to Settings > Accessibility > Accessibility Shortcut.
Step 2. Make sure only Guided Access is checked.
04Set a Time Limit
If you're worried about a child or yourself getting stuck indefinitely, you can set a timer before you start the session. Once Guided Access is activate, set a time limit first.
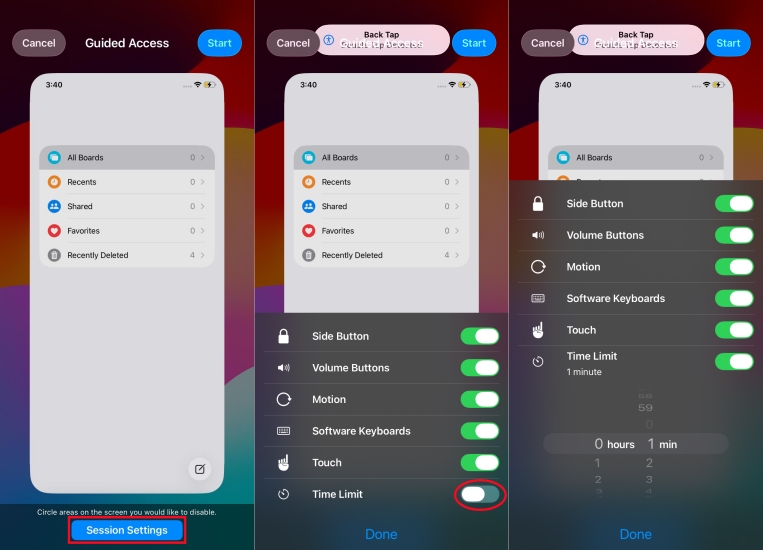
Step 1. In the Guided Access panel, tap Session Settings.
Step 2. Turn on Time Limit and set a specific time to end.
Part 5. FAQs about Guided Access on iPhone
How to set up Guided Access on iPhone?
It's easy to set up Guided Access on your iPhone. Just follow the steps below.
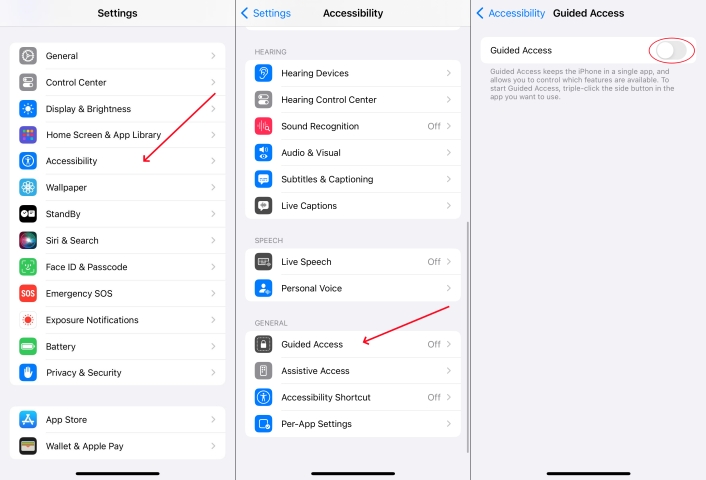
Step 1. Go to Settings > Accessibility, then turn on Guided Access.
Step 2. Select Passcode Settings and tap Set Guided Access Passcode.
Step 3. Enter a pascode and reenter it again to confirm.
How to start Guided Access on iPhone?
To start a Guided Access session, you need to turn on Guided Access in the Settings on your iPhone first. Then follow the steps below to activate Guided Access.

Step 1. Choose an app that you want to use with Guide Access.
Step 2. Triple-click the side button to open the Accessibility Shortcuts panel.
Step 3. Tap Guided Access > Start to start a Guided Access session.
Besides this, to start a Guided Access session, you can tell Siri "Turn on Guided Access."
How to disable Guided Access on iPhone without passcode?
To disable Guided Access on your iPhone without a passcode, you can double-click the Side or Home button, then use Face ID or Touch ID. But if you don't have turned on Touch ID or Face ID for Guided Access, you cannot disabled Guided Access on your iPhone without a passcode.
Why isn't Guided Access working on my iPhone?
If Guided Access isn't working on your iPhone, it could be due to several factors, including disabled features, passcode isues, software glitches, or hardware problems like a faulty Home or Side button. When Guided Access isn't working on your iPhone, try restarting the device, checking for updates, or troubleshooting hardware issues.
Part 6. Conclusion
Resolving an iPhone stuck in Guided Access can range from a simple restart to more complex troubleshooting steps. By following this guide, you should be able to fix the issue and regain control of your device. So, choose one method introduced in this guide. But here we suggest you to use MagFone iOS System Recovery if you cannot remove Guided Access and forget your Guided Access passcode.

Teresa Miller
Editor in chief