
The message "Attempting data recovery" appears on the iPhone after an iOS update or an unexpected restart. Are you troubled by this issue now? Looking for solutions to this issue? Many users have encountered this issue before and got rid of it with useful methods. The guide will explore the meaning, reasons, and solutions of iPhone Attempting data recovery. Let's dive into more details!

- Part 1. What Does Attempting Data Recovery Mean on an iPhone?
- Part 2. Why Does iPhone Say Attempting Data Recovery?
- Part 3. How to Get Out of Attempting Data Recovery on iPhone
- Part 4. How to Prevent iPhone Attempting Data Recovery
- Part 5. Conclusion
Part 1. What Does Attempting Data Recovery Mean on an iPhone?
It is common that the Attempting data recovery message displays on your iPhone screen, but you may be confused about it. Now, here will make a simple introduction to iPhone Attempting data recovery.
What Does iPhone Attempting Data Recovery Mean?
When your iPhone shows "Attempting data recovery", iOS has detected a problem with system files and is trying to repair them automatically. This usually happens after a failed or interrupted software process, most commonly an iOS update. Instead of immediately erasing your data, the iPhone attempts to:
- Repair corrupted system files
- Restore data from an internal snapshot
- Boot normally without requiring a full reset
In simple terms, your iPhone is trying to save your data before doing anything drastic.
How Long Does iPhone Attempting Data Recovery Take?
A normal iPhone Attempting data recovery can last from a few minutes to 30 minutes. In rare cases, it takes up to an hour or longer to complete, depending on amount of data stored, iPhone model, and iOS version. But if the Attempting data recovery screen has been unchanged for several hours, the process may be stuck.
Part 2. Why Does iPhone Say Attempting Data Recovery?
Understanding the cause of Attempting data recovery can help you decide whether to wait or take action. The most common causes of Attempting data recovery displaying on the iPhone screen include:
Reason 1. Interrupted iOS Update
If the iOS update process is interrupted by an insufficient battery, an unstable Wi-Fi connection, or other issues, or if the new system fails to download or install correctly, your iPhone will be stuck on Attempting data recovery.
Reason 2. Insufficient Storage Space
iOS system upgrades and restores need much space to store large temporary files. So if there is not enough space for an upgrade, it will hold up the upgrade process and trigger Attempting data recovery.
Reason 3. System File Corruption
System file corruption will make files unreadable, inaccessible, or cause crashes. Then it will trigger recovery mode like Attempting data recovery appears.
Reason 4. Unexpected Shutdown
When there is an unexpected shutdown, the iOS system will detect that it is in an unstable state or because of incomplete operation, forcing your iPhone into a built-in recovery loop to protect data. So your iPhone will display Attempting data recovery when it attacked an unexpected shutdown.
Part 3. How to Get Out of Attempting Data Recovery on iPhone
If your iPhone remains stuck on Attempting data recovery for an usually long time, you may urgently need to know how to get out of it. There are three methods to help your iPhone get out of Attempting data recovery quickly and effectively.
Method 1. Force Restart Your iPhone
Force restart your iPhone can clear temporary cache files, reload applications, and often resolve a wide range of iPhone issues, like fixing Attempting data recovery. But different iPhone models have different operating steps. Choose the corresponding steps to force restart your iPhone correctly.

iPhone 8 and later: Quickly press the Volume Up button and then press the Volume Down button. After that, press and hold the Power button until the Apple logo displays.
iPhone7/7 Plus: Press and hold the Volume Down button and the Side button at the same time until you see an on-screen Apple logo.
iPhone 6 and earlier:Press and hold the Power button and the Home button, release them when the Apple logo appears.
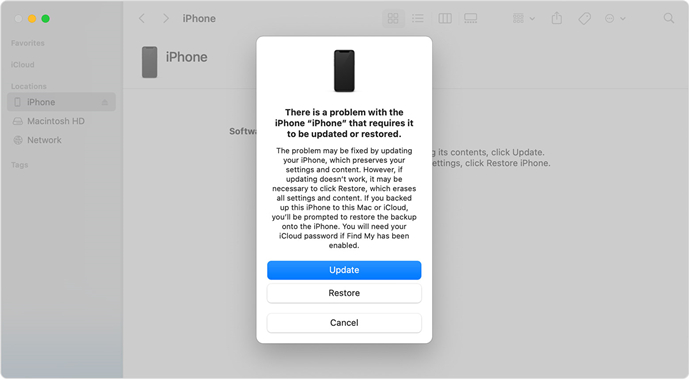
Method 2. Restore Your iPhone into Recovery Mode (Data Loss)
If a force restart can't solve the problem, you can choose the method of putting your iPhone into Recovery Mode. Recovery Mode will reinstall your iOS system, so it will cause data loss. Before booting your iPhone into Recovery Mode, backup your important data via iTunes or Finder carefully.
Step 1. Power off your iPhone first. Then use a USB cable to connect it to your computer.
Step 2. Open iTunes on a PC or the Finder on a Mac.
Step 3. Quickly press and release the Volume Up button, then quickly press and release the Volume Down button.
Step 4. Keep holding the Power button until you see the Recovery Mode screen.
Step 5. In iTunes or Finder, select your iPhone. Click the on-screen Restore button.
Step 6. Your iPhone will be restored in several minutes, then you can use it smoothly.
Method 3. Use a Professional iOS System Repair Tool (No Data Loss)
If basic methods like waiting, force restart, or Recovery Mode restore don't work, or you prefer an easier way and don't want to lose any data, a dedicated iOS system repair tool may help resolve the issue without immediately erasing data. One commonly used option is MagFone iOS System Recovery. This type of tool focuses on repairing iOS system errors rather than recovering deleted files, which makes it relevant for situations where the system fails to boot properly after an update. Learn how to get out of iPhone Attempting data recovery with MagFone iOS System Recovery.
MagFone iOS System Recovery
Fix various iOS and iPadOS system issues, such as black screen, boot loop, frozen screen, or stuck on Apple logo, without data loss.
Step 1Connect Your iPhone with A Computer
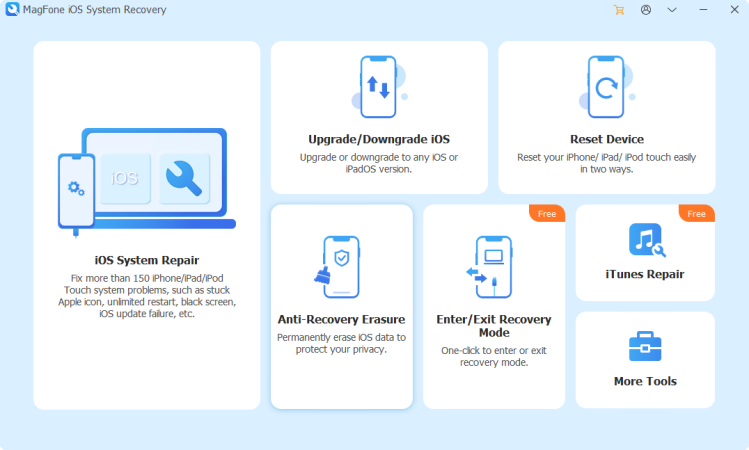
Start by using a USB cable to connect your iPhone to a computer. On the beginning interface, choose iOS System Repair. Then click Start.
Step 2Choose Standard Repair
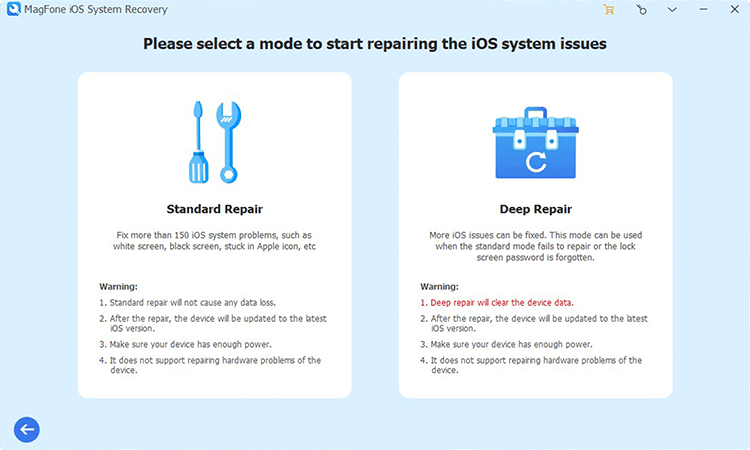
After choosing Standard Repair on the next screen, your iPhone model will be detected by MagFone.
Step 3Download Firmware Package
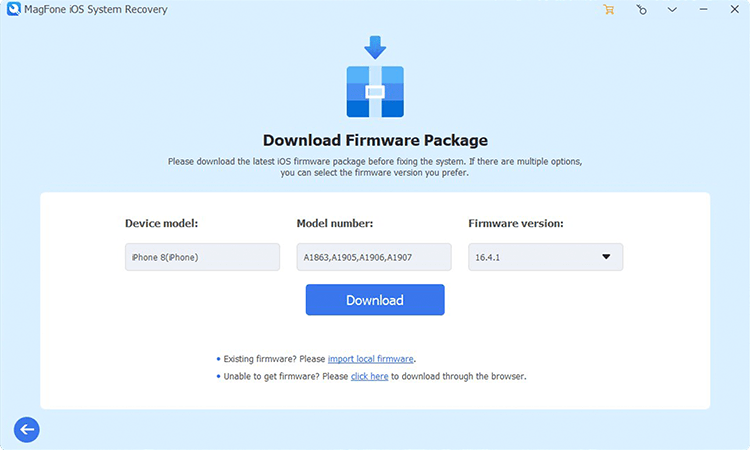
You will see the basic information of your iPhone on the computer screen. Check them quickly and carefully, then click Download to download the firmware package.
Step 4 Get Out of Attempting Data Recovery
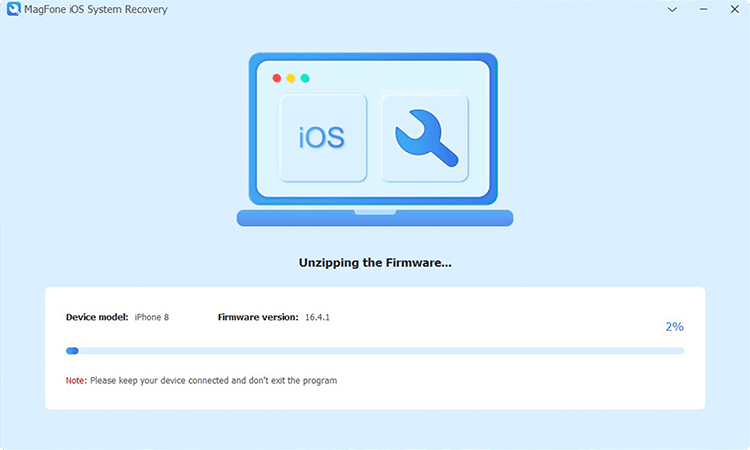
When the firmware package is downloaded successfully, you can choose Start Standard Repair. MagFone will unzip the firmware package and begin fixing the issue of Attempting data recovery on your iPhone. When completing the process, you can click the Finish button, and use your iPhone normally.
Part 4. How to Prevent iPhone Attempting Data Recovery
After knowing the reasons and solutions for iPhone Attempting data recovery, understanding how to prevent iPhone Attempting data recovery is also important and noticeable. By setting up your iPhone in advance, you can no longer have trouble with the issue of iPhone Attempting data recovery. So follow the tips below to prevent iPhone Attempting data recovery correctly.
- Keep your iPhone charged above 50% before updating iOS.
- Upgrade your iPhone with a stable Wi-Fi connected.
- Update your iPhone when needed.
- Keep at least 5-10 GB free storage space.
- Avoid jailbreaking your iPhone.
- Avoid downloading unsafe and unknown software.
Part 5. Conclusion
When your iPhone is stuck on Attempting data recovery, you will be nervous and don't know what to do. But after walking through the comprehensive guide, you are clear about the meaning and reasons for iPhone Attempting data recovery. And you can force restart your iPhone, put your iPhone into Recovery Mode, and use a third-party tool to get out of iPhone Attempting data recovery smoothly. To perform a quick and safe fix, MagFone iOS System Recovery is the best option. In addition, don't forget to prevent iPhone Attempting data recovery by setting up your iPhone.

Teresa Miller
Editor in chief