
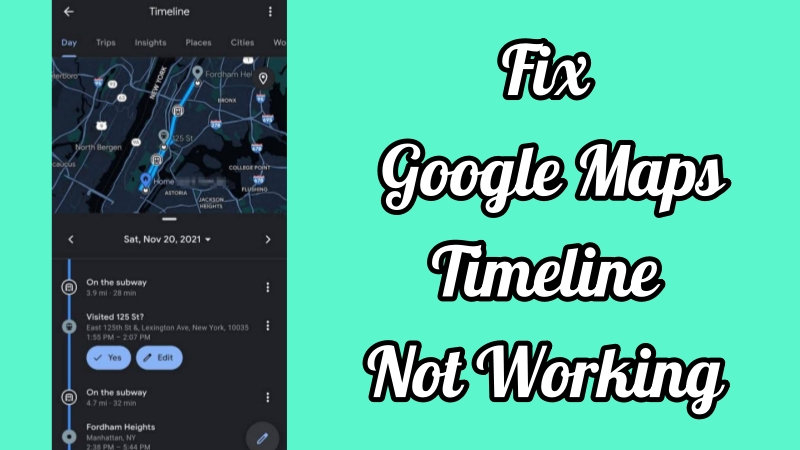
Google Maps Timeline is a useful feature that automatically records your travel history, helping you revisit places you've visited, routes you've taken, and memorable trips. However, many users encounter issues such as Google Maps Timeline not working, missing location records, or incomplete travel data. If you're facing a Google Maps Timeline not working problem, read this guide to find more effective solutions for both iPhone and Android devices.
- Part 1. Why Is Google Maps Timeline Not Working?
- Part 2. How to Fix Google Maps Timeline Not Working on iPhone
- Part 3. How to Fix Google Maps Timeline Not Working on Android
- Part 4. Bonus Tip: How to Fake Location on Google Maps
- Part 5. Conclusion
Part 1. Why Is Google Maps Timeline Not Working?
In most cases, the Google Maps Timeline not working issue is caused by incorrect Timeline settings. If these features are disabled, Google Maps cannot record your visited places and routes. Fortunately, you can manually enable Google Maps Timeline in just a few steps.
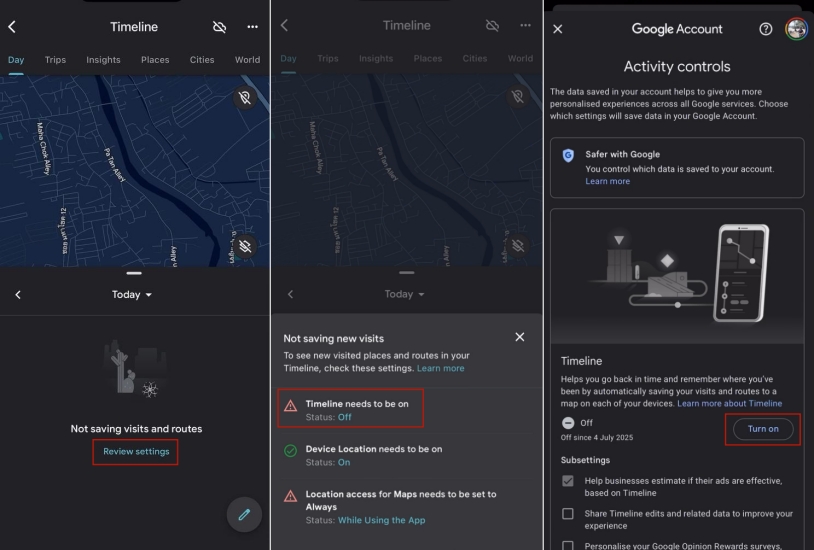
Step 1. Open the Google Maps app, and then tap your profile > Your timeline.
Step 2. Press Review settings and then tap the Timeline needs to be on section.
Step 3. Continue to select the Turn on button and confirm your selection.
If you have already turned on Google Maps Timeline, but it is still not showing your location history or working properly, the problem may be related to your phone settings or Google account. Below are some of the most common reasons Timeline may not record or display your trips.
Reason 1. Location Services Disabled: Google Maps cannot track your movements if device location services are turned off.
Reason 2. Poor Internet Connection: Unstable network connections may interrupt synchronization of timeline records.
Reason 3. Outdated Google Maps Version: Older app versions may contain bugs affecting Timeline functionality.
Reason 4. Corrupted Cache Files: Damaged cache data can interfere with location recording and history display.
Reason 5. Google Account Sync Problems: Synchronization errors may stop Timeline data from updating properly.
Reason 6. GPS Signal Issues: Weak GPS reception may prevent accurate route and location recording.
Part 2. How to Fix Google Maps Timeline Not Working on iPhone
Google Maps is one of the most commonly used apps on iPhone for location sharing, navigation, and searching for places. If Google Maps Timeline is not working on your iPhone, try the troubleshooting methods below to restore Timeline and properly track your location history.
Method 1. Check Location Services
Location tracking is the foundation of Google Maps Timeline. If Location Services are disabled or Google Maps lacks proper permission, the app cannot record your visits and routes. Follow these steps to check if you've turned on location services for Google Maps.

Step 1. Enter Settings. Hit Privacy & Security and tap Location Services.
Step 2. Make sure Location Services is enabled. Then scroll down and tap Google Maps.
Step 3. Choose Always under Location Access and enable Precise Location.
Method 2. Log Out and In Google Maps
Account synchronization problems can sometimes prevent Timeline data from appearing properly. Signing out and then signing back into your Google account refreshes account information, re-establishes synchronization, and may fix issues related to missing travel history or location records.
Step 1. Switch to Google Maps and tap your profile photo.
Step 2. Select Manage your Google Account and remove the Google account temporarily.
Step 3. Restart Google Maps. Then sign back into the same Google account.
Step 4. Check whether Timeline starts working now.
Method 3. Update Google Maps on App Store
Google frequently releases updates that include bug fixes, performance improvements, and compatibility enhancements. Running an outdated version can sometimes trigger the Google Maps timeline not working issue. Installing the latest version ensures you have the newest fixes available.
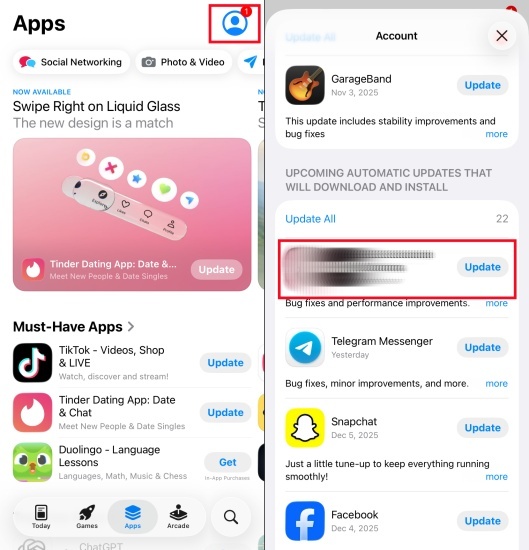
Step 1. Fire up the App Store and pick your profile icon.
Step 2. Scroll to available updates to locate Google Maps.
Step 3. Tap Update beside the app and wait for a while.
Step 4. Open Google Maps and verify Timeline.
Method 4. Reinstall Google Maps on App Store
Sometimes, Google Maps Timeline may stop working because of minor app glitches or corrupted data. In this case, deleting and reinstalling the app can help resolve the issue. Simply remove Google Maps from your iPhone and download it again from the App Store to fix this issue.
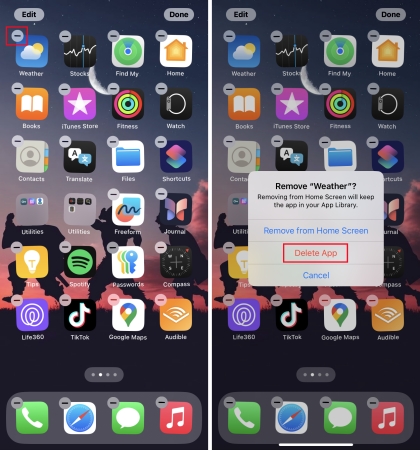
Step 1. Press and hold the Google Maps icon and hit Delete App. Then confirm app deletion.
Step 2. Open the App Store and search for Google Maps.
Step 3. Download and install the application again.
Step 4. Sign in and check Timeline functionality.
Method 5. Restart Your iPhone
A simple restart can eliminate temporary software glitches affecting background services, GPS functionality, and app synchronization. Many users find that restarting the device helps restore proper Timeline tracking after permissions or settings have been adjusted.
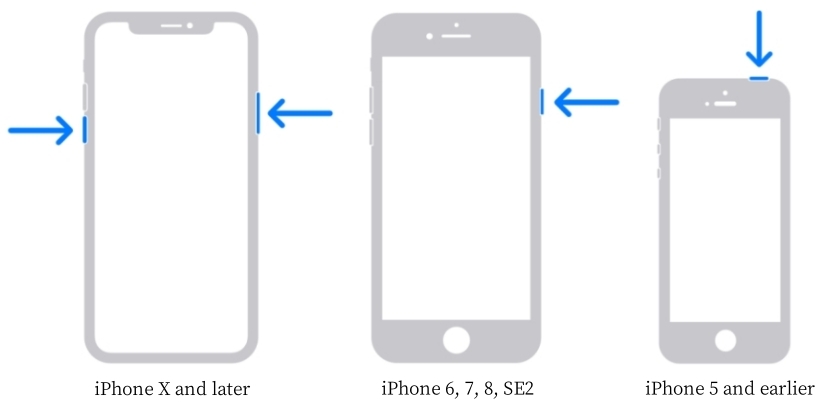
Step 1. Tap and hold the Side key and a Volume key.
Step 2. Drag the power-off slider and wait about 30 seconds.
Step 3. Turn the iPhone back on and open Google Maps to verify Timeline recording.
Part 3. How to Fix Google Maps Timeline Not Working on Android
If you're an Android user, the troubleshooting steps are slightly different from those mentioned above. Since Android devices have different system settings and app management features, you can try clearing the Google Maps cache and other Android-specific solutions to fix the Timeline issue.
Method 1. Re-Add Google Account
Sometimes account authentication or synchronization errors prevent Timeline from updating correctly. Removing and re-adding your Google account refreshes system connections and may resolve persistent Timeline recording issues.
Step 1. Fire up the Google Maps app and then tap the profile.
Step 2. Select Switch account > Manage accounts on this device.
Step 3. Choose your account and tap Remove account.
Step 4. Then add it back by tapping + Add another account in the Switch account section.
Method 2. Clear Google Maps Cache
Over time, cached data may become corrupted and interfere with app performance. Clearing the cache removes temporary files without deleting personal information, often helping resolve the Google Maps timeline history not working problem.
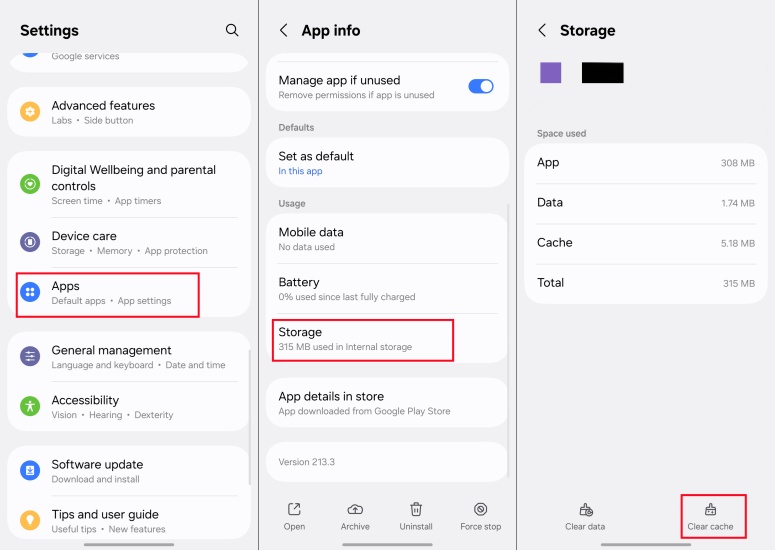
Step 1. Open Settings and select Apps > Google Maps.
Step 2. Tap Storage and choose Clear Cache.
Step 3. Relaunch Google Maps and check Timeline functionality.
Method 3. Update Google Maps on Play Store
Running the latest version of Google Maps ensures access to new features, security improvements, and bug fixes. Updating the application can eliminate software-related issues affecting Timeline tracking and synchronization.

Step 1. Open the Google Play Store and enter your profile.
Step 2. Tap Manage apps & device > Updates available.
Step 3. Locate Google Maps and select the Update option.
Method 4. Reinstall Google Maps on Play Store
If app files become damaged or configuration errors persist, reinstalling Google Maps can provide a fresh start. This process replaces corrupted files and often restores missing Timeline functionality. Here's how to reinstall Google Maps on an Android device.
Step 1. Open Settings and navigate to Apps.
Step 2. Select Google Maps and tap Uninstall.
Step 3. Enter the Google Play Store to reinstall Google Maps.
Method 5. Restart Your Android Phone
Restarting the device refreshes system resources, GPS services, and background processes. It is a quick and effective way to eliminate temporary glitches that may be causing Google Maps Timeline to stop recording your location history.
Part 4. Bonus Tip: How to Fake Location on Google Maps
If you need to change your location on Google Maps or simulate virtual routes while sharing your live location with others, MagFone Location Changer can be a practical solution. This tool allows users to modify GPS locations and create customized movement routes across Google Maps and many location-based applications on both iPhone and Android devices. Whether your goal is privacy protection, location testing, or route simulation, the software offers flexible features to meet different requirements. Follow the guide below to get started.
MagFone Location Changer
Easily change your GPS location on iOS and Android devices to anywhere with one click, while not requiring root or jailbreaking!
Step 1 Run MagFone Location Changer
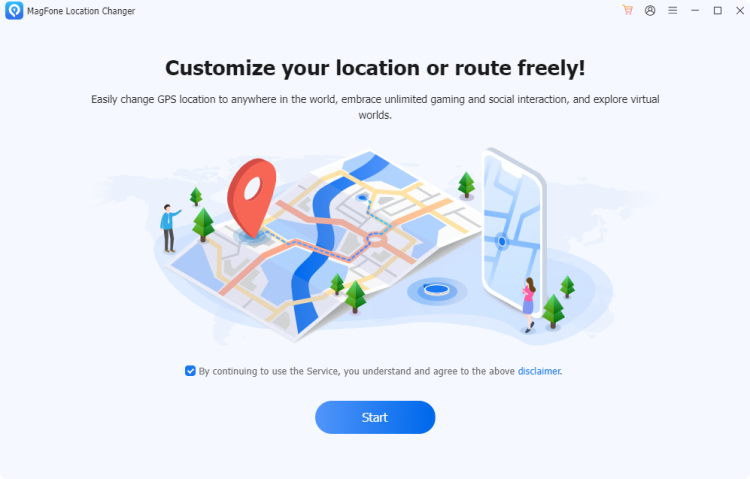
Open MagFone Location Changer on your computer and select the Get Started option. Link your iPhone or Android device using a USB cable. If prompted, enable the required permissions or developer options. Once the device is detected successfully, choose the location-changing mode.
Step 2 Change Location on Google Maps
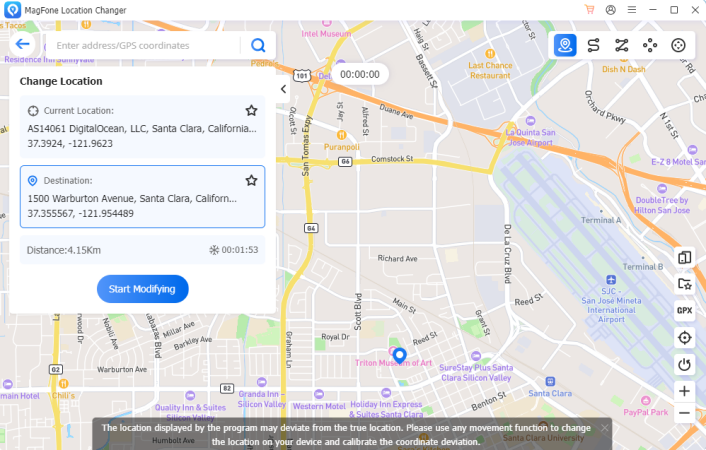
Use the search field to enter a destination or browse the map manually to choose your preferred location. After selecting the target area, review the details and confirm your choice. Click the Modify Location button, and the selected virtual position will be applied to Google Maps and supported apps.
Part 5. Conclusion
By following the troubleshooting methods outlined above for both iPhone and Android devices, you can usually restore Timeline functionality quickly. If you encounter Google Maps timeline history not working or Google Maps timeline import not working errors, these solutions should help you identify the cause and get your location records working normally again.

Edgar Davis
Editor in chief