I've been getting code 9039 on itunes since yesterday, it seems like the itunes app itself doesn´t connect to internet, i've tried every possible fix that i read online or in the apple support page (yes, i do have internet, that's not the problem), neither of them worked. I need help!"
—— From the Apple Community
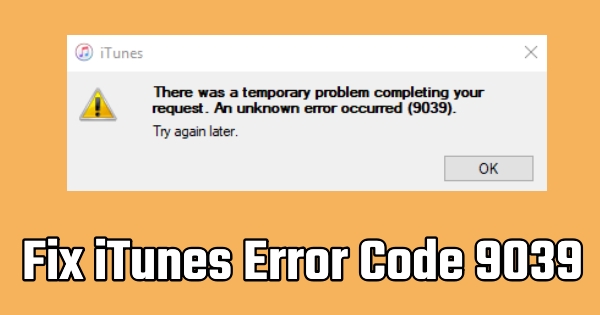
Are you also encountering the same problem when you are using iTunes? If it is your first time to come across this, then you may be terrified and didn't know what's wrong with your iTunes. Since iTunes is a perfect companion to iOS devices, it can sync and back up your images, messages, and so on. Not only can it transfer data, but also can update and restore the iPhones. Given these functions, the error 9039 on iTunes can arise from various issues. Here, we will tell you how to diagnose and fix it.
- Part 1. What Is Error 9039 on iTunes?
- Part 2. Why Does 9039 iTunes Error Occur?
- Part 3. How to Fix iTunes 9039 [One-Click]
- Part 4. How to Fix iTunes Error 9039
- Part 5. Conclusion
Part 1. What Is Error 9039 on iTunes?
9039 is the code number of iTunes errors. Apple has categorized different types of iTunes errors according to why they happen. In fact, iTunes error 9039 usually occurs when you try to connect an AirPlay device to iTunes on the computer. Or when you try adding songs to your music library. This code is typically a sign that something went wrong while connecting, backing up, and restoring.
Part 2. Why Does 9039 iTunes Error Occur?
There was a temporary problem iTunes 9039 can appear for a variety of reasons. Identifying the root cause of iTunes Error 9039 can guide you to the appropriate fix, making it easier to troubleshoot and resolve the error effectively. Here's a closer look at the primary causes.
Reason 1. Authorization Issues
If your computer isn't authorized in iTunes, you may encounter error 9039 while trying to sync or access your iTunes library. iTunes requires authorization on each device to ensure content security.
Reason 2. Outdated Software
Running an outdated version of iTunes can sometimes cause compatibility issues with iOS devices, triggering errors. Regular updates provide critical fixes and compatibility improvements that help reduce errors like 9039.
Reason 3. Corrupted Cache Files
iTunes uses cache files to store temporary data, which helps speed up operations. However, if these files become corrupted, they can disrupt iTunes' normal functions, leading to errors.
Reason 4. iCloud Music Library Conflicts
If your iCloud Music Library is out of sync or contains conflicting data, this can also trigger Error 9039. Keeping the library updated and synchronized with your iTunes can help prevent such issues.
Part 3. How to Fix iTunes 9039 [One-Click]
In addition to iTunes its own glitches, issues may arise when you connect your device to your computer to sync the music library. At this point, iTunes Error 9039 may stem from your device. To address this, we recommend trying MagFone iOS System Recovery. This tool can help resolve errors quickly, whether the issue is caused by a failed backup, restore attempt, or system glitch on your iPhone.
MagFone iOS System Recovery offers a high success rate and ease of use, providing a one-click solution that identifies and fixes the issue without risking data loss. No technical expertise is required, and the repairing process is stress-free. Besides solving iTunes errors, MagFone can help users enter or exit recovery mode, reset their devices, and upgrade or downgrade iOS. Click the link below to learn more!
MagFone iOS System Recovery
Fix various iOS and iPadOS system issues, such as black screen, boot loop, frozen screen, or stuck on Apple logo, without data loss.
Step 1 Open the Program and Connect Your Device
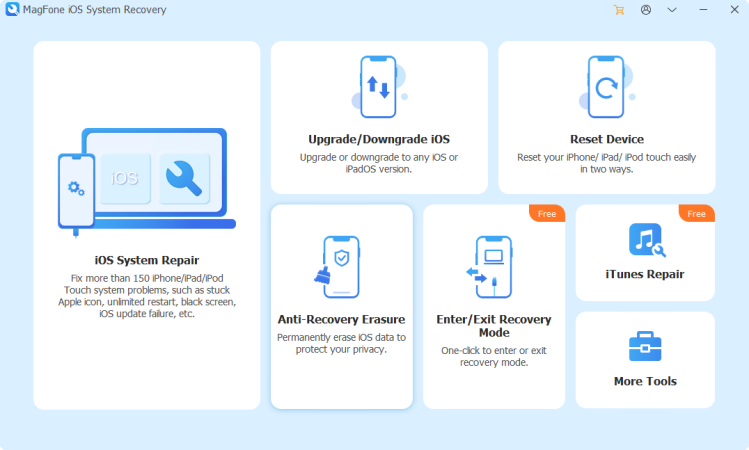
Since you have connected your device to the computer, you will only need to run MagFone iOS System Recovery. Click iOS System Repair and select Device Problems from the trouble list.
Step 2 Click Standard Repair on the Computer
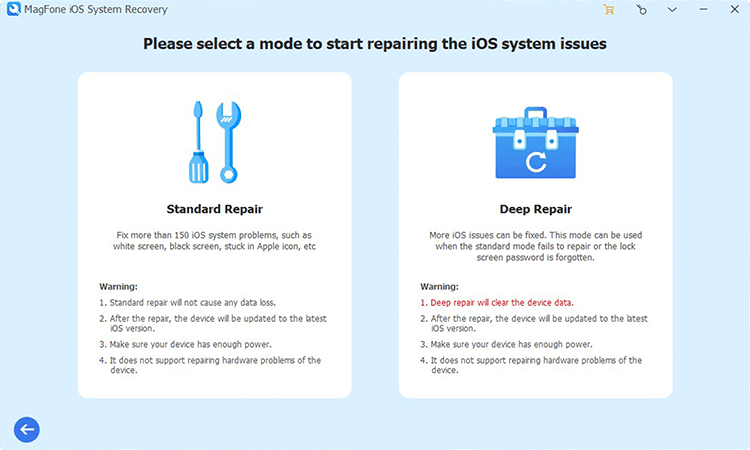
Click Standard Repair to avoid data loss. In fact, standard mode is able to solve most types of iOS system glitches. If not necessary, be cautious to choose Deep Repair.
Step 3 Download and Verify Firmware Package
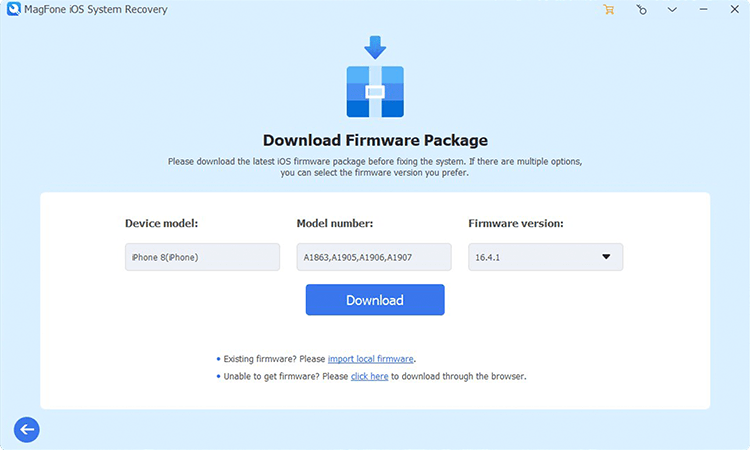
Make sure that your device is detected by the program. If not, please follow the onscreen guidance to put your device into DFU Mode or Recovery Mode. Then continue to check your device information and download a vital firmware package.
Step 4 Select Repair to Solve iTunes Error 9039
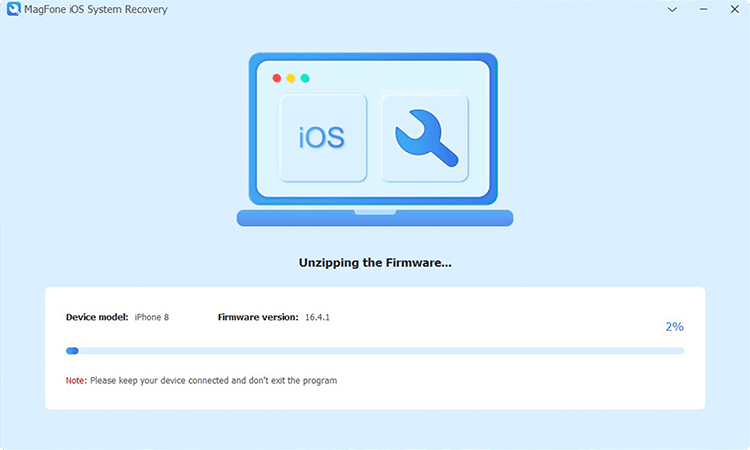
After the package is downloaded, please click Start Standard Repair to let the program fix the iTunes error for you. This process may take some time. Please wait patiently. Till the process is done, try iTunes and check whether it can work well.
Part 4. How to Fix iTunes Error 9039
If the error is not on your device, then the cause is originated from the iTunes and your computer. The following eight approaches focus on removing potential software conflicts, refreshing connections, and resolving authorization issues. Working through these methods can help you eliminate the 9039 error and allow iTunes to work properly with the music library and device syncs.
Method 1. Restart the Computer
A simple restart can often clear temporary files and reset background processes that might interfere with iTunes. Restarting can also refresh the connection between iTunes and any attached devices, addressing any system-related causes of Error 9039 without additional try.
Method 2. Sign Out and In iTunes
The first thing you can do when an iTunes error shows up is to sign out of your iTunes account and try to log in again. When you add music or connect a device to iTunes, the iTunes account you're using may have encountered a temporary glitch, causing the error code 9039. It is a major contributor to various problems with iTunes. So please follow the steps to settle this matter.
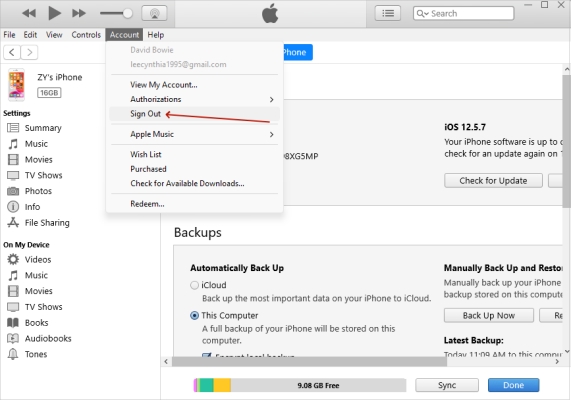
Step 1. Close iTunes and then open it again on your computer. If the iTunes error window appears, ignore it.
Step 2. On the interface, click Account on the top part of the menu bar. Then click Sign Out.
Step 3. Then navigate to iTunes one more time. Click Account again to log in to your account. Check whether this will remove the error window.
Method 3. Delete and Reinstall iTunes
Some iTunes glitches can also lead to the iTunes error 9039. They are hard to be noticed. The simplest way to solve this can be to uninstall iTunes and reinstall it on your computer.
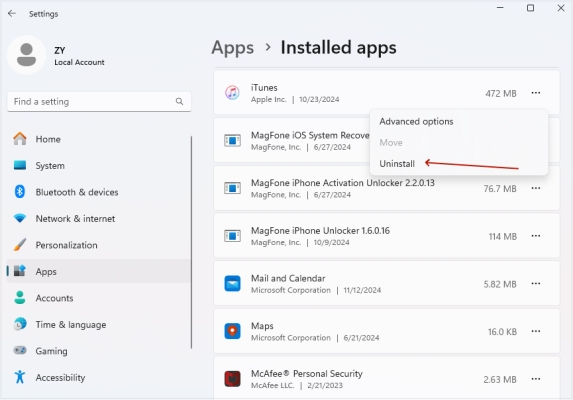
Step 1. Press the Windows key on the keyboard and click Settings on your computer.
Step 2. Click Apps, and select Installed apps.
Step 3. Find or type iTunes, and click More to uninstall iTunes.
Step 4. Then open a web browser to search iTunes and download it from the official site.
Method 4. Delete Songs in Music Library
If you have stored up to thousands of songs on your iTunes account, then when you try to add some music to the iTunes music library, the window "iTunes error 9039" is quite likely to appear. In this case, we recommend you delete some songs to clear the storage on iTunes.
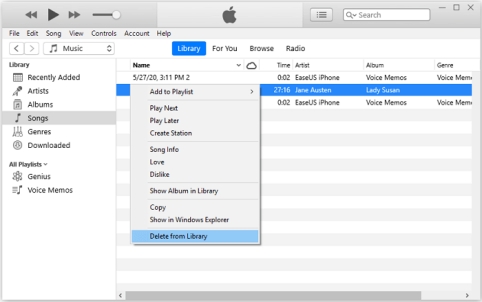
Step 1. Open iTunes on your PC, click Songs on the left side of the window, then click Library.
Step 2. Choose the song you want to delete, press the right button on your mouse, then select Delete from Library.
Step 3. On the pop-up window, confirm to click Delete Song to complete the process.
Method 5. Clear iTunes Cache Files
Cache files allow iTunes to load data more quickly, but if these files become corrupted, they can contribute to errors. Clearing cache files can reset the software's stored data, potentially fixing Error 9039 by removing files that may be causing conflicts within iTunes.
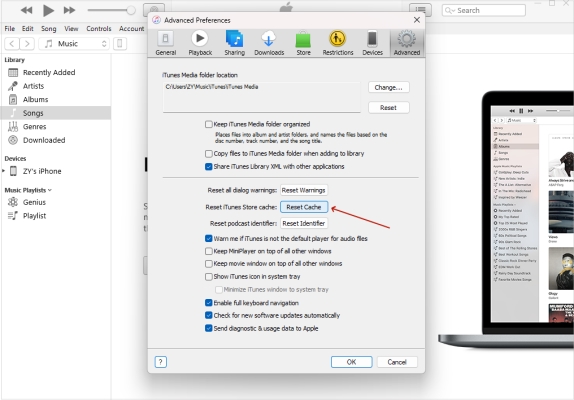
Step 1. Fire up iTunes on your computer.
Step 2. Click Edit on the top of iTunes and select Preferences.
Step 2. Switch to the Advanced tab and click on Reset Cache to clear the iTunes cache.
Method 6. Authorize PC to iTunes
If you do not authorize the computer you are currently using, then iTunes may prevent you from changing any settings or contents of the iTunes library. To fix this, you can authorize your computer, giving it access and permissions to your iTunes library. You can follow the steps below to guide you through the process.
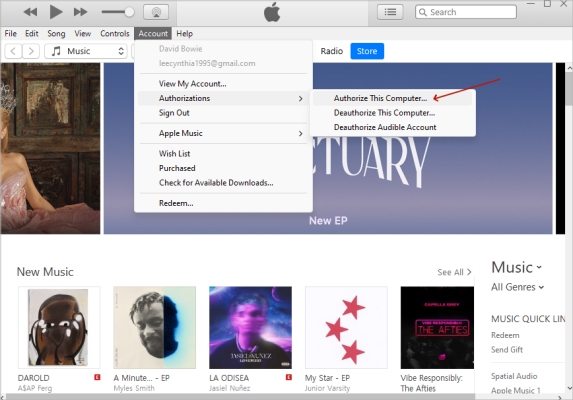
Step 1. Open iTunes. On the top part of the menu, click Account.
Step 2. Choose Authorizations, and navigate to Authorize This Computer.
Step 3. Then click Account, and choose Sign in. Enter your Apple ID and password.
Step 4. Click Authorize to finish the whole process.
Method 7. Update iTunes Version
It is possible that your iTunes is out of date and cannot sync with your device. That can be the reason why iTunes error code 9039 appears. Try to update your iTunes to remove the error window.
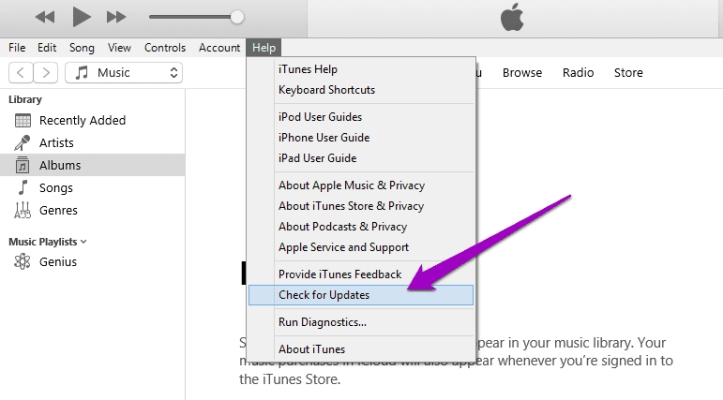
Step 1. Click Help at the top menu on iTunes.
Step 2. Then select Check for Updates on the scroll-down page.
Step 3. If iTunes detects a new version, then there will be a pop-up window. Click Download iTunes.
Step 4. Then click Install 1 item on the Apple Software Update pop-up. And go on to install the latest version of iTunes.
Method 8. Update iCloud Music Library
According to some of our customers, they have successfully removed the iTunes error window after updating the iCloud Music Library. So if you are also trapped in iTunes error 9039, have a try!
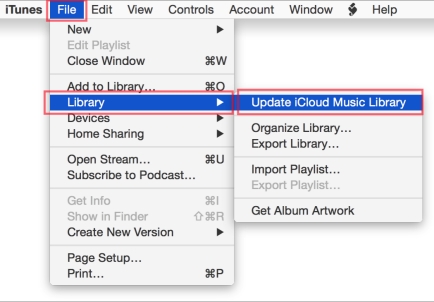
Step 1. Launch iTunes to continue.
Step 2. Click the File tab on the menu.
Step 3. Choose Library, then move your mouse to the right and select Update iCloud Music Library.
Part 5. Conclusion
This wraps up our guidance on how to remove iTunes error code 9039 on the PC. If you have any problem while applying the solutions above, leave a comment and share it with us. We will try our best to answer it for you. Besides, if you try to figure it out on your own, we strongly recommend MagFone iOS System Recovery to help you solve iTunes error code 9039. Have a try, and tell us what you think about it!

