
iTunes error 0xE80000A refers "iTunes could not connect to this iPhone. An unknown error occurred (0xE80000A)." Unlike iTunes error 4013, this error is a communication glitch between an Apple device and a Windows computer. But if you have not come across a particular iTunes error before, there is no need to worry if you don't how to fix it. In this guide, we will explain some possible reasons and cover simple methods to help fix the issue quickly.

- Part 1. What Does iTunes Error 0xE80000A Mean?
- Part 2. Why Does iTunes Error 0xE80000A Occur?
- Part 3. Troubleshooting Steps for 0xE80000A Error iTunes
- Part 3. One-Click Quick Solution to iTunes Error 0xE80000A
- Part 5. How to Fix iTunes Error 0xE80000A on Windows 11/10
- Part 6. Conclusion
Part 1. What Does iTunes Error 0xE80000A Mean?
iTunes error 0xE80000A is a connection-related error that occurs when iTunes fails to recognize or communicate with an iPhone or iPad connected to a computer. When the error appears, iTunes usually displays a message similar to:
"iTunes could not connect to this iPhone. An unknown error occurred (0xE80000A)."
This error typically indicates that something is preventing the device authentication process between the computer and the iOS device. You might see the error message when:
- Connecting an iPhone or iPad to iTunes
- Syncing music, photos, or apps
- Creating or restoring an iPhone backup
- Updating iOS using iTunes
When this error code appears, iTunes cannot complete the operation because the authentication or communication process with the device fails at any stage.
Part 2. Why Does iTunes Error 0xE80000A Occur?
iTunes error 0xE80000A can be a frustrating obstacle for Apple device users, disrupting the seamless synchronization between computers and iOS devices. This can result from several technical issues, ultimately affecting the device functionality and user experience. Here are the main possible reasons that cause iTunes error 0xE80000A.

Reason 1. Outdated iTunes Version.
Older versions of iTunes may not fully support iOS versions, causing compatibility problems during device connection.
Reason 2. USB Cable or Port Problems.
A damaged cable, faulty USB port, or unstable connection can interrupt communication between the device and the computer. Using non-certified Lightning cables can also cause connection errors.
Reason 3. Corrupted Lockdown Folder.
The Lockdown folder stores pairing certificates that allow your iPhone and computer to trust each other. If these files become corrupted, iTunes may fail to authenticate the device.
Reason 4. Trust Permission Issues.
Your iPhone must approve a computer before allowing data access. If this permission data becomes corrupted, iTunes cannot connect properly.
Reason 5. Apple Mobile Device Service Failure.
The Apple Mobile Device Service is responsible for communication between iTunes and iOS devices. If the service stops running or encounters errors, iTunes may fail to detect the device.
Reason 6. Security Software Conflicts.
Some antivirus or firewall programs may block the communication process between iTunes and connected devices.
Part 3. Troubleshooting Steps for 0xE80000A Error iTunes
One prevalent cause is connection issues between your iPhone and computer. Additionally, outdated iTunes or a corrupted USB cable can contribute to the occurrence of this error. For those encountering iTunes Error 0xE80000A, a series of troubleshooting steps can be taken.
Troubleshooting 1. Check USB Ports and Cables
Often, the problem lies with an incompatible or damaged USB cable or port. Using a certified Apple cable and checking each port on your computer can resolve basic connectivity issues. Testing with different cables or ports will help determine if this is the underlying issue.
Troubleshooting 2. Check the Version of iTunes
If you're using an outdated version of iTunes, it may cause compatibility issues. Ensuring that iTunes is updated to the latest version helps address bugs and connectivity issues that could interfere with recognizing your device. Checking for updates can be an easy fix.
Troubleshooting 3. Restart iPhone and Computer
Restarting your iPhone and computer is a great option to repair minor system issues that could be blocking iTunes from detecting your device. A restart can clear temporary glitches or minor conflicts within either device, enhancing compatibility.
Troubleshooting 4. Delete and Reinstall the iTunes
In some cases, reinstalling iTunes can fix deeper software problems that an update alone cannot solve. Deleting and reinstalling iTunes gives you a clean installation, removing any corrupt files or incomplete updates that might be causing the error.
Part 4. One-Click Quick Solution to iTunes Error 0xE80000A
If you're still struggling with the iTunes 0xE80000A error, it's time to consider a more powerful solution, that is, MagFone iOS System Recovery. Unlike typical troubleshooting methods, this tool is designed to address complex iOS system issues that prevent iTunes from connecting to your iPhone, iPad, or iPod touch.
With MagFone iOS System Recovery, you don't need to worry about data loss, as it repairs system issues without losing data under the standard repair mode. Whether it's software glitches or deeper connectivity issues, this solution quickly re-establishes iTunes synchronization. Its easy-to-use interface makes it accessible to all users, even those without technical experience. Don't let this error block your connection, and give MagFone a try.
MagFone iOS System Recovery
Fix various iOS and iPadOS system issues such as black screen, boot loop, frozen screen, or stuck on Apple logo, without data loss.
Step 1 Open MagFone Software and Connect iPhone
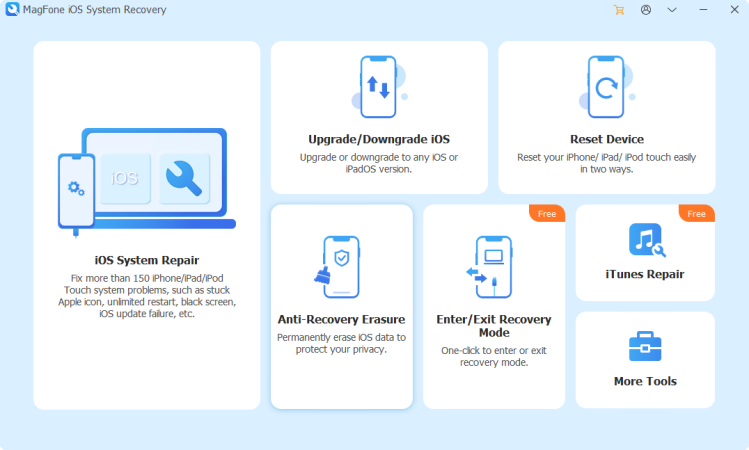
Start by opening MagFone iOS System Recovery, then connect your iPhone to your computer through a USB cable. On the main interface, select the iOS System Repair option, then click on the Start button.
Step 2 Select Standard Repair to Fix iPhone Issue
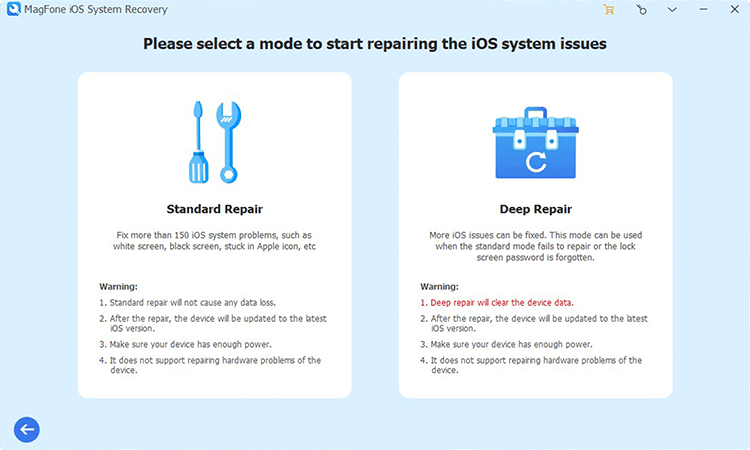
Proceed to select the Standard Repair option. Ensure that your device is detected by MagFone software. Then you have to put your iPhone into recovery mode or DFU mode by following the onscreen instructions.
Step 3 Download and Verify the Firmware for iPhone
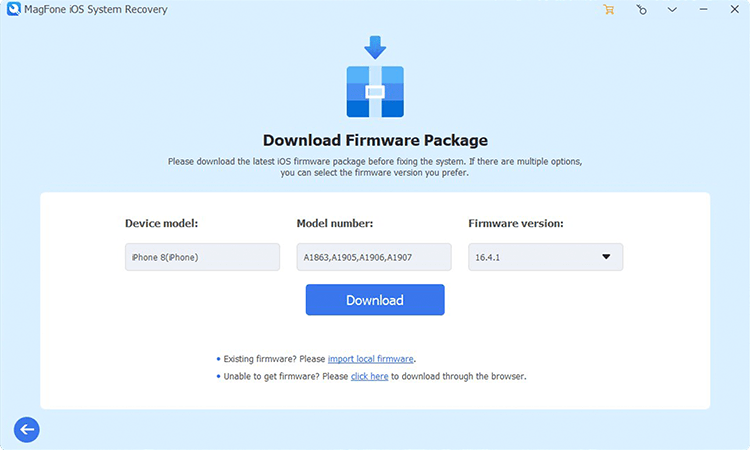
Go to check the device information, including the device model and model number. Then select the firmware version and click on the Download button. Wait to download the firmware package for the iPhone.
Step 4 Start to Fix the iTunes Error 0xE80000A
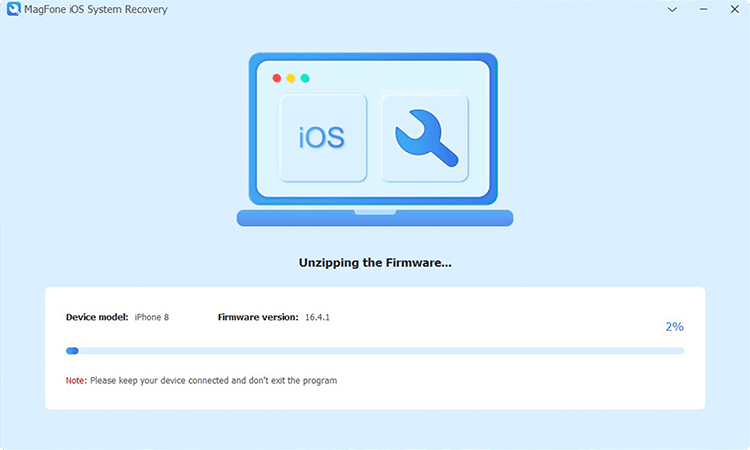
After completing the download of the firmware, you can click on the Start Standard Repair button. MagFone iOS System Recovery will unzip the firmware package and start fixing iTunes Error 0xE80000A.
Part 5. How to Fix iTunes Error 0xE80000A on Windows 11/10
If the troubleshooting steps above do not work, or an iTunes repair tool is not your ideal option, try the following deeper troubleshooting methods. Whether this issue originates from your iPhone or computer, here you can find the appropriate method to fix the issue.
Fix iTunes Error 0xE80000A from iPhone
Addressing the issue directly on your iPhone may help resolve it. These solutions focus on updating iOS and adjusting device settings to improve compatibility with iTunes.
01Update the iOS Version
Updating iOS to the latest version is a fundamental step in resolving the issue. The out-of-date version of iOS can also influence the connection between your iPhone and computer.
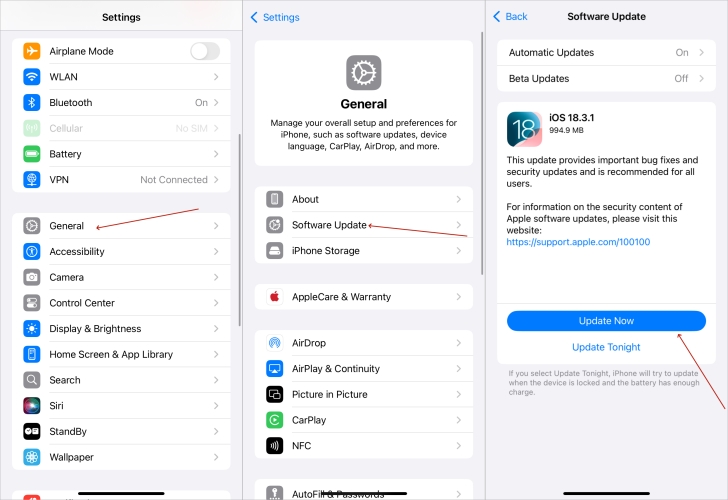
Step 1. On your iPhone, head to Settings.
Step 2. Find and select General > Software Update.
Step 3. Find an iOS version to update, then tap Download and Install.
Step 4. Enter your screen passcode and tap Install Now.
02Reset Location & Privacy
After using it for a long time, there would be some settings you've set on your iPhone. Sometimes, the settings, especially the settings of Location & Privacy, can cause the error.

Step 1. Go to Settings on your iPhone.
Step 2. Then tap General > Transfer or Reset iPhone.
Step 3. Tap Reset and select Reset Location & Privacy.
Step 4. Enter your screen passcode, then tap Reset Settings.
03Disable Lockdown Mode
Lockdown Mode is a new feature available for iOS 16 or later. It helps protect devices against extremely rare and highly sophisticated cyber attacks. If you have enabled it, just turn it off.
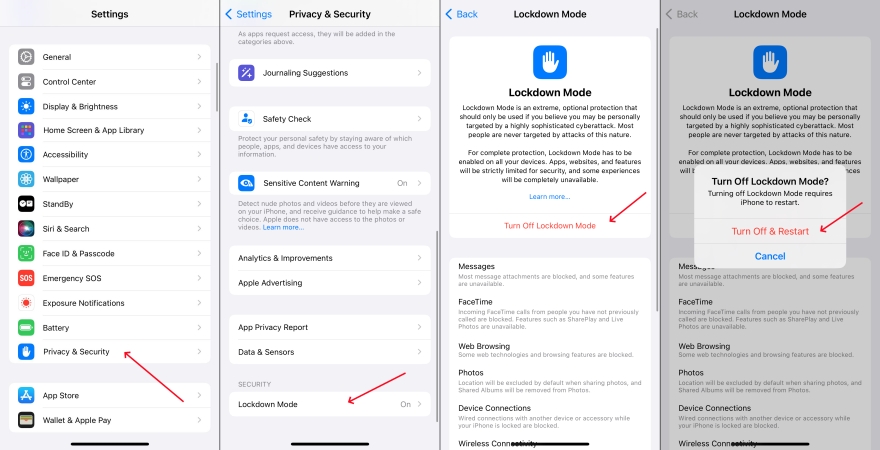
Step 1. Open the Settings app on your iPhone and tap Privacy & Security.
Step 2. Under Privacy & Security, scroll down to tap Lockdown Mode.
Step 3. Tap Turn Off Lockdown Mode, then tap Turn Off & Restart to confirm.
Step 4. Enter your screen passcode and wait for your device to restart.
04Solution 4. Factory Reset iPhone
The last solution you can do on your iPhone is to restore your device to the original factory settings. This can resolve most issues on your device, but it will erase all the data and settings.
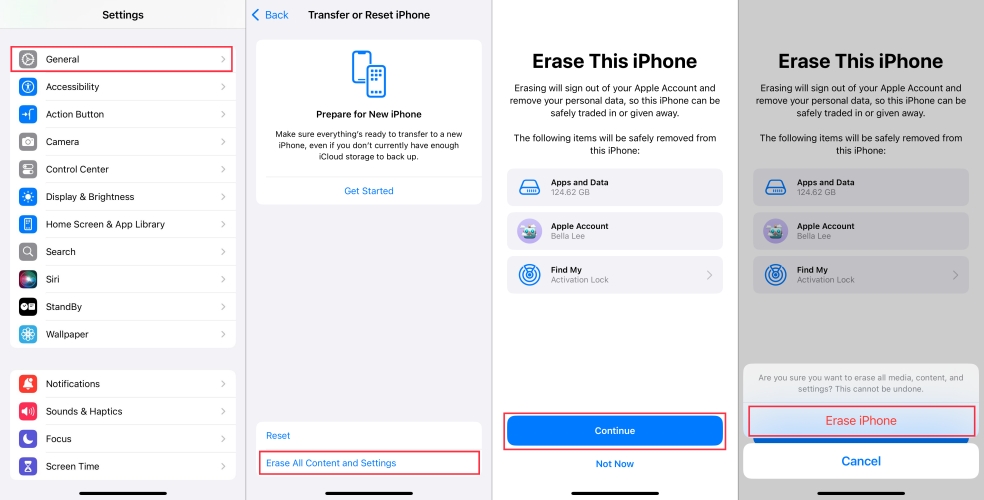
Step 1. Go to Settings > General.
Step 2. Next, scroll down to tap Transfer or Reset iPhone.
Step 3. Select Erase All Content and Settings.
Step 4. Enter your passcode or Apple ID password if asked. Then press Continue.
Fix iTunes Error 0xE80000A from Computer
In some cases, the root cause of the error lies on your PC rather than your iPhone. The steps below address possible PC-related issues that could interfere with iTunes connectivity.
01Update the Windows Version
When receive the error message iTunes cannot connect to this iPhone. An unknown error occurred (0xE80000A) on your computer, the first thing you can do is to update Windows.
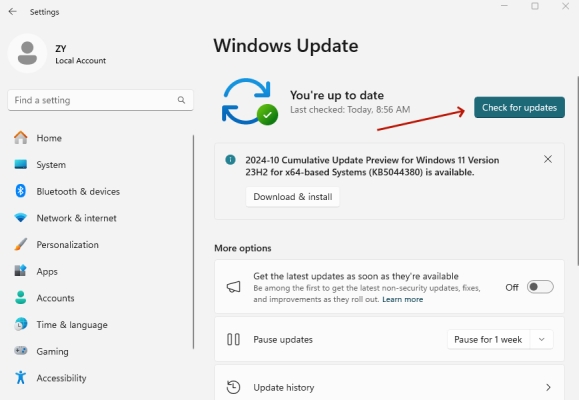
Step 1. Press the Windows+I key on your keyboard at the same time.
Step 2. In the Settings window, click on the Windows Update button.
Step 3. Click on the Check for Updates to update your Windows computer.
02Disable Antivirus and Firewall
Sometimes, lots of software like antivirus on your computer would prevent iTunes from detecting your iPhone. In this case, you can try disabling the antivirus software on your computer.
03End iTunes-Related Processes
Some processes running in the background on your computer would disturb the working of iTunes. When too many iTunes-related processes are running, you would encounter the error.
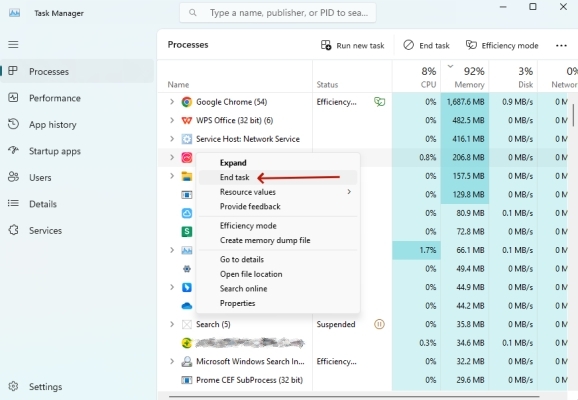
Step 1. Press the "Ctrl+Shift+Esc" key on your keyboard to open the task manager.
Step 2. In the Processes tab, find those processes and right-click them, then select End Task.
04Reset the Lockdown Folder
A lockdown folder is created automatically on your Windows computer. This folder is essential for Apple devices to establish communication with the computer successfully.
Step 1. Press the Windows+R key on your keyboard to open the Run window.
Step 2. In the Run window, enter %ProgramData% in the box and click on the OK button.

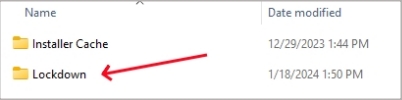
Step 3. Select the Apple folder and then right-click the Lockdown folder and rename it old.
Step 4. Open iTunes and connect your Apple device again.
05Restart Mobile Device Service
Restarting Apple Mobile Device Service is another option to fix the error. In the Apple Community, some users reported that this solution can fix the error successfully.
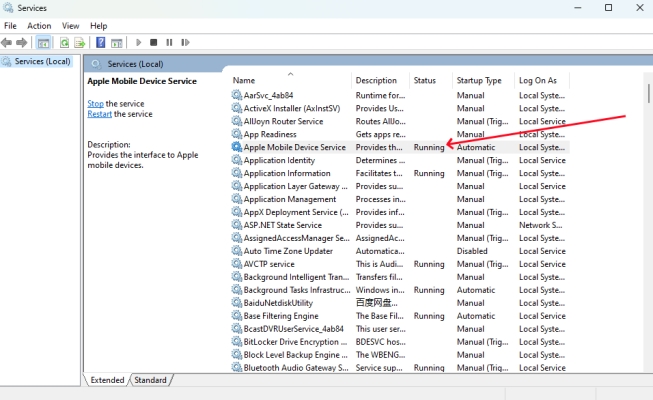
Step 1. In the Start menu, search for Services.
Step 2. Find and click Apple Mobile Device Service.
Step 3. Select Properties from the menu.
Step 4. In the Properties window, set the Startup type to Automatic, click Start, and then click OK.
06Update Apple iPhone Drivers
In addition to restarting Apple Mobile Device Service, updating the driver of the Apple iPhone is also important when you come across an error. This method can solve the error with ease.
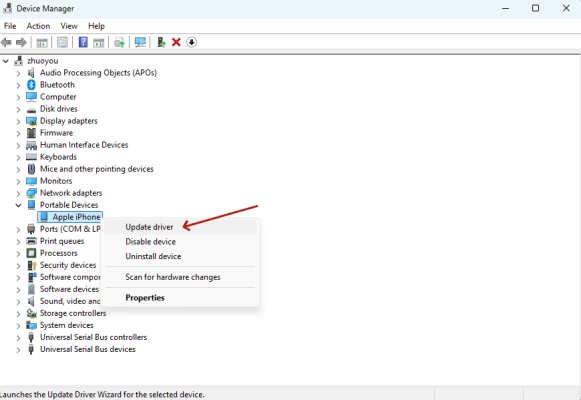
Step 1. In the Start menu on your compute, search for Device Manager.
Step 2. Expand Portable Devices and right-click Apple iPhone.
Step 3. Select Update Driver, then click Search automatically for updated driver software.
Part 6. Conclusion
Now that you have fixed iTunes Error 0xE80000A by trying the above methods, you can connect your iPhone to iTunes on your computer. Whether you troubleshoot the issue with the common steps or fix it with advanced solutions, the error can be resolved as soon as possible. If you still cannot resolve it, just contact Apple Support for help.

Dylan Jones
Editor in chief