I have a iPhone 11 with a good amount of storage but since I've updated my phone to IOS 16.6 none of my facetime photos have been saving to my camera roll or live photos album and I don't know what else to do cause I've tried everything and nothing works."
—— From discussion.apple.com
FaceTime is Apple's popular video and audio calling service available over WiFi or cellular on supported Apple devices. FaceTime not only enables you to have virtual conversations but also lets you capture memorable moments with its built-in photo features. Sadly, some users may encounter a frustrating issue where FaceTime photos fail to save properly after iOS 26 or 18 updates. Today, here we are going to walk you through where FaceTime photos go and how to fix FaceTime photos not saving on your iPhone, iPad, or Mac. Let's dive into the details.

- Part 1. Why Are My FaceTime Photos Not Saving/Working?
- Part 2. How to Fix FaceTime Photos Not Saving on iPhone/iPad
- Part 3. How to Fix FaceTime Photos Not Saving on Mac
- Part 4. Where Do FaceTime Photos Go on iPhone/iPad/Mac?
- Part 5. FAQs about FaceTime Photos
- Part 6. Conclusion
Part 1. Why Are My FaceTime Photos Not Saving/Working?
When you use FaceTime to take photos during a call, those snapshots are usually saved to your iPhone's camera roll automatically. However, there are instances where users report that these photos do not appear in their photo gallery despite capturing them during the call. This can be perplexing, especially if you wish to cherish those moments later on. Why are FaceTime photos not saving? This issue can arise from several reasons, and the following are the main reasons.
Reason 1. Incorrect FaceTime Settings
FaceTime photos may not save due to incorrect FaceTime settings, such as FaceTime Live Photos being disabled. If these FaceTime features aren't enabled, your iPhone won't have permission to capture and store FaceTime snapshots.
Reason 2. Internet Connection Issues
A stable internet connection is essential for various functions on your iPhone, including saving FaceTime photos. If your iPhone is connected to a weak or intermittent network, it may prevent photos from being saved successfully.
Reason 3. Storage Space Insufficiency
Another common reason for FaceTime photos not saving is insufficient storage space on your iPhone. If your iPhone's storage is full, it may not be able to save additional photos, leading to the FaceTime live photos not saving issue.
Reason 4. iOS Software Glitches
Software glitches or bugs within the iOS operating system can also interfere with the saving process of FaceTime photos. These glitches may arise due to various reasons, including outdated software or conflicts with FaceTime.
Part 2. How to Fix FaceTime Photos Not Saving on iPhone/iPad
If your FaceTime photos are not saving, don't worry, there are several ways to resolve this issue. The problem may stem from a misconfigured FaceTime or other settings, outdated software, or insufficient storage. You can follow the troubleshooting solutions below to fix FaceTime photos not saving on iOS 26 or earlier versions.
🎯 Solutions to FaceTime Photos Not Saving Due to FaceTime Errors
Most of the time, the issue is related to FaceTime settings or server problems, which can prevent photos from saving. Ensuring FaceTime features are correctly enabled and refreshing the app may help. If the problem persists, we've also listed other fixes to troubleshoot potential issues.
Solution 1. Turn on FaceTime Live Photos
When you are encountering the FaceTime live photos not saving issue, you need to check whether you have enabled FaceTime Live Photo on your device. Here's how to allow live photos on FaceTime.
Note:
The FaceTime Live Photo feature is not available in all countries or regions. Besides, this feature only offers to an iPhone with 12.1.4 or later, as well as, an iPad with iPadOS 13 or later.
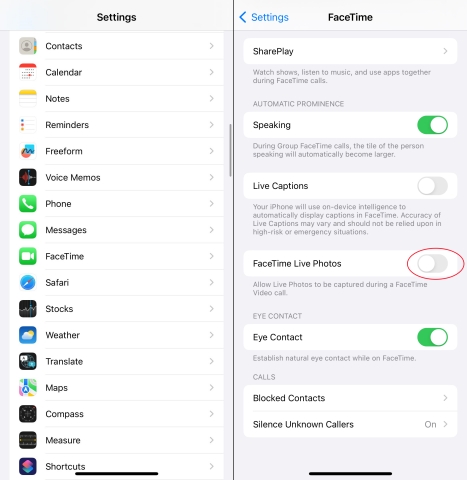
Step 1. Open Settings on your iPhone, then tap Apps > FaceTime.
Step 2. Find FaceTime Live Photos and turn it on.
Solution 2. Disable and Re-enable FaceTime
If there is a problem with FaceTime on your device, you can try disabling this feature and then re-enable it. This can resolve some glitches in FaceTime, including FaceTime photos not saving.

Step 1. In Settings on your iPhone, tap Apps > FaceTime.
Step 2. Switch off the toggle next to FaceTime.
Step 3. Wait for a while and enable FaceTime.
Solution 3. Restart FaceTime and iPhone
Sometimes, a simple restart can resolve minor software glitches. You can restart your iPhone or FaceTime, then try capturing FaceTime photos again to see if the issue persists.
Restart iPhone:

Press and hold either volume button and the power button until the power-off slide appears. Drag the slider, then wait 30 seconds for your device to turn off. After that, press and hold the power button until you see the Apple logo.
Restart FaceTime:
Swipe up from the bottom edge to open the App Switcher, then swipe right to find FaceTime. Continue to swipe up on FaceTime and go to the Home Screen to open FaceTime again.
Solution 4. Update iOS Version and FaceTime
As updates often include bug fixes, make sure you are using the latest version of FaceTime and iOS on your device. If not, go to update the iOS version and FaceTime to fix the FaceTime photos not saving issue.
Update iOS Version:
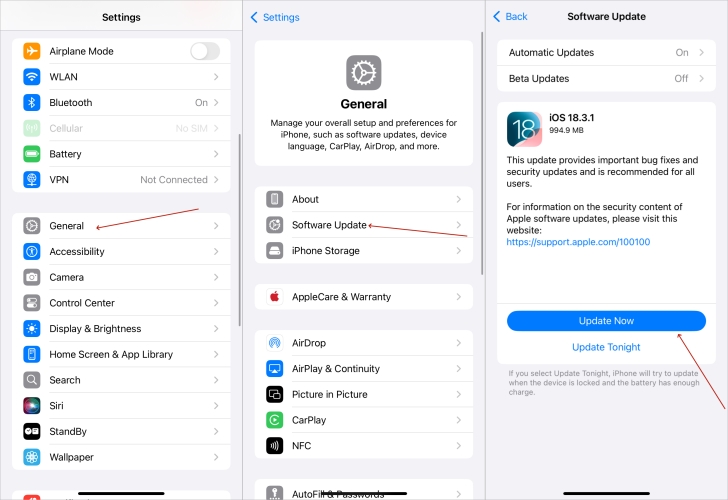
Step 1. Go to Settings > General, then tap Software Update.
Step 2. Tap Download and Install to download the update.
Step 3. Tap Install Now and enter your screen passcode.
Update FaceTime:

Step 1. Launch the App Store app on your iPhone, then tap Search.
Step 2. Input FaceTime in the search filed and find FaceTime.
Step 3. If you see an update, tap Update to download the update.
Solution 5. Check Restrictions for FaceTime
If you have set restrictions for FaceTime on your iPhone, this will prevent FaceTime from saving photos to your device. It's essential to turn off restrictions for FaceTime on your device.
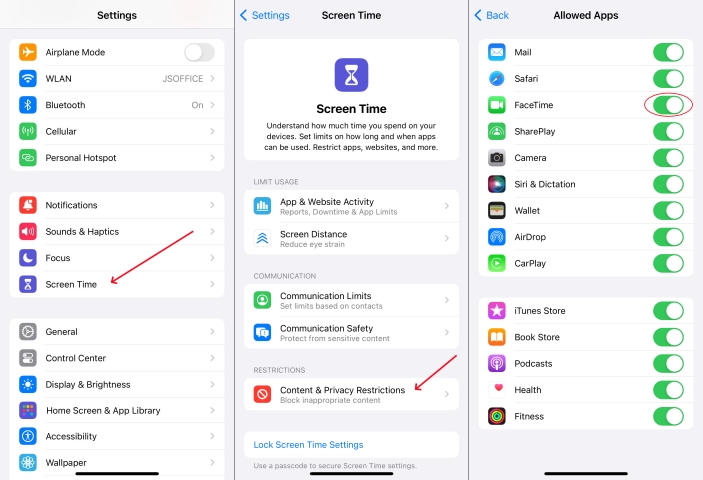
Step 1. Go to Settings > Screen Time, then tap Content & Privacy Restrictions.
Step 2. Tap Allowed Apps & Features and toggle on the switch next to FaceTime.
Solution 6. Delete and Reinstall FaceTime
To fix FaceTime screenshots not saving, you can also choose to delete and reinstall FaceTime on your iPhone, which can completely resolve the issue caused by corrupted files.
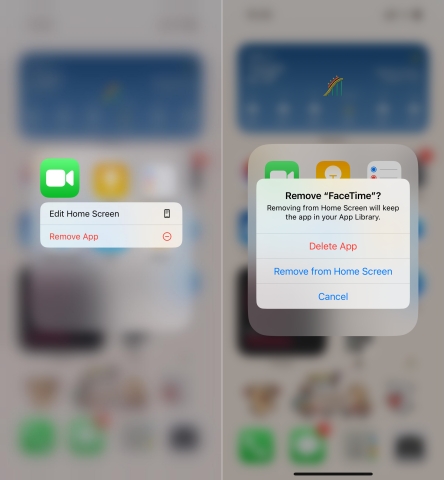
Step 1. On the Home Screen, touch and hold FaceTime.
Step 2. Tap Remove App, then tap Delete App > Delete to delete it from iPhone.
Step 3. Go to App Store and search FaceTime to install it again.
🎯 Solutions to FaceTime Photos Not Saving Due to Software Bugs
If FaceTime settings aren't the issue, external factors like low storage, iCloud syncing errors, or network restrictions could be preventing photos from saving. Try the corresponding solutions outlined below to help resolve the problem. Let's get started.
Solution 1. Free up Storage Space
Insufficient storage space can cause FaceTime photos not saving to happen. If your device has not enough storage space available for FaceTime photos, you need to clear up your device.
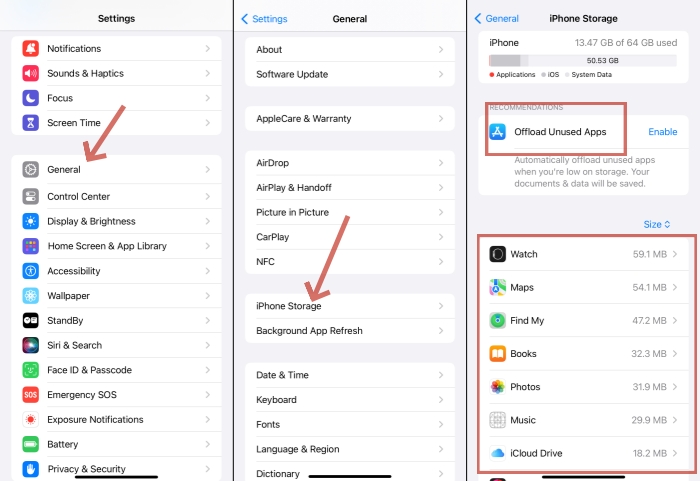
Step 1. On your iPhone, tap Settings > General, then select iPhone Storage.
Step 2. Find and select some unused apps to delete and tap Delete App.
Solution 2. Reset Network Settings
In most cases, the FaceTime photos not saving issue can be caused by the network. Make sure that you have a stable network. Or you can choose to reset network settings on your device.
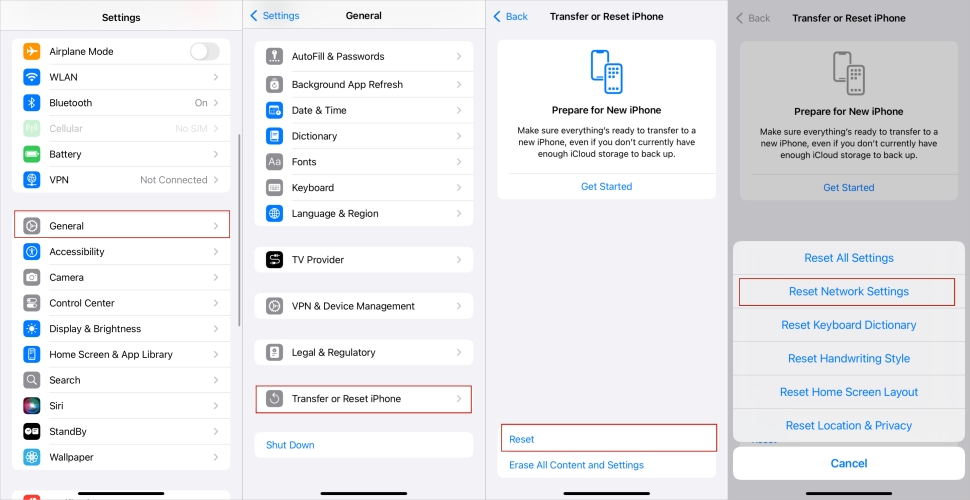
Step 1. Fire up the Settings app and tap General > Transfer or Reset iPhone.
Step 2. At the bottom of the screen, tap Reset and select Reset Network Settings.
Step 3. Enter your screen passcode and tap Reset Network Settings to confirm.
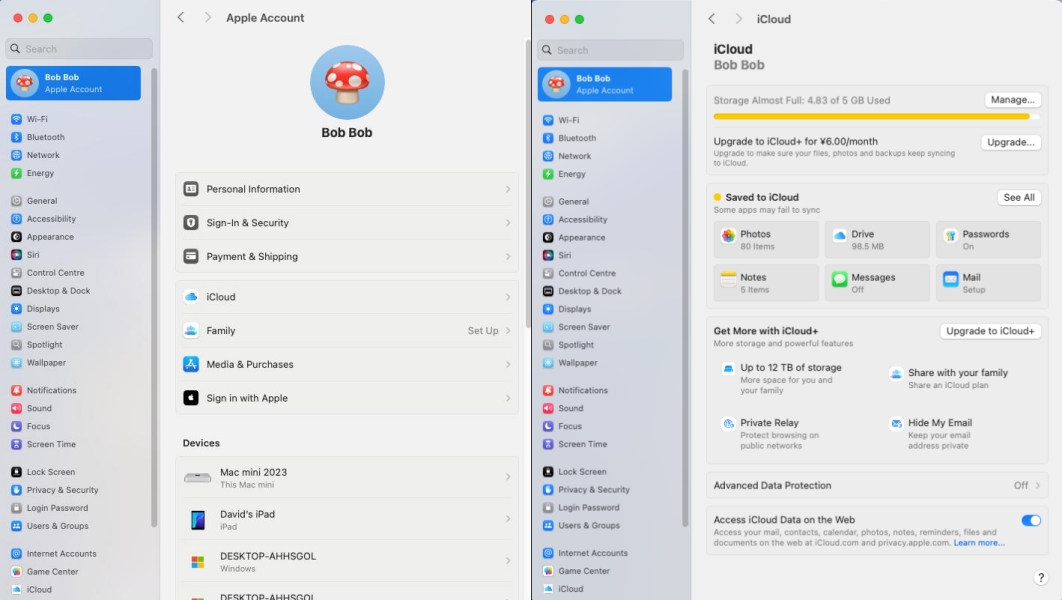
Solution 3. Sign out and Sign in iCloud
All data and content, including FaceTime photos, are often synced with iCloud automatically. If the login state of iCloud is abnormal on your device, it can prevent live photos from being saved.
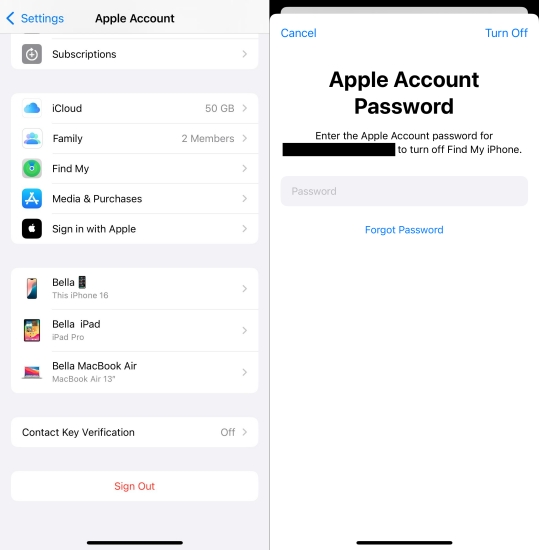
Step 1. Tap your Apple ID name at the top screen of Settings.
Step 2. Scroll down to tap Sign Out and enter your Apple ID password.
Step 3. Tap Turn off to sign out of your Apple ID.
Step 4. Tap Sign In and enter your Apple ID password to sign in again.
Solution 4. Use a Professional iOS Repair Tool
If the FaceTime photos not saved after iOS update on your iPhone or iPad, you can consider using a professional iOS repair tool to fix the iOS bugs and issues, instead of trying the above method. As a remarkable system repair tool for iPhone, iPad, and iPod touch, MagFone iOS System Recovery can fix more than 150 system issues in two repair modes while not deleting any data and content. When you cannot fix the FaceTime photos not saving to camera roll issue, you can try to use MagFone iOS System Recovery to quickly and easily fix the issue.
MagFone iOS System Recovery
Fix various iOS and iPadOS system issues, such as black screen, boot loop, frozen screen, or stuck on Apple logo, without data loss.
Step 1Connect iPhone to Computer
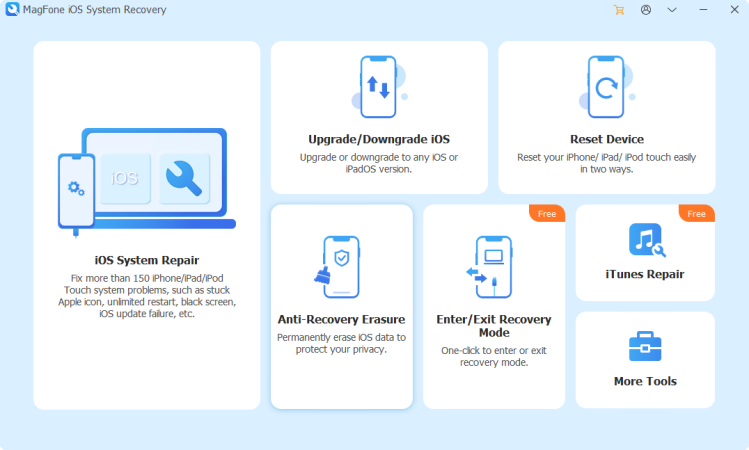
First up, go to use a USB cable to connect between your iPhone and computer. Then run MagFone iOS System Recovery and select the iOS System Recovery option. After that, there are two repair modes, and here you can select Standard Repair.
Step 2Put iPhone into Recovery Mode
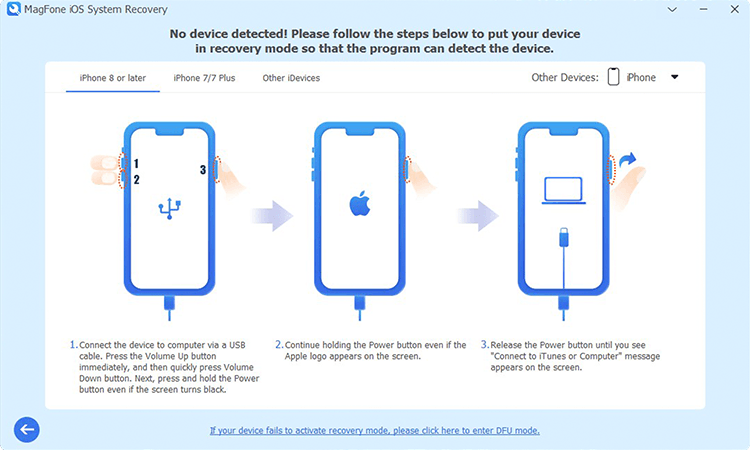
Then, you have to put your iPhone into recovery mode. The steps of booting iPhone into recovery mode will be shown on the screen of the software. If it fails to put iPhone into recovery mode, you can click the link to put your device into DFU mode.
Step 3Download the Firmware Package
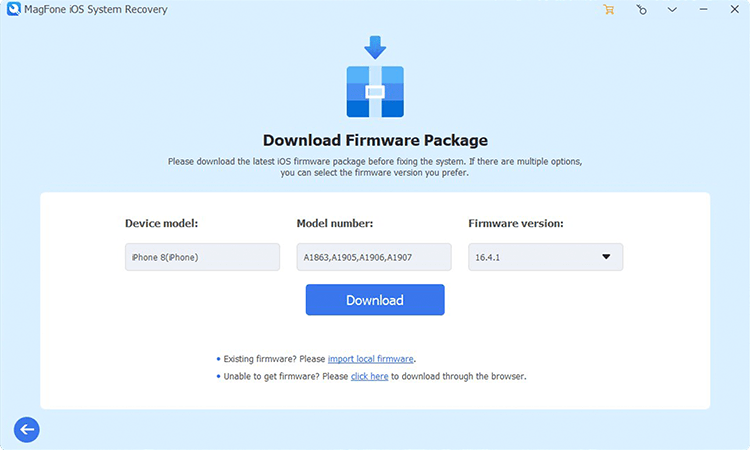
Next, go to check the device information of your iPhone appearing on the screen of the software. Here you need to make sure that the information is correct. Then you can click the Download button to download the firmware package.
Step 4Fix FaceTime Photos Not Saving
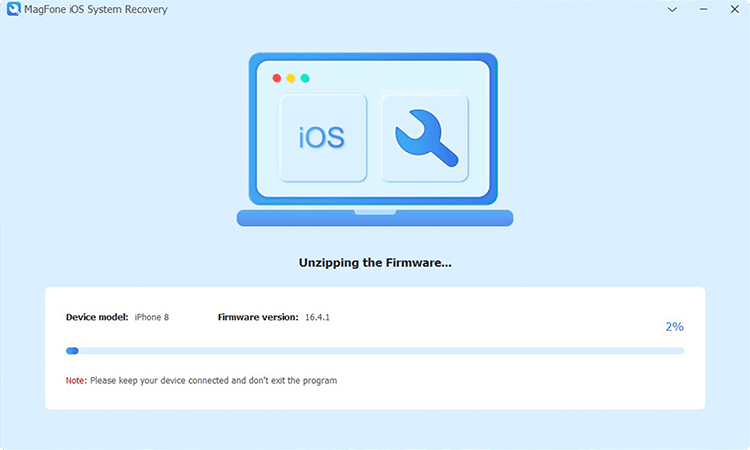
Finally, the firmware has been downloaded, and click the Repair button on the software. MagFone iOS System Recovery will start to fix the FaceTime photos not saving issue. Keep your device connected until the process end.
Solution 5. Factory Reset iPhone
Using a third-party system recovery software to fix the FaceTime photos not saving issue could be a good option. But you can also factory reset your iPhone if you don't mind the data loss.
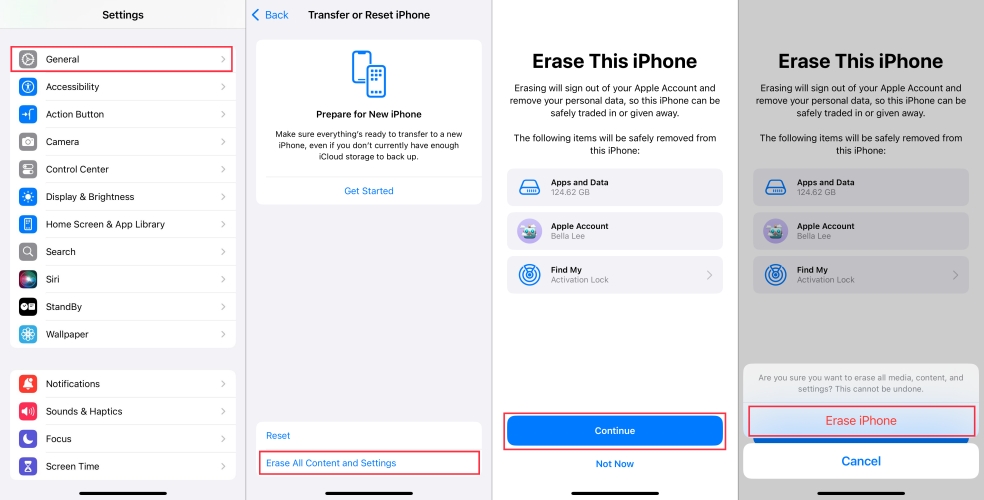
Step 1. Tap General > Transfer or Reset iPhone in Settings on your iPhone.
Step 2. At the bottom of the screen, select Erase All Content and Settings.
Step 3. Enter your Apple ID password and tap Continue, then tap Erase iPhone.
Solution 6. Restore iPhone in Recovery Mode
If the problem persists and none of the above solutions work, you can use iTunes to restore your device in recovery mode. iTunes can fix various system glitches and bugs related to iPhone. Before using iTunes to restore your device, remember to make a backup of your device first.
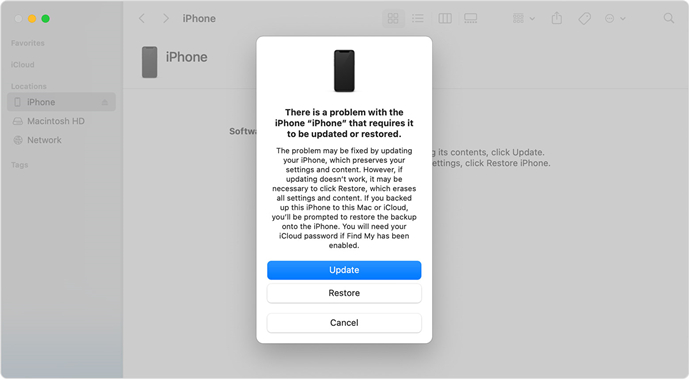
Step 1. Connect your iPhone to your computer through a USB cable, then turn it off.
Step 2. Proceed to put your device into recovery mode with the following button.
- iPhone 8 or later: Press and quickly release the volume up button, then repeat the same action with the volume down button. Continue to press and hold the Power button until the Connect to computer screen appears.
- iPhone 7 and iPhone 7 Plus: Press and hold the Power button and the volume down button at the same time. Keep holding them until you see the Connect to Computer screen.
- iPhone 6s or earlier: Press and hold the Home button and the Power button at the same time. Keep holding them until the Connect to Computer screen appears.
Step 3. Open iTunes or Finder on your computer, then click Restore.
Part 3. How to Fix FaceTime Photos Not Saving on Mac
The FaceTime photos not working issue troubles not only iPhone and iPad users but also Mac users. Most of time, it's easy to fix FaceTime photos not saving on Apple devices. By trying the above quick fixes, you can fix the issue on your iPhone or iPad. If you run into this issue on your Mac, follow the fast solutions below to fix the issue.
- Solution 1. Enable FaceTime Live Photos
- Solution 2. Update macOS and FaceTime
- Solution 3. Check Photos App Permissions
- Solution 4. Verify iCloud Photos Sync
- Solution 5. Check Storage Space on Mac
- Solution 6. Sign out and Sign in Apple ID
- Solution 7. Reinstall FaceTime
- Solution 8. Reset NVRAM/PRAM
- Solution 9. Use Terminal to Reset Permissions
Solution 1. Enable FaceTime Live Photos
The most common reason why FaceTime photos are not saving is because the feature is turned off. If this option is disabled, FaceTime photos will not save. Go to enable this feature.
Note:
On a Mac with the latest version of either macOS 10.13.6 or macOS 10.14.4 or later, you can enable FaceTime Live Photos. But this feature isn't available in all countries or regions.
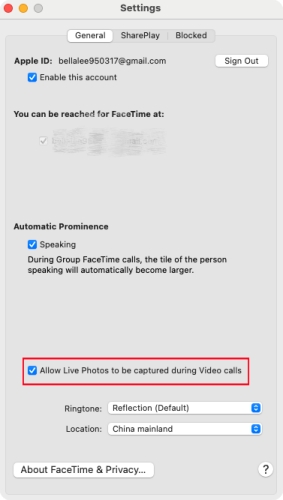
Step 1. Open the FaceTime app on your Mac.
Step 2. Choose FaceTime > Settings, then click General.
Step 3. Select the "Allow Live Photos to be captured during video calls" checkbox.
Solution 2. Update macOS and FaceTime
Compatibility issues often occur if your Mac is running an outdated version of macOS. Updating ensures that FaceTime and the Photos app run with the latest bug fixes and improvements.
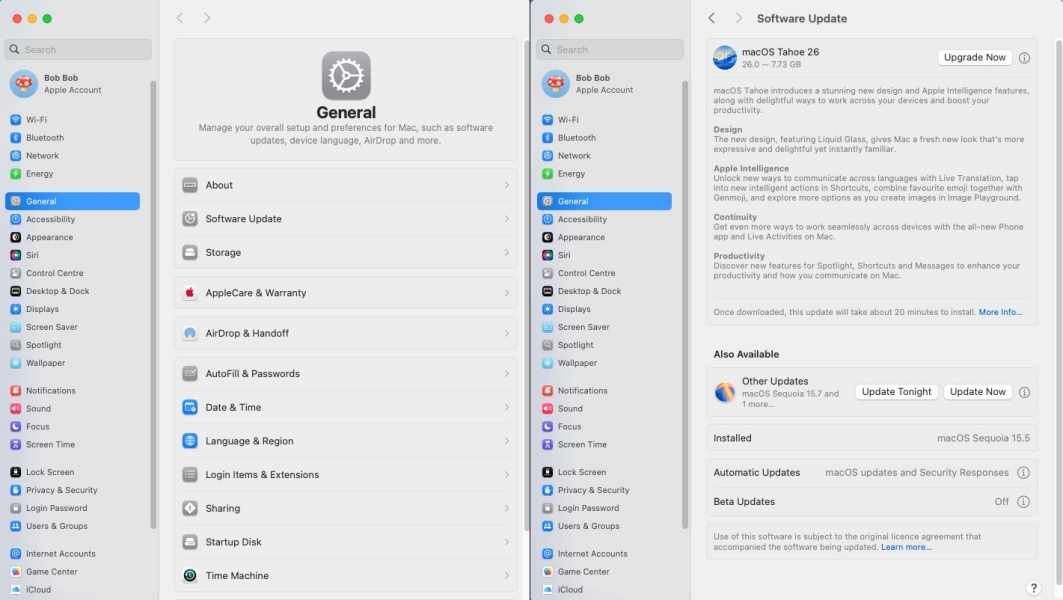
Step 1. Go to System Settings > General > Software Update.
Step 2. If an update is available, click Update Now.
Step 3. Restart your Mac after installation.
Solution 3. Check Photos App Permissions
FaceTime photos are usually saved in the Photos app. If the Photos app lacks the necessary permissions, FaceTime may fail to store images. Without this access, captured photos may never appear in your library.

Step 1. Open System Settings and select Privacy & Security > Photos.
Step 2. Make sure FaceTime is allowed access.
Solution 4. Verify iCloud Photos Sync
If you use iCloud Photos, syncing issues may cause FaceTime snapshots to disappear. Sometimes, photos may take time to upload and appear across devices.
Step 1. Go to System Settings > Apple ID > iCloud > Photos.
Step 2. Ensure iCloud Photos is enabled.
Step 3. Wait a few minutes for your library to sync.
Solution 5. Check Storage Space on Mac
If your Mac's storage is nearly full, FaceTime may fail to save images. Maintaining at least 10–15GB free space ensures smooth system performance and photo saving.

Step 1. Go to System Settings > General > Storage.
Step 2. Check available space.
Step 3. Delete unused files or transfer them to external storage if necessary.
Solution 6. Sign out and Sign in Apple ID
Sometimes, account-related glitches may cause FaceTime photos not to save. This step helps determine whether the issue is tied to your account settings.
Step 1. Go to System Settings on your Mac.
Step 2. Click your name at the top of the sidebar.
Step 3. Click Sign Out and follow the onscreen instructions.
Solution 7. Reinstall FaceTime
If FaceTime continues to malfunction, reinstalling may resolve the problem. Reinstalling ensures you're running a clean, updated version.
Step 1. Open Launchpad.
Step 2. Locate FaceTime and remove it.
Step 3. Reinstall from the Mac App Store.
Solution 8. Reset NVRAM/PRAM
If none of the above methods work, resetting NVRAM/PRAM can fix system-level issues. This reset clears temporary glitches that may prevent FaceTime photos from saving.
Step 1. Shut down your Mac.
Step 2. Turn it on and immediately press and hold Option + Command + P + R.
Step 3. Hold the keys for about 20 seconds, then release.
Solution 9. Use Terminal to Reset Permissions
If Photos app permissions are corrupted, you can reset them using Terminal. This will reset permissions for FaceTime, prompting you to grant access again.
Step 1. Open Terminal.
Step 2. Type the command:
Step 3. Press Enter.
Part 4. Where Do FaceTime Photos Go on iPhone/iPad/Mac?
FaceTime photos are automatically saved to the Photos app on all Apple devices. If you can't find them, check the Recent Days or FaceTime album. You can also jump to a specific month using the timeline at the bottom for easier access. Ensure you're signed into iCloud with the correct Apple ID and have iCloud Photos enabled. Here's how to access FaceTime photos on Apple devices.
How to Find FaceTime Photos on iPhone/iPad
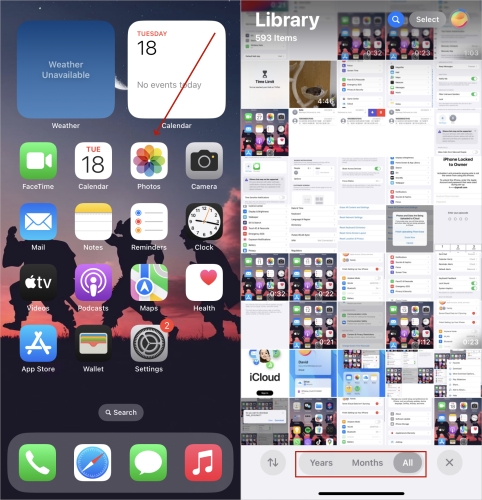
Step 1. Head to the Photos app on your iPhone or iPad.
Step 2. Tap Collections and select Recent Days to find the FaceTime photos saved.
Step 3. You can also swipe up in Library to search for a FaceTime photo album.
How to Find FaceTime Photos on Mac
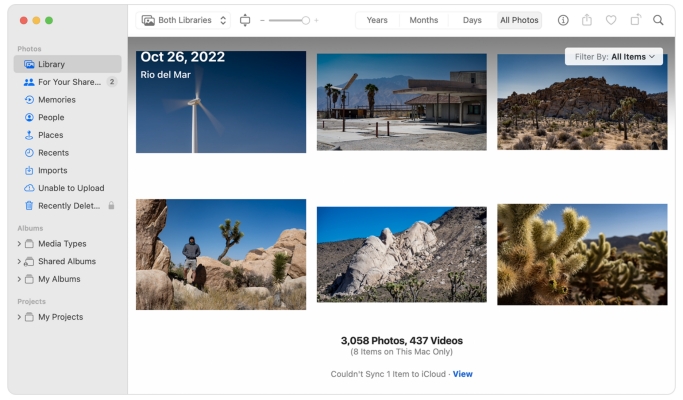
Step 1. Switch to Photos on your Mac.
Step 2. Choose Media Types > Live Photos to check the FaceTime photos.
Step 3. You can also directly check the FaceTime pictures from Library or Recents.
Part 5. FAQs about FaceTime Photos
Why are my FaceTime photos horizontal?
It is because you were holding phone sideways in landscape orientation, when you took the photo. To ensure your photos are portrait, hold your phone vertically before taking the shot. If your photos are already horizontal, use the rotate tool in the Photos app to fix the issue.
How to get FaceTime photos that didn't save?
FaceTime photos not saving may result from full storage or disabled iCloud backup. You can check the FaceTime app itself, as sometimes photos are saved there. If they're not, you can also ask the other caller to resend the photo if they took it.
How to enable FaceTime photos on both devices?
To enable FaceTime photos on both devices, you just need to turn on FaceTime Live Photos in the device's settings. Make sure that this feature is available in the place where you live.
Why is FaceTime live photos greyed out?
FaceTime Live Photos may be greyed out if either participant has disabled it in FaceTime settings. Additionally, restrictions under Screen Time > Content & Privacy Restrictions could block it. A temporary glitch or a missing FaceTime update can also cause the feature to become unavailable.
Part 6. Conclusion
In conclusion, there could be several reasons behind the FaceTime photos not saving issue. However, with the right troubleshooting steps, you can fix the issue with ease and ensure that your cherished moments are safely stored. Try to use MagFone iOS System Recovery, and you'll be able to fix the issue as soon as possible. If all else fails, don't hesitate to reach out to Apple support for further assistance.

Teresa Miller
Editor in chief