Woke up this morning to find both faceid and passcode are not being recognized. Tried using my watch to unlock, tried several times with faceid and the CORRECT passcode (which didn't change overnight!)....and now faced with the 1-hour lock screen. I know the 16.5.1 update was pushed out last night and automatically updated....and can only think this is what caused it. Anyone facing similar issues? How do I get into my phone?!?!"
—— From the Apple Community
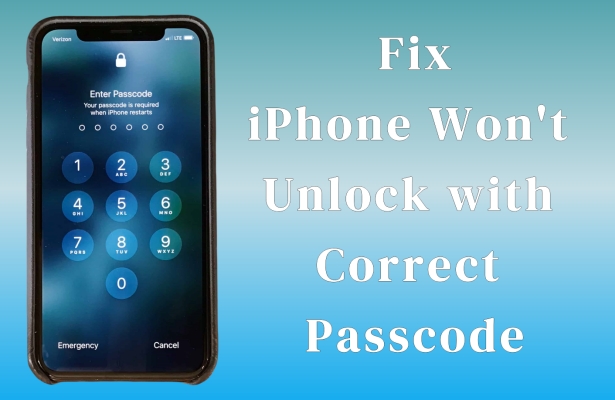
The iPhone is a vital part of our daily lives, keeping us connected. But many users reported that they can't unlock their iPhones with a correct passcode after a restart or update. This frustrating issue can disrupt your routine and leave you scrambling for solutions. So what do you do when it refuses to unlock with the correct passcode?
Fortunately, this problem isn't as uncommon as you might think, and there are several effective ways to address it. This guide outlined nine workable methods to fix the iPhone won't unlock with correct passcode issue. The table below provides a quick comparison of these methods, helping you choose the one that best suits your situation and needs.
| Methods | Data Loss | Needs Apple ID | Needs Computer | iOS Requirement |
|---|---|---|---|---|
| Restart iPhone | ✔️ | ❌ | ❌ | All versions |
| Previous Passcode | ✔️ | ❌ | ❌ | iOS 17+ |
| Try Later | ❌ | ❌ | / | All versions |
| Lock Screen | ❌ | ✔️ | ❌ | iOS 15.2+ |
| iCloud.com | ❌ | ✔️ | ❌ | iOS 13+ |
| Find My App | ❌ | ✔️ | ❌ | iOS 13+ |
| iTunes | ❌ | Maybe | ✔️ | All versions |
| Recovery Mode | ❌ | ❌ | ✔️ | All versions |
| A Passcode Unlocker | ❌ | ❌ | ✔️ | All versions |
- Part 1. Why Won't My iPhone Unlock with the Correct Passcode?
- Part 2. How to Fix iPhone Won't Accept Correct Passcode [No Data Loss]
- Part 3. How to Fix iPhone Won't Unlock with Correct Passcode [Data Loss]
- Part 4. How to Fix iPhone Won't Unlock with Correct Passcode with Ease
- Part 5. Conclusion
Part 1. Why Won't My iPhone Unlock with the Correct Passcode?
It may sound strange, but the issue of an iPhone not unlocking with the correct passcode does sometimes occur among iPhone users. According to Apple users, this issue mainly happens after setting a new passcode, after a software update, or after the iPhone restarts following a drained battery. This issue may stem from software glitches during an iOS update, temporary device errors, or hardware damage.
Part 2. How to Fix iPhone Won't Accept Correct Passcode [No Data Loss]
Using the correct passcode but still being unable to unlock your iPhone can be frustrating. In many cases, this happens due to minor software glitches or input errors. This section outlines three straightforward methods to resolve the issue while retaining your data.
Method 1. Restart Your iPhone
Restarting your iPhone is one of the easiest ways to resolve temporary glitches. It refreshes the system and can often fix passcode-related errors. By simply powering off and restarting your device, you might regain access with your correct passcode. This approach is quick to perform.
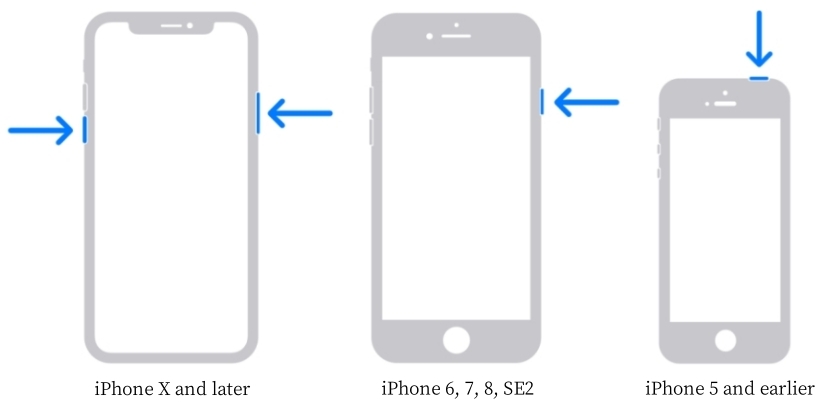
- iPhone X + models:
- iPhone X – models:
Step 1. Push the Power button (or Side button) along with the Volume Up button until the power-off slider shows.
Step 2. Press and move the slider to shut off your iPhone. Wait until the device completely shuts down.
Step 3. After a few seconds, push the Power button again until the iPhone restarts.
Step 1. Long-press the Power button until the power-off slider appears.
Step 2. Drag the slider to shut off your iPhone.
Step 3. After the iPhone completely shuts down, long-press the Power button to restart.
Method 2. Use the Previous Passcode
For users who have just reset the iPhone passcode in the past 72 hours and the iPhone won't unlock with the correct passcode, you may use the previous passcode to unlock it. This works only on iOS 17 and new versions.
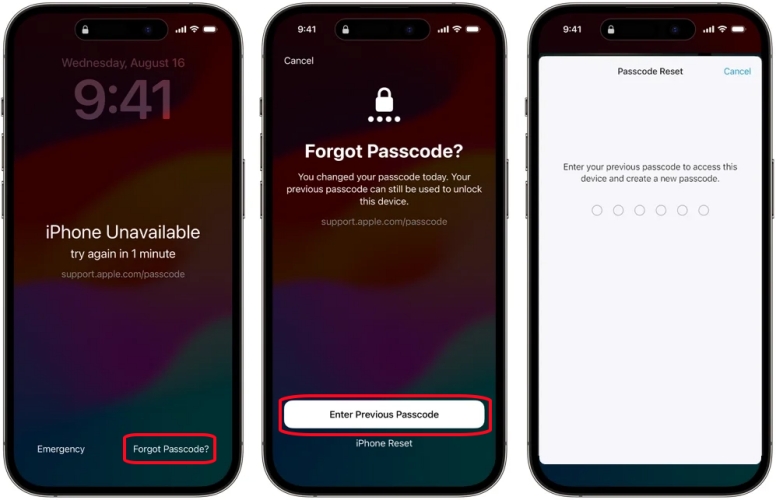
Step 1. Repeatedly type your passcode to wake up the iPhone Unavailable screen.
Step 2. Tap Forgot Passcode? at the bottom of the screen.
Step 3. Tap Enter Previous Passcode on the next page and input the previous passcode.
Step 4. After that, the iPhone will ask you to set another screen passcode.
Method 3. Try After an Unavailable Timer or Try Later
Some users have reported that they were able to use the passcode to unlock their iPhones after waiting through several iPhone Unavailable timers. Others have reported that they unlocked their iPhones with the passcode after a few hours. So, you can try several failed attempts on your iPhone to trigger an unavailable timer, or try entering the passcode again after a relatively long period of time. Be careful not to reach the maximum number -- 10 failed passcode attempts.
Part 3. How to Fix iPhone Won't Unlock with Correct Passcode [Data Loss]
📌Important:
All methods in this section will erase your iPhone completely. Make sure you have exhausted Part 2 options before proceeding. If you have an iCloud or iTunes backup, your data can be restored afterward.
When passcode issues persist, erasing your iPhone might become necessary. This approach resets your device entirely, allowing you to regain access and resolve deeper software issues. Whether you choose to erase your iPhone directly from the lock screen or use recovery tools like iTunes, each method ensures a clean slate for starting fresh.
Method 1. Erase iPhone on Lock Screen
With the latest iOS updates, Apple introduced an option to erase the device directly from the lock screen. If your iPhone isn't unlocking, this feature allows you to reset the device entirely. Though all your iPhone data will be removed by it, you can restore it from backup later.
For iOS 17 or Later:
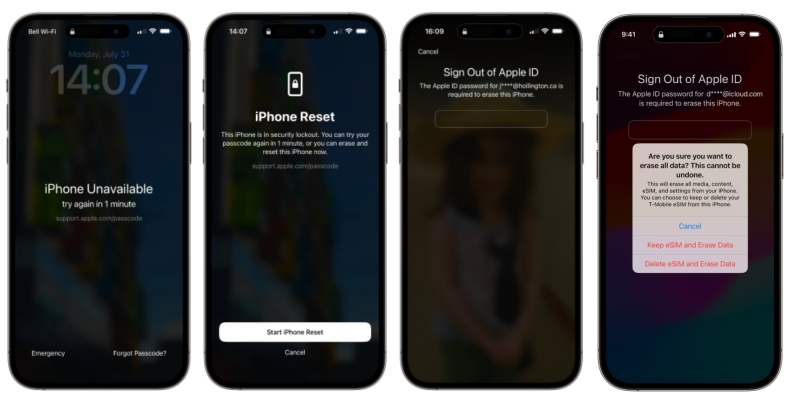
Step 1. Type incorrect passcodes until the iPhone Unavailable screen appears.
Step 2. Hit Forgot Passcode? and then select the Start iPhone Reset button to start the reset process.
Step 3. Next, input your Apple ID password when prompted to sign out of the Apple ID.
Step 4. Confirm the erase. For iOS 17 or later with eSIM, choose whether to retain your eSIM during the reset.
For iOS 15.2 to iOS 16:

Step 1. On the iPhone Unavailable screen, locate and tap Erase iPhone at the bottom corner.
Step 2. Verify by touching Erase iPhone again, then input your Apple ID password to proceed with the reset.
Step 3. Once signed out of your Apple ID, press Erase iPhone and your iPhone will automatically erase all data, including the passcode.
Method 2. Erase iPhone in iCloud.com
iCloud's Find My iPhone feature lets users erase their devices remotely. This method is useful if you're unable to unlock your iPhone and want to reset it securely. Once erased, the screen passcode can be removed at the same time.
Step 1. On another device, enter a browser and sign into iCloud.com with your Apple ID credentials.
Step 2. Pick your iPhone from the device list, then select the Erase This Device or Erase option.
Step 3. Input an optional phone number and your Apple ID password to confirm when prompted, and the erasing will begin if there is a network on your iPhone.
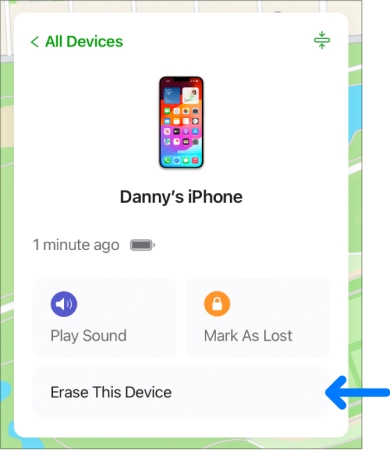
Method 3. Erase iPhone on Find My App
If you have another Apple device, such as an iPad or another iPhone, the Find My app provides a convenient way to erase your locked iPhone. This approach is particularly handy when you don't have access to iCloud.com.
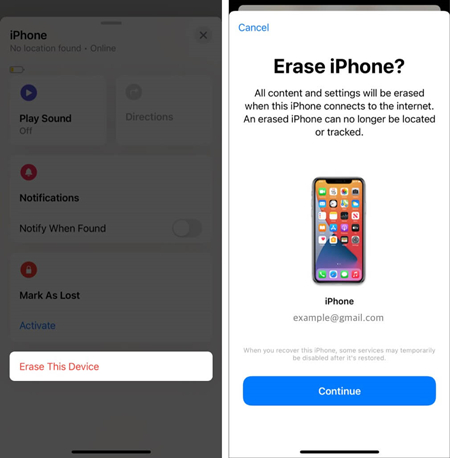
Step 1. Fire up the Find My app on another Apple device and then switch to the Devices tab.
Step 2. Locate your iPhone in the device list and tap it to view available options.
Step 3. Tap Erase This Device or Erase and confirm your choice by tapping Continue.
Step 4. Then, put a required phone number and your Apple ID password to begin erasing.
Method 4. Restore iPhone via iTunes
Using iTunes, you can reset your iPhone to its factory settings. This process removes the passcode and all data, providing a clean state for setting up your device. This works on a trusted computer and iTunes. And be sure to back up your data beforehand to avoid losing important information.
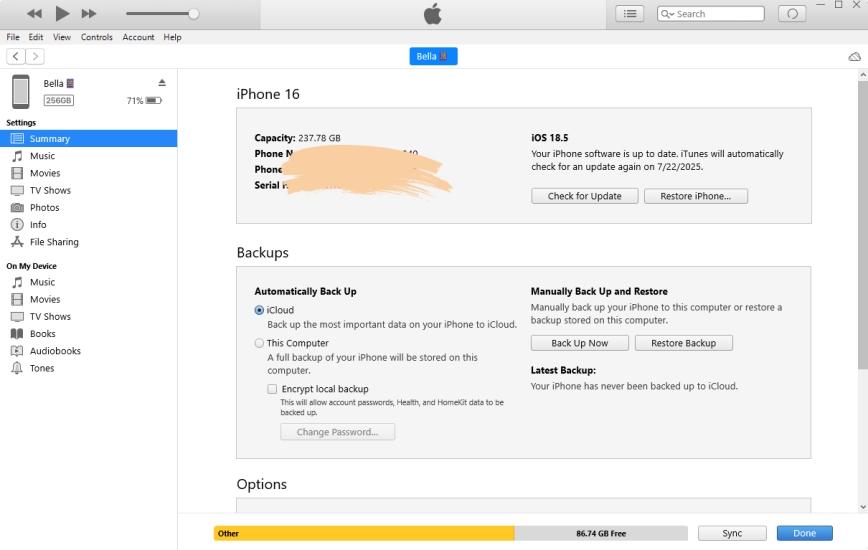
Step 1. Fire up iTunes on your computer and click the iPhone icon.
Step 2. Tap Summary and then hit Restore iPhone.
Step 3. Then follow the onscreen instructions and wait for the process to complete.
Method 5. Restore iPhone in Recovery Mode
If you haven't trusted your computer ahead, then you can restore your iPhone in recovery mode. By connecting your iPhone to a computer and entering recovery mode, you can restore the device and resolve underlying system errors that may be causing the passcode issue.
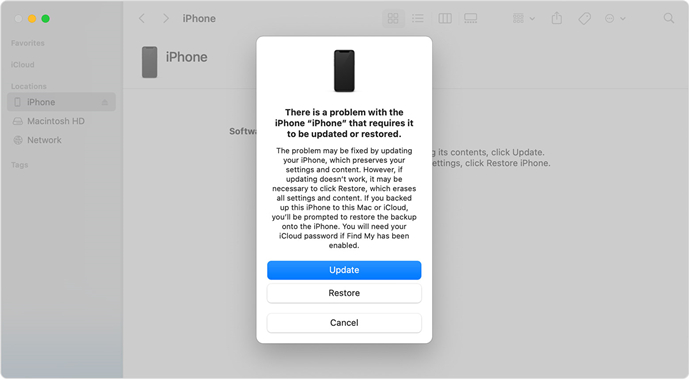
Step 1. Use a USB cable to link a computer with Finder or iTunes to your iPhone.
Step 2. Enter recovery mode by pushing the appropriate buttons.
- iPhone 8 or later: Quickly press and release the Volume Up button, then quickly press and release the Volume Down button, then press and hold the Power button until the Recovery Mode screen appears.
- iPhone 7 Series: Press and hold the Volume Down button and the Power button at the same time until the Recovery Mode screen appears.
- iPhone 6s or earlier: Press and hold the Home button and the Power button together until the Recovery Mode screen appears.
Step 3. Launch Finder or iTunes, and your computer will appear with Restore or Update.
Step 4. Select Restore to erase your iPhone, and then wait for the process to finish.
Part 4. How to Fix iPhone Wont Unlock with Correct Passcode with Ease
Are you looking for a quick way to resolve passcode issues? MagFone iPhone Unlocker is an effective solution for fixing passcode-related issues, even when your iPhone won't accept the correct passcode. This tool is designed to bypass locks, remove forgotten passcodes, and address glitches that hinder unlocking. In addition, it can manage passwords on your iPhone, including Wi-Fi passwords, website and app passwords, email credentials, and Apple ID password. Its intuitive interface ensures a quick and efficient process. With MagFone, you can fix the issue of your iPhone not unlocking with the correct passcode easily and regain access to your device.
MagFone iPhone Unlocker
Fix iPhone not unlocking with correct passcode, without needing passcode and Apple ID password.
Step 1 Run MagFone and Link the iPhone
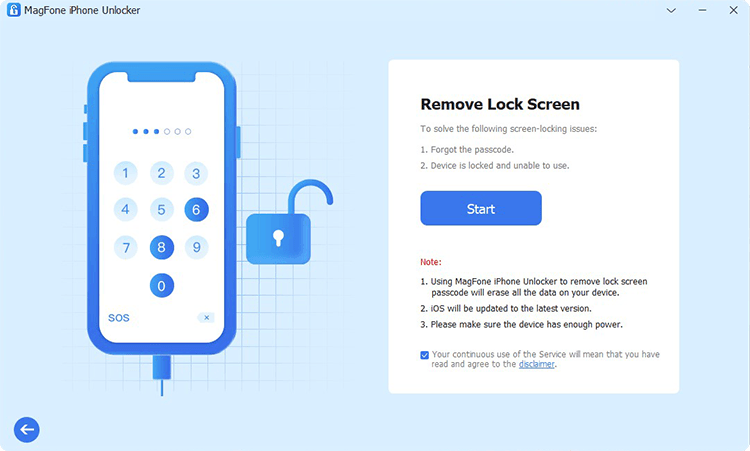
Fire up the MagFone iPhone Unlocker on a PC first. Then use a USB cable to link your iPhone and that PC. Pick the Unlock iOS Screen tab on MagFone's main interface, and then click the next arrow to initiate the process.
Step 2 Switch to Recovery or DFU Mode
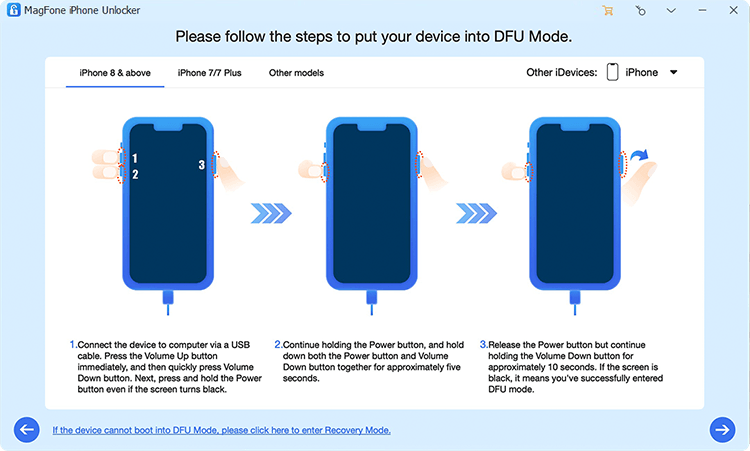
MagFone program will prompt you to get your iPhone into Recovery Mode manually. Follow the steps displayed on the screen. If Recovery Mode cannot be activated, you'll be guided to use DFU Mode instead.
Step 3 Verify and Download Firmware Package
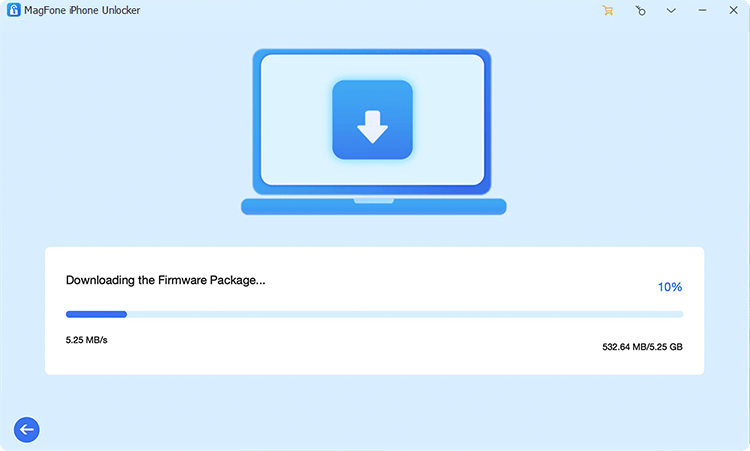
MagFone will detect your device details when your iPhone is in Recovery or DFU mode. Ensure the displayed information is accurate, correct it if needed. Next, click the Download button to acquire a proper package.
Step 4 Bypass Your iPhone Passcode
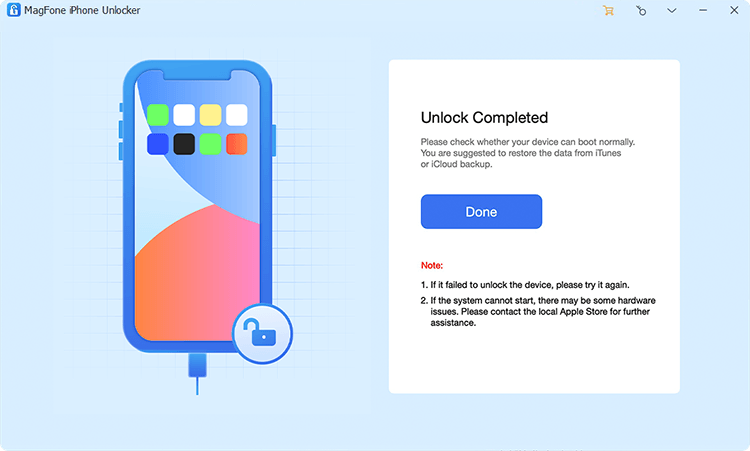
After downloading the firmware successfully, select the Unlock button to initiate the process. MagFone will bypass the passcode in a few moments. Once completed, your iPhone will be ready to use without requiring a passcode.
Part 5. Conclusion
If your iPhone won't unlock with the correct passcode, it can disrupt your day-to-day use. Several factors could cause this issue, ranging from incorrect passcode entry to system errors. Correspondingly, there are multiple approaches to resolve this, from simple steps like restarting to more advanced methods involving erasing the device or using third-party tools for a smoother fix.

Teresa Miller
Editor in chief