
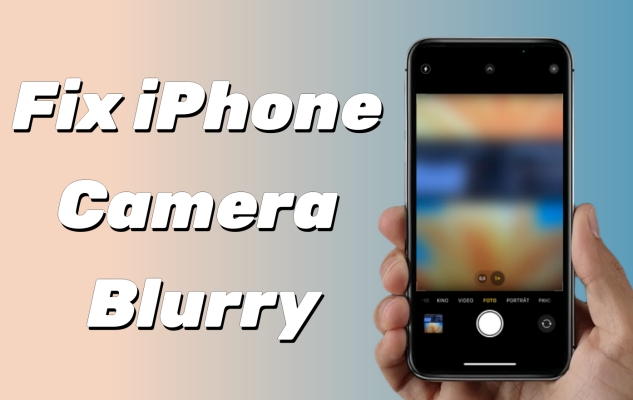
"My iPhone camera is blurry!" Many iPhone users exclaim when they can't focus on the camera. Someone suspected the iPhone was damaged, but strangely, upon inspection, no cracks were found. Whether you are using the latest iPhone 17 Pro or an older model like iPhone 11, a blurry camera is one of the most complaints, especially after installing the new iOS update. So, what exactly causes the iPhone to become blurry when shooting? How can you quickly restore the camera to normal? Continue reading this guide to find answers.
- Part 1. Why Is the Camera on My iPhone Blurry?
- Part 2. Easy Fixes to Camera on iPhone Is Blurry
- Part 3. How to Fix iPhone Front/Rear Camera Blurry
- Part 4. Conclusion
Part 1. Why Is the Camera on My iPhone Blurry?
Having a blurry camera on your iPhone can be incredibly frustrating, especially when you're trying to capture a fleeting moment. While cleaning your lens is the standard advice, the reality is that several factors can cause the iPhone camera is blurry. Here we will explore common cases and exact causes of iPhone camera blurry.
1.1 Common Cases of iPhone Camera Blurry
In the Apple Community, we have found that many users are troubled by the issue of the iPhone camera not being able to focus. For numerous posts, three most common cases are as follows.

Case 1. iPhone Camera Blurry All of a Sudden
The camera feature on your iPhone works properly, and the photos taken are clear and realistic, with high quality. But all of a sudden, the camera is blurry when taking a photo. You don't know what to do because you're unsure if it's due to setup issues or hardware errors.
Case 2. iPhone Camera Blurring and Deblurring
After the iOS 26 update, you may notice that the camera keeps blurring and deblurring especially when you zoom lot. It is really frustrating that you do not have a decent zoom photo that is not blurry. The issue may exist in the iOS update or the camera has broken.
Case 3. iPhone Camera Blurry and Shaky
A user bought a preowned iPhone with problems in back camera and normal camera. The camera is blurry and shaky, and sometimes there is even a shutter sound and flash. If you're facing the same issue, keep reading to find the reasons and solutions.
1.2 Exact Causes of Camera on iPhone Blurry
The reason for the iPhone camera blurry is usually because there is something dirty on the lens or accessories like the case that hinders focusing. Besides, improper camera settings and minor system glitches may lead to blurry bugs in the camera. As there are different cases of iPhone camera blurry, use this quick checklist to identify what's causing your blurry camera.
| iPhone Camera Blurry | Exact Causes |
|---|---|
| Blurry Front Camera Only | Screen protector blocking the lens Smudges or fingerprints on the front lens Autofocus confusion in low light Software bug affecting selfies only |
| Blurry Rear Camera Only | Lens scratches or impact damage Dirt or condensation inside the lens Autofocus failure due to software conflicts Low light conditions causing motion blur |
| Blurry Photos But Clear Videos | Incorrect focus point when capturing still images Overexposed lighting affecting photo sharpness Motion during shutter capture, especially in low light |
| Blur Only After an iOS Update | Camera processing bugs introduced by the update Cached settings interfering with autofocus behavior Third-party camera apps conflicting with system changes |
1.3 Camera Blurry on Some Specific Models
From the advanced AI processing of iPhone 17 series to the aging hardware of an iPhone, users encounter the issue of camera blurry in different situations. For different iPhone generations, the primary cause of blur and recommended fix is different. It is necessary to break down why the camera is blurry on your specific iPhone model.
| iPhone Model | Primary Cause of Blur | Recommended Fix |
|---|---|---|
| iPhone 17 Series | AI Processing Bugs | Update iOS or disable "Faster Shooting" |
| iPhone 14 - 16 Series | Macro Focus Distance | Enable "Macro Control" in the Settings |
| iPhone 11 - 13 | OIS Hardware Failure | Check for "rattling" or avoid high vibrations |
| All Models | External Interference | Remove cases or accessories |
Part 2. Easy Fixes to Camera on iPhone Is Blurry
Most "blurry iPhone camera" issues are caused by external factors or minor bugs that we often overlook in our daily rush. Before diving into technical solutions, try these fast solutions that resolve the majority of blurry camera issues in just a few minutes.
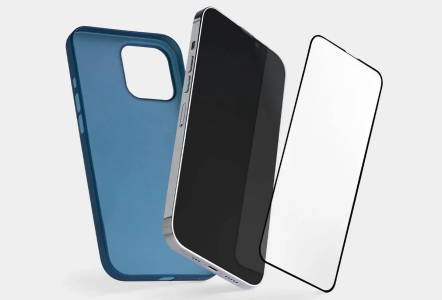
Method 1. Remove Accessories
Some protective cases or lens covers can partially block the camera or confuse autofocus sensors. When the iPhone detects an obstruction that is too close, the picture on the camera will become blurry. Magnetic lens holders or lens converters also have a certain impact. Remove any accessories and take a test photo to see if sharpness improves.
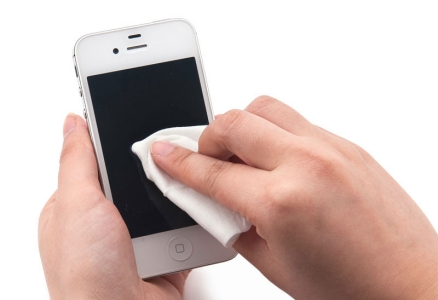
Method 2. Wipe Camera Lens
Some solids or liquids can also be the culprits of iPhone camera blur. When your camera lens gets stuck with some dirty solids, or when you wash your hands and get water on your iPhone, the iPhone will also take blurry photos. This principle is similar to the cover of an unfit iPhone case. You can use dry fiber cloth to clean the iPhone lens.
Method 3. Restart the iPhone
If you open the camera app on your iPhone and find it lagging or blurry, it may be that multiple pages are running in the background and the system is unresponsive, causing the camera to malfunction. Follow these steps to restart your iPhone to fix this issue.

Step 1. Get into Settings > General and tap Shut Down.
Step 2. Drag the slider from left to right, then wait 10 seconds.
Step 3. Turn it back on and test the camera again.
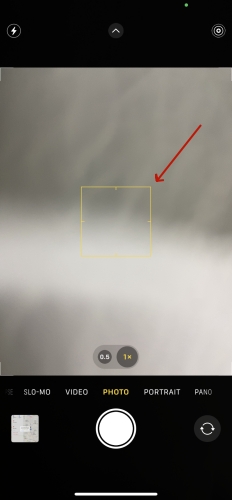
Method 4. Select Focus Point
Some users may not always use manual focusing in their daily lives, but it is indeed workable. Your iPhone may occasionally experience in-focus or out-of-focus, and it cannot automatically determine the appropriate focus, causing a blurry screen. So manually set the focus point. After entering the camera app interface, tap your desired focus position on the screen with your finger.
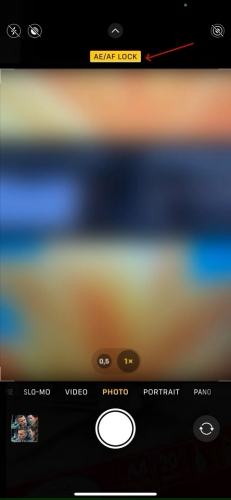
Method 5. Disable the AE/AF Lock
Auto exposure (AE) and Autofocus (AF) can affect the fixed focal length and exposure values in iPhone cameras. It can ensure that your iPhone is always focused on the object that is being photographed. However, as the distance between your iPhone and the subject changes, AE/AF will cause your picture to be blurry. Tap once on the screen to disable the AE/AF on your iPhone.
Part 3. How to Fix iPhone Front/Rear Camera Blurry
If your iPhone camera is blurry, it is often because the iPhone's automated features like lens switching or rapid-fire process are working against the specific shot you're trying to take. Here you can perform some advanced settings to restore a sharp, professional focus. Follow the methods below to fix the iPhone camera blurry caused by camera settings and system bugs.
Method 1. Enable Macro Control
As discussed in our model-specific analysis, newer models like iPhone 13 Pro and later have a larger minimum focal distance. If you get too close, the main lens physically cannot focus, causing a blur. Enabling Macro Control can significantly improve the blurriness of close-up shots.
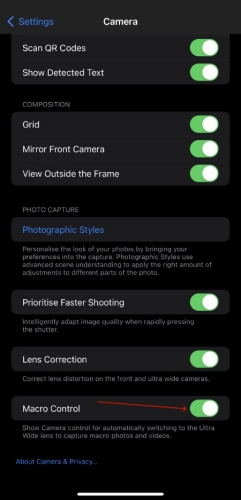
Step 1. Navigate to Settings > Camera.
Step 2. Activate Macro Control.
Method 2. Choose Default Lens
Sometimes, your iPhone tries to be "too smart." While recording video or framing a shot, it may jump between the Wide and Ultra-Wide lenses because it thinks it's helping you focus. This "lens hunting" creates a momentary blur or a "jitter" effect. Go to custom the Main camera lens.
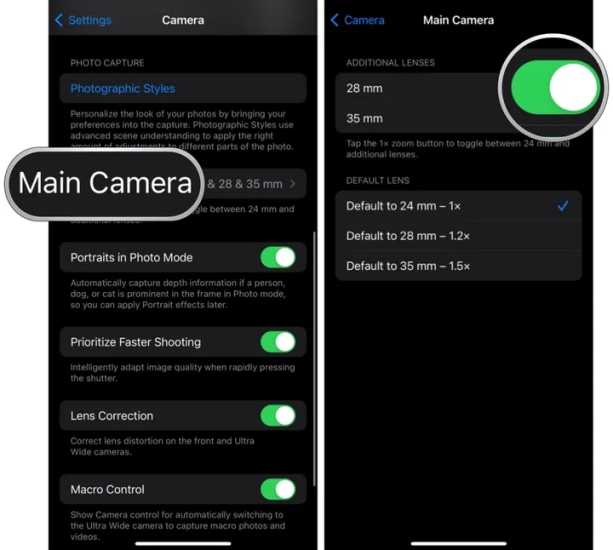
Step 1. Go to the Settings app and tap Camera > Main Camera.
Step 2. Below Additional Lenses, turn on 28 mm and 35mm.
Step 3. Below Default Lens, switch to Default to 35 mm - 1.5x.
Note:
The feature of Main camera lens is only available on a part of iPhone models, including iPhone 15 Pro series, iPhone 16 Pro series, and iPhone 17 Pro series.
Method 3. Adjust Camera Formats
In some cases, the blur isn't a focus issue, but a compression issue. If your phone is set to "High Efficiency" (HEIF/HEVC), it uses aggressive compression to save space, which can sometimes result in a loss of fine detail that looks like a "soft" focus. Just adjust the camera format.
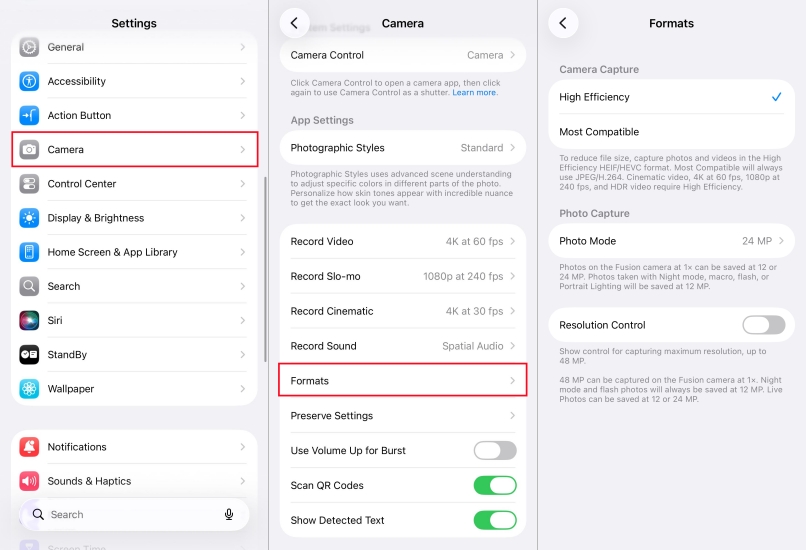
Step 1. Go to Settings > Camera > Formats.
Step 2. Switch from High Efficiency to Most Compatible.
Method 4. Disable Prioritize Faster Shooting
This is a hidden culprit for "blurry" photos when capturing moving subjects or taking several photos in a row. When this setting is on, the iPhone reduces the amount of image processing to allow the shutter to click faster. To fix the issue, disable Prioritize Faster Shooting.
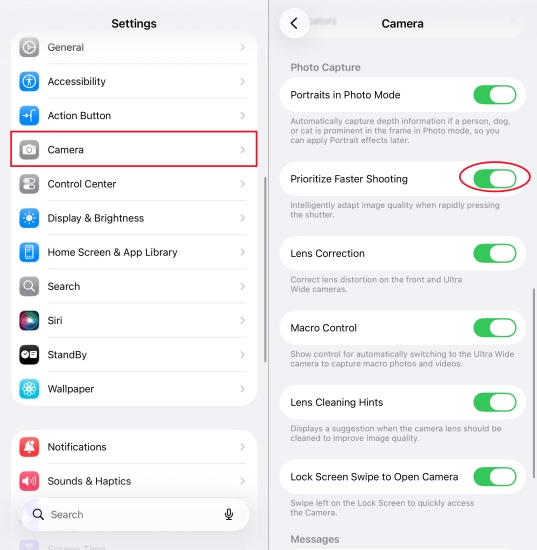
Step 1. Go to Settings > Camera.
Step 2. Toggle off Prioritize Faster Shooting.
Method 6. Reset All Settings
If you have already reset all the Camera settings, but don't know which specific setting went wrong, resetting all settings is also worth trying. Resetting settings can eliminate hidden conflicts affecting autofocus or exposure calculations without deleting personal data.
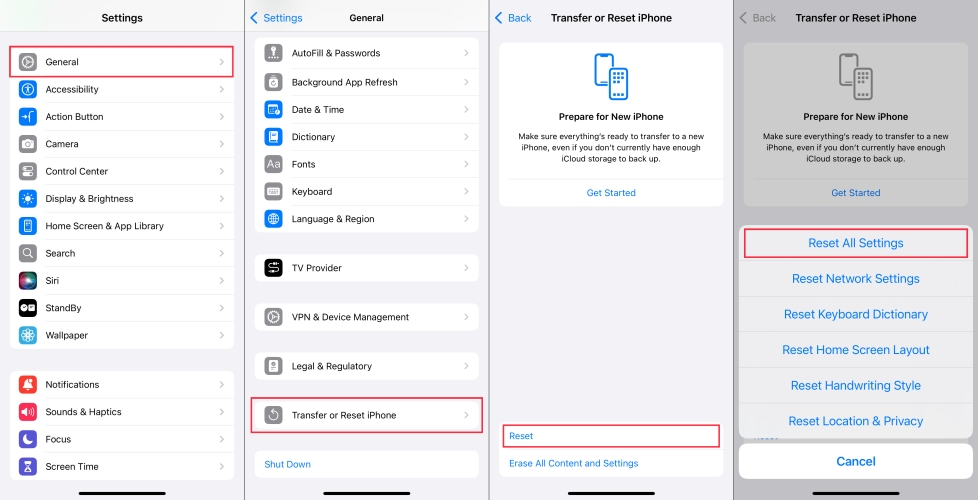
Step 1. Open Settings and tap General > Transfer or Reset iPhone.
Step 2. Tap Reset and select Reset All Settings.
Step 3. Allow to reset with the screen passcode and tap Reset.
Method 7. Update the iOS Version
If blur only appears in specific modes, the issue is likely related to software processing rather than hardware failure. Software updates often include camera performance improvements and bug fixes. Make sure that your iPhone is updated to the latest version.
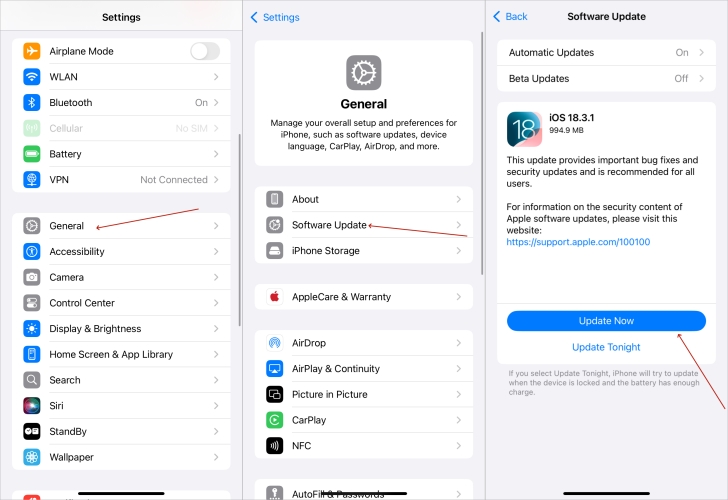
Step 1. Run Settings and tap General > Software Update.
Step 2. Tap Install Now to download the update file.
Step 3. After the downloads, tap Update Now.
Step 4. Enter the screen passcode to confirm the update.
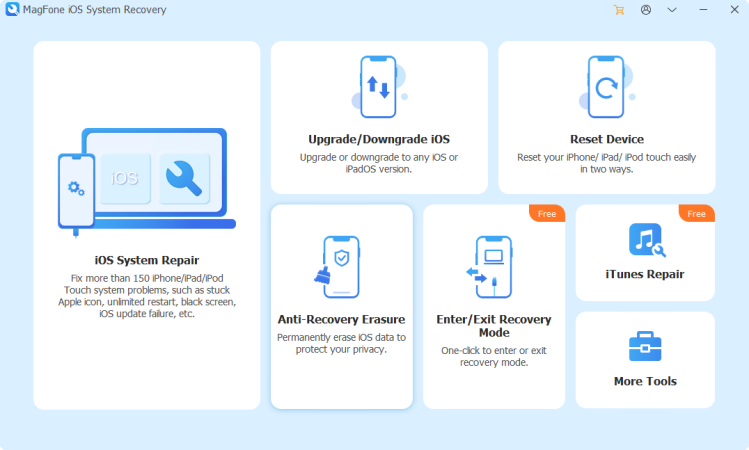
Method 8. Resolve the iOS Issues
Apart from incorrect camera settings, some complicated system bugs or glitches in iOS 26 or 18 can also be a large factor that causes blurry pictures in the camera. To get your iPhone out of this issue, MagFone iOS System Recovery is worth trying. It is a quick fix for more than 150 types of iOS system problems, such as iPhone camera blurry and iPhone camera refocusing. It provides users with two repairing modes, including Standard Repair and Deep Repair. The standard repairing mode can protect your data from losing.
MagFone iOS System Recovery
Fix various iOS and iPadOS system issues, such as black screen, boot loop, frozen screen, or stuck on Apple logo, without data loss.
Step 1Install the MagFone iOS System Recovery
First of all, link your iPhone and computer using a cable. Then, download and launch MagFone iOS System Recovery on a computer and select iOS System Repair tab on the screen.
Step 2Get iPhone into Recovery Mode
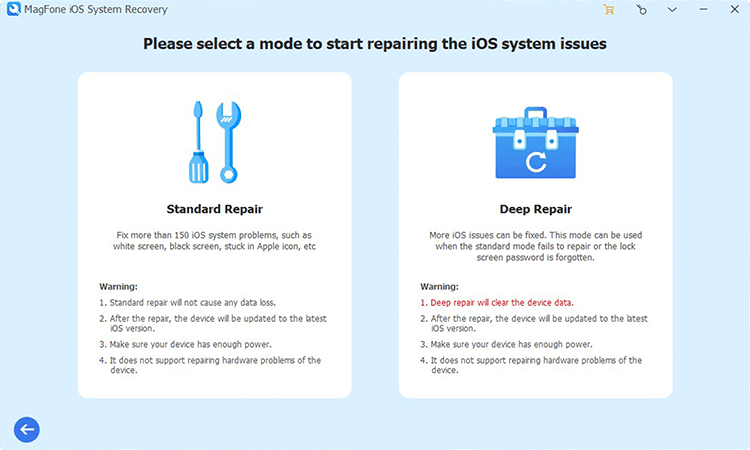
Click the Standard Repair button to save your data. Then you need to put your iPhone into recovery mode or DFU mode manually based on the onscreen instructions.
Step 3Verify the Download Firmware
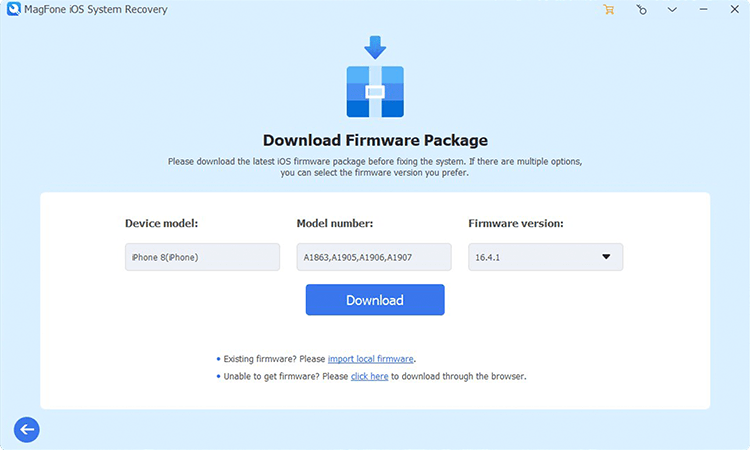
After confirming the information on the screen, you should. Then you should click Download button to download and verify a firmware package.
Step 4Fix the iPhone Camera Blurry
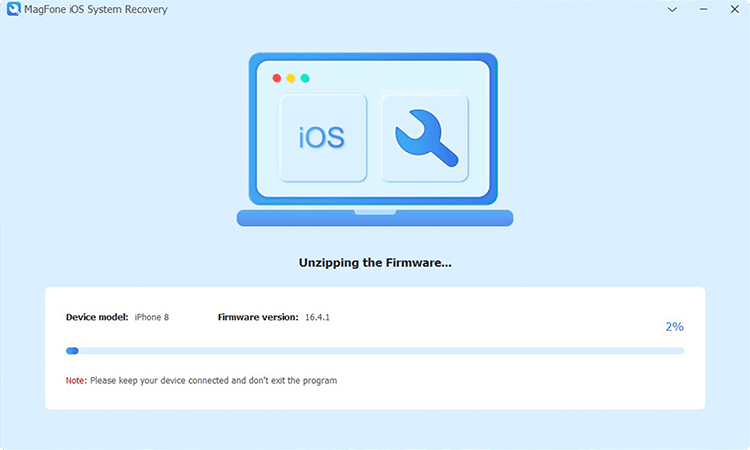
Unzip and verify the firmware package after clicking the Repair button. After that, wait for MagFone to resolve the blurry camera on your iPhone.
Part 5. Conclusion
All the issues, including the iPhone camera becoming blurry suddenly, iPhone camera keeping burring and deblurring, or iPhone camera being blurry and shaky can be fixed with the methods mentioned in this guide. If you have encountered the similar issue, try some simple fixes to check your iPhone first. For those blurry iPhone camera issues caused by complicated system glitches, choose to use MagFone iOS System Recovery to fix the issue efficiently and quickly.

Teresa Miller
Editor in chief