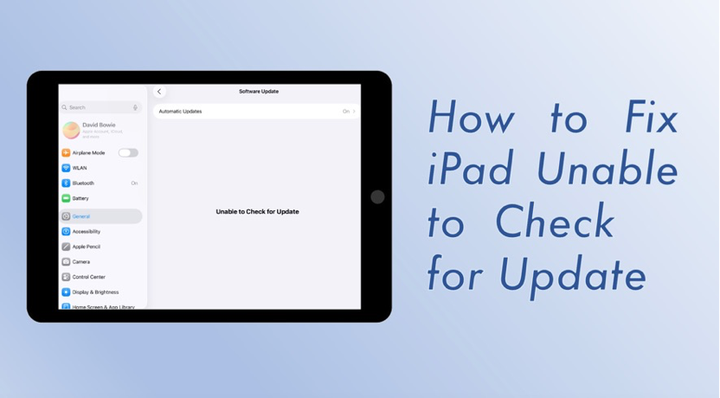
Many users suddenly encounter the embarrassing situation — iPad Unable to Check for Update — after clicking on the iPad notification that there is a system update available. It is really maddening that there is an update available but you are unable to check for update. So what is the problem? This article will reveal the reasons behind it and provide a simple and efficient solution to get your device into the new system smoothly!
- Part 1. Why is My iPad Saying Unable to Check for Update?
- Part 2. How to Fix iPad Unable to Check for Update [Step-by-Step]
- Part 3. How to Update iPad When Unable to Check for Update
- Part 4. Conclusion
Part 1. Why is My iPad Saying Unable to Check for Update?
When your iPad prompts Unable to Check for Update, it may be due to network problems, insufficient device storage space, abnormal system settings, etc. After knowing the reasons, we will teach you how to solve this problem step by step to ensure a smooth system update.
Part 2. How to Fix iPad Unable to Check for Update [Step-by-Step]
After figuring out the root cause of your iPad's inability to check for updates, try following the solutions below to fix the issue efficiently. Or choose to update your iPad directly with your comptuer by using iTunes or a professional iPad upgrade software.
Method 1. Check WIFI Connection
Make sure your iPad is connected to a stable, reliable Wi-Fi network. System update requires Wi-Fi, not cellular data. If you are using a public network, a router with a weak signal, or a restricted network, such as a school or company network, the update request may fail. We recommend that you try the following:

Step 1. Open Settings > WLAN, and confirm that you are connected to the network.
Step 2. Avoid using a VPN or proxy.
Step 3. Try switching to another Wi-Fi network.
Step 4. Restart your router or reconnect to Wi-Fi.
After confirming that the network is normal, re-enter Settings >General > Software Update to see if you can successfully check for an update.
Method 2. Restart Your iPad
If the network connection is normal but it still prompts iPad Unable to Check for Update, you can try restarting the device to clear temporary glitches or cache errors. Restarting is a simple but effective method that often solves system freezes or update failures. The steps are as follows:

For iPads with a Home button: long-press the top power button, slide to power off, and long-press the power button again to power on.
For iPads without a Home button: long-press and hold the top power button and either volume button at the same time, slide to power off, and then power on again.
After waiting for the device to restart, go to Settings > General > Software Update to check if it has returned to normal.
Method 3. Verify Apple's System Status
Sometimes the problem is not with your device, but with Apple's servers. If Apple's system update service is temporarily unavailable, iPad Unable to Check for Update may display. The steps are as follows:
Step 1. Open the browser and visit Apple's official system status page.
Step 2. Check whether services such as iOS Device Activation or Software Update are displayed as green Available on the page.
If the page shows that the service is interrupted or under maintenance, just wait patiently and try to update later.
Method 4. Reset Network Settings
If you have confirmed that Wi-Fi is working, restarting the device does not work, and Apple servers are in good condition, then the problem may be with the device's network configuration. By resetting network settings, you can clear the DNS cache, incorrect network parameters, or old connection records that may cause update failures. The steps are as follows:
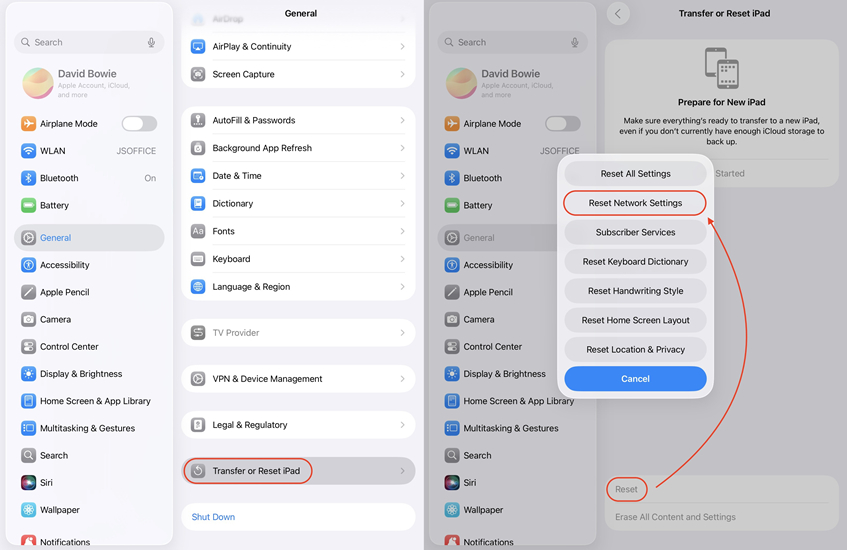
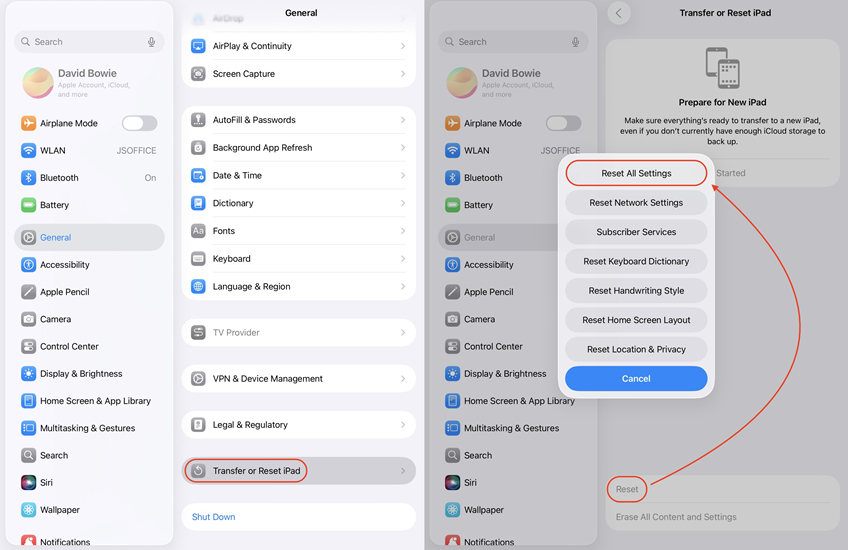
Step 1. Open Settings > General.
Step 2. Pull down to find and tap Transfer or Reset iPad .
Step 3. Select Reset > Reset Network Settings.
Note:
This operation will not delete your data, but it will clear all saved Wi-Fi passwords and VPN settings. Please reconnect to Wi-Fi after resetting and try to check for updates again.
Method 5. Remove Any VPN or MDM Profiles
Some VPN settings or MDM profiles may interfere with the iPad's communication with Apple servers, resulting in an inability to check for updates. If you have VPN apps or MDM profiles installed on your device, it is recommended that you temporarily remove or disable them. The steps are as follows:
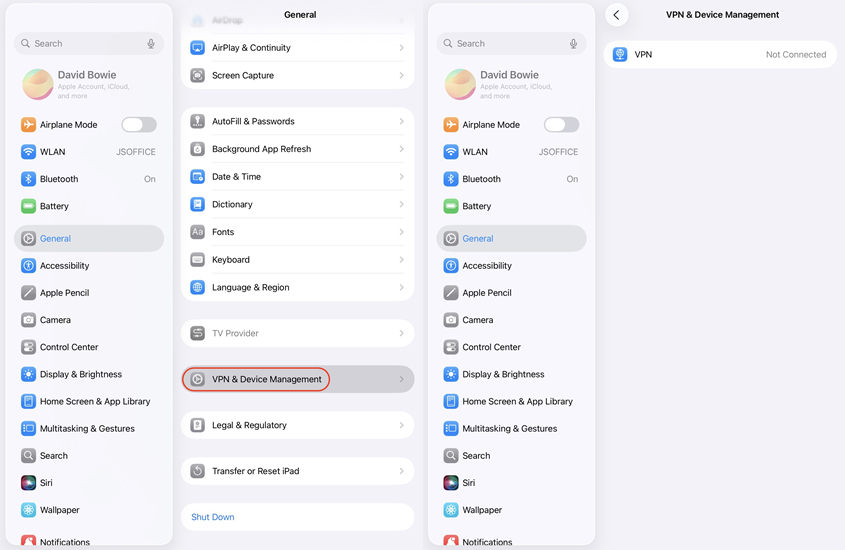
Step 1. Open Settings > General > VPN > Device Management.
Step 2. Check to see if there are any installed VPN configurations or management profiles.
Step 3. Select the unnecessary or suspicious profiles and tap Delete Profile.
Step 4. Restart the iPad and try to check for an update.
It is recommended to turn off VPN first, confirm that the update is successfull, and then restore the connection. If your iPad is limited by MDM and you don't know the removal password, try MagFone iPad MDM removal, a robust tool to remove MDM from iPad without a password instantly.
MagFone iPhone Unlocker
Unlock various locks on iOS devices, including screen locks, MDM, Apple ID, and Activation Lock without needing a password.
Method 6. Ensure Sufficient Storage Space
iPad requires a certain amount of storage space when downloading and installing a system update. If the device storage space is insufficient, it may also cause iPad Unable to Check for Update. The steps are as follows:
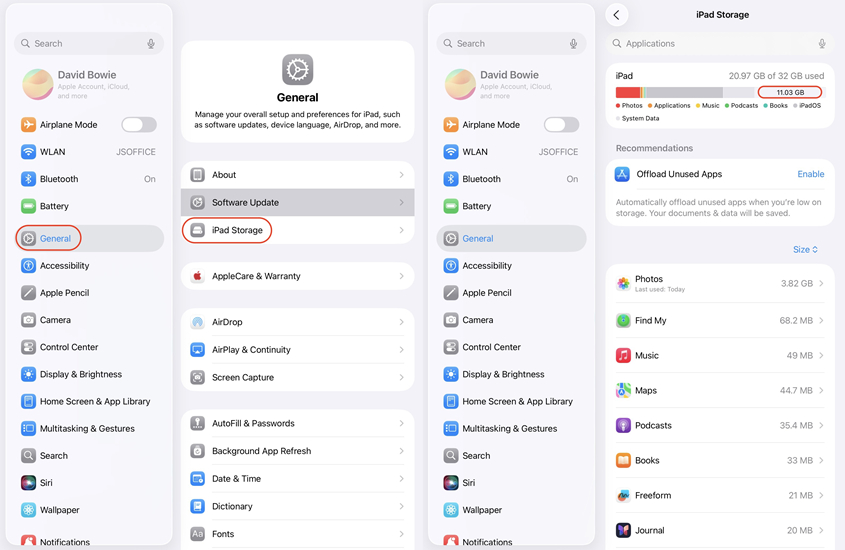
Step 1. Open Settings > General > iPad Storage.
Step 2. Check whether there is enough free space. It is generally recommended to leave at least 5GB of free space.
Step 3. Delete unnecessary apps, photos, videos or files to free up space.
Step 4. After the cleanup is complete, try to check for updates again.
Maintaining sufficient storage space not only helps to smoothly update the system, but also ensures the overall smooth operation of the device.
Method 7. Reset All Settings
If the above methods fail to solve the problem, trying to reset all settings may work. This step will not delete your personal data and apps, but will restore system settings, such as network, privacy, location and notifications to the default state to eliminate potential setting conflicts. The steps are as follows:
Step 1. Open Settings > General > Transfer or Reset iPad.
Step 2. Select Reset > Reset All Settings.
Step 3. Enter the device password to confirm the operation.
Step 4. After the device restarts, try to check for update again.
Please note that after resetting, you need to reconfigure personalized settings such as Wi-Fi passwords and Bluetooth devices.
Method 8. Perform a Factory Reset [Data Loss]
If all the above methods cannot solve the iPad Unable to Check for Update problem, the last resort is to restore the iPad to factory settings. This will erase all data and settings and completely eliminate software-level failures. But be sure to back up important data in advance to prevent loss. The steps are as follows:
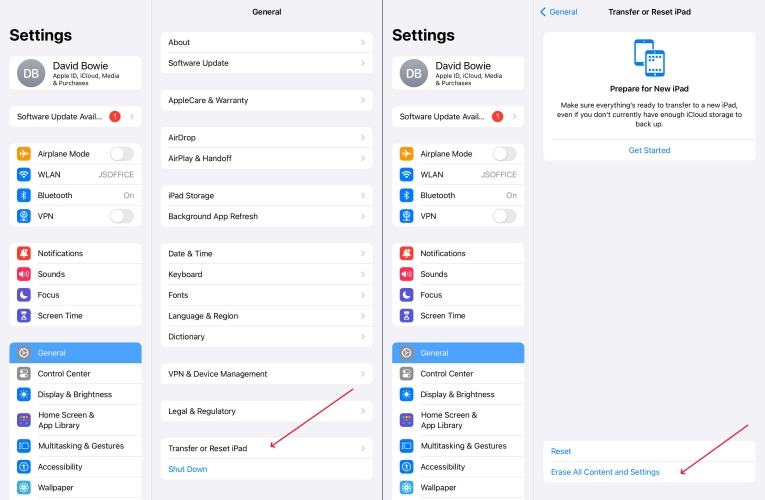
Step 1. Open Settings > General > Transfer or Reset iPad.
Step 2. Select Reset > Erase All Content and Settings.
Step 3. Enter the device passcode and confirm to perform a factory reset.
Step 4. After the device restarts, follow the prompts to complete the initial setup. Try to check for system updates again.
Note:
Factory reset is the most thorough solution and will clear all your data, please back up your iPad data in advance. Or you can choose to use a iPadOS repairing tool like MagFone iOS System Recovery to fix this issue without any data loss.
Part 3. How to Update iPad When Unable to Check for Update iPad
After trying the above solutions, if you still have the iPad Unable to Check for Update error on your iPad, you can update your device from your computer. Two methods are available to update your iPad, including using iTunes or a professional iPad upgrade software. If you prefer a quick and secure upgrade, switch to a professional iPad upgrade software.
Method 1. Restore iPad Using iTunes/Finder
When the iPad displays Unable to Check for Update and the solutions do not work, you can restore and update the device system through iTunes on your computer, or Finder in macOS Catalina and above. The steps are as follows:
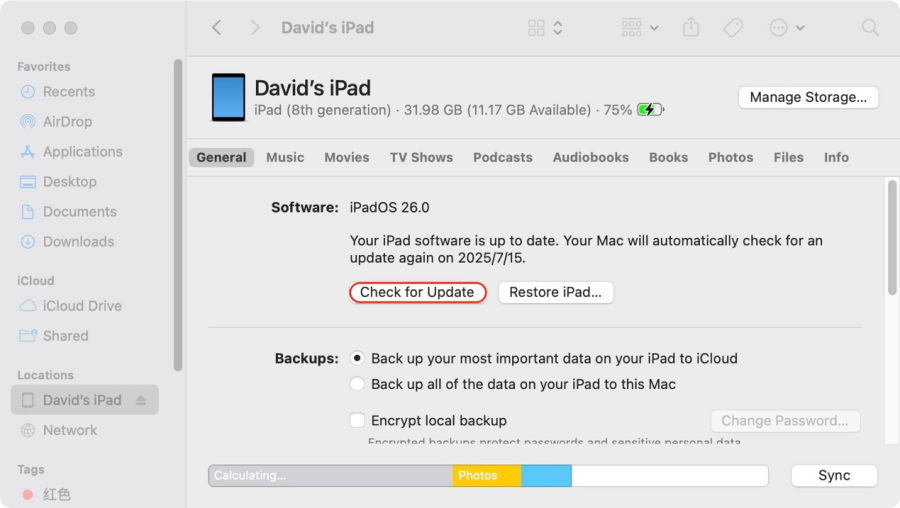
Step 1. Connect the iPad to the computer using a data cable.
Step 2. Open iTunes or Finder and select the iPad device on the left.
Step 3. If prompted, enter the device password and select Trust This Computer.
Step 4. On the device summary page, click Check for Update.
Step 5. Follow the on-screen instructions to complete the operation and wait for the system to download and install the update.
Method 2. Restore iPad Using a Third-party Tool
As well as using iTunes, using a professional iPad upgrade software is an ideal option. MagFone iOS System Recovery is highly recommended to you if the over-the-air update doesn't work. It is a feature-rich, trustworthy tool that not only fixes various iPadOS issues but also offers iPadOS upgrade and downgrade services. With MagFone software, you can bypass several issues that prevent the iPad from checking for updates. Let's see how to update your iPad via MagFone iOS System Recovery with just one click.
MagFone iOS System Recovery
Fix various iOS and iPadOS system issues, such as black screen, boot loop, frozen screen, or stuck on Apple logo, without data loss.
Step 1 Connect iPad to Your Computer
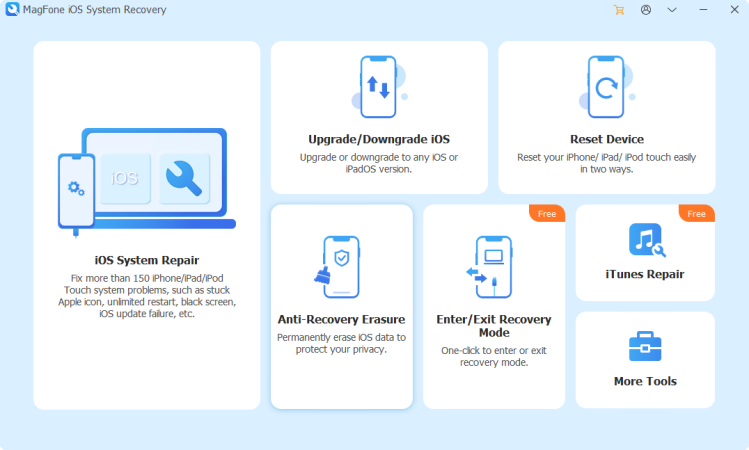
Use a data cable to connect your iPad to a computer, then open MagFone iOS System Recovery software. On the main interface, click the Upgrade/Downgrade iOS option to proceed to the next step.
Step 2 Select iOS Upgrade
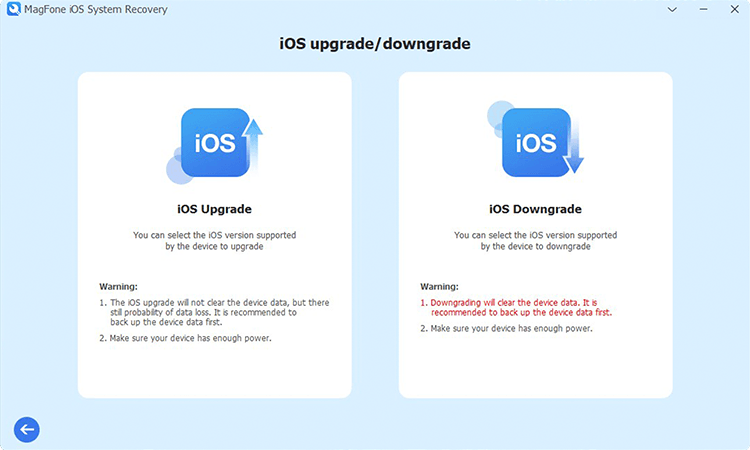
After entering the repair interface, the system will provide an iOS upgrade or downgrade to choose from. Please select the iOS Upgrade.
Step 3 Download the Firmware Package
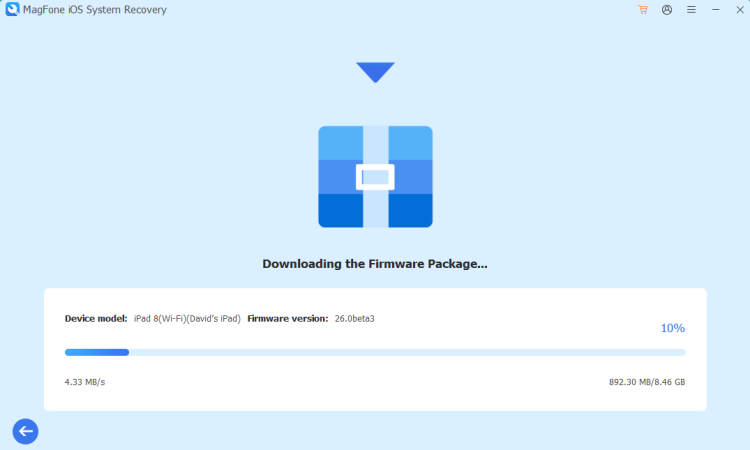
The system will automatically identify the device information, please confirm it is correct. If there is an error, you can modify it manually. After confirmation, click the Download button to start downloading and verifying the firmware package for your device.
Step 4 Fix iPad Unable to Check for Update

After the firmware verification is successful, click the Start Upgrade button and the software will start an update on your iPad. Please keep the device connected to the computer throughout the process until the update is completed.
Part 4. Conclusion
iPad Unable to Check for Update may seem tricky, but most users can quickly resolve it with some simple settings adjustments and troubleshooting methods. If you are also troubled by this problem, why not follow the above solutions once. Solved? Feel free to share with other beta users; still not solved? Leave a message to tell us, your problem may be the answer to others!

Dylan Jones
Editor in chief