
Transferring all your data and settings, including photos, contacts, mails, and more, from your previous iPhone to your new one is easier than ever. If you have already purchased a new iPhone, then you can use Quick Start to transfer data from an used iPhone. However, have you ever been in the middle of transferring data from one iPhone to another and found yourself stuck on the "Preparing to Transfer" screen? Frustrating, right? Fortunately, you're not alone. Don't let this scare you, though. Here we will introduce several helpful methods to fix iPhone stuck on Preparing to Transfer. Let's check the details.

- Part 1. What Does "Preparing to Transfer" Mean?
- Part 2. Why Does My New iPhone Say Preparing to Transfer?
- Part 3. How to Fix New iPhone Stuck on Preparing to Transfer
- Solution 1. Keep Devices Near Each Other
- Solution 2. Restart Your iPhone
- Solution 3. Connect to the Same WiFi Network
- Solution 4. Check for iOS Updates
- Solution 5. Delete Unwanted Data and Files
- Solution 6. Reset Network Settings
- Solution 7. Perform a Hard Reset
- Solution 8. Use an iOS System Repair Tool
- Part 4. Alternative Ways When Transfer Data to New iPhone Stuck
- Part 5. FAQs about iPhone 17/16/15/14 Stuck on Preparing to Transfer
- Part 6. Conclusion
Part 1. What Does "Preparing to Transfer" Mean?
When you use Quick Start, your old iPhone sets up the new device by transferring apps, data, and settings wirelessly. "Preparing to Transfer" is part of the Quick Start data migration process. During this step, your iPhone checks iOS versions, prepares apps and settings, and verifies your WiFi connection. Depending on your data size, WiFi stability, and iPhone models,
- Small data sets may take 5~15 minutes.
- Larger backups may take 1~2 hours.
This stages should only take a few minutes, but if your device stays on "Preparing to Transfer" for more than 2 hours, it's a sign something went wrong. Before diving into reasons and fixes, here's a tutorial video that shows you how to fix iPhone 17/16/15/14/13 stuck on Preparing to Transfer. Or skip this demo video, and move on to reasons and fixes.
Part 2. Why Does My New iPhone Say Preparing to Transfer?
Typically, the issue of iPhone stuck on Preparing to Transfer arises when transferring data during a new iPhone setup, especially if the device is using Quick Start or iCloud. It can also happen during a manual transfer using iTunes or the Finder. However, lots of users cannot figure out the reasons, thus unable to fix the issue in no time. In fact, the issue can be result from the following causes.
Reason 1. Poor or Different WiFi Connection
Provided that you don't have a stable and strong WiFi connection or your devices are not connected to the same WiFi network, then you cannot complete the transferring by using Quick Start or iCloud wirelessly.
Reason 2. Some Unknown Software Glitches
The unknown software issue on your devices can cause that the iPhone keeps saying Preparing to Transfer and processes to hang unexpectedly when you are using Quick Start or iCloud to transfer data from an old iPhone to a new one.
Reason 3. Outdated iOS System on Two Devices
If your two devices are using the different iOS version, then you would encounter the iPhone stuck on Preparing to Transfer issue, which might be why your iPhone gets stuck during the transfer process. In general, a new iPhone comes with the latest iOS version.
Reason 4. Too Far Distance Between Two Devices
When your devices are not close together, the iPhone stuck on Preparing to Transfer issue would happen. In the process of transferring data, keeping two iPhones close together is a must. You have to turn on your new device and place it near your current device.
Reason 5. Insufficient Storage or Hardware Issues
If your new iPhone doesn't have enough storage to accommodate the data being transferred, the process may stall. Always ensure there's plenty of free space on your new device. In rare cases, the problem might be hardware-related, such as malfunctioning component.
Part 3. How to Fix New iPhone Stuck on Preparing to Transfer
If you prefer a text guide instead of the video demo, in this part, we'll outline the detailed steps from the video, along with additional solutions that may help resolve the issue. By following these methods, you can quickly fix the new iPhone stuck on preparing to transfer. Once resolved, you can proceed with using Quick Start, iTunes, or iCloud to complete your transfer. Let's go through the steps you need to take to get your iPhone working again.
Solution 1. Keep Devices Near Each Other
To use Quick Start for wireless transferring, your two iPhones should be in close proximity to each other. When the distance between devices are too far, then the iPhone stuck on preparing to transfer. So, bring your current iPhone near this iPhone and keep them plugged into power until the data migration process is complete.
Solution 2. Restart Your iPhone
Often, a simple restart can fix the problem. If you have the issue of iPhone stuck on Preparing to Transfer while transferring data from an old iPhone to a new one, you can just restart your iPhone to fix the issue. Hold down the power button and swipe to turn off your iPhone. After a few seconds, turn it back on and try the transfer again.
Solution 3. Connect to the Same WiFi Network
Make sure that your current device is connected to Wi-Fi and Bluetooth is on. To use Quick Start for wireless transferring, your devices should be under the same WiFi network. When both devices are connected to a different WiFi network, then there will happen the issue that the iPhone keeps saying preparing to transfer. Here's how to.
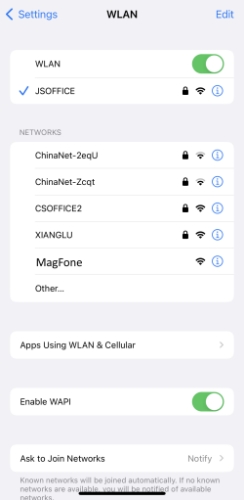
Step 1. Open the Settings app on your iPhone, then tap WiFi.
Step 2. Check whether both devices are using the same WiFi network.
Solution 4. Check for iOS Updates
Quick Start uses your iPhone to automatically set up a new device. When setting up a new device, you can transfer data from your previous iPhone to your new iPhone seamlessly and wirelessly. If you use Quick Start, make sure that your devices are updated to the same iOS version. Therefore, you can go to check the version of iOS on your devices.
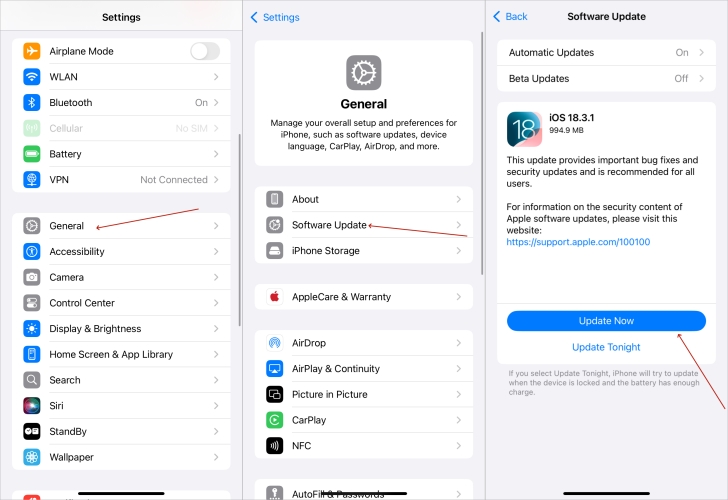
Step 1. Head to Settings > General and tap Software Update.
Step 2. Under Software Update, find whether there is a new update on your iPhone.
Step 3. Select an update and tap Download and Install, then tap Install Now.
Solution 5. Delete Unwanted Data and Files
It will take a long time to complete the transfer of your data from a previous iPhone to a new iPhone, especially when there is a large amount of data to be transferred. iPhone stuck on transferring data is inevitable. In this case, you can delete some unused data and files on your old iPhone. Or you can choose to move your data from your old iPhone to your new iPhone via iCloud or iTunes. Before transferring data, you can make a backup of your previous device as there is a temporary iCloud storage.
Solution 6. Reset Network Settings
Another method to fix this issue is to reset network settings on your iPhone. Sometimes, the original settings of network on your iPhone cannot be adjusted by simply reconnecting a WiFi network. In case, you can choose to reset network settings, which can completely solve the iPhone transferring data stuck issue caused by the network. Here's how to.
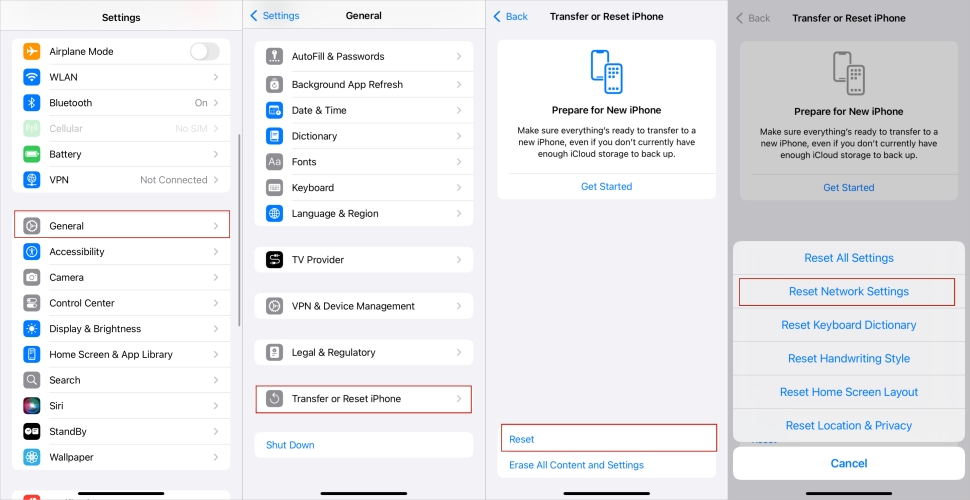
Step 1. Locate Settings on your iPhone, then tap General > Reset or Transfer iPhone.
Step 2. Tap Reset and select Reset Network Settings.
Step 3. Enter your iPhone unlock passcode and tap Reset to reset network settings.
Solution 7. Perform a Hard Reset
Unlike a soft reset, a hard reset can sometimes clear up persistent issues. For iPhones with Face ID, press and quickly release the volume up button, press and quickly release the volume down button, then press and hold the side button until the Apple logo appears. For iPhone with Touch ID, press and hold the power button and the Home button at the same time, then release them when the Apple logo appears.
Solution 8. Use an iOS System Repair Tool
An alternative to all of the above solutions is to use an iOS repair tool. When there is a software glitch related to your device, you can use MagFone iOS System Recovery to resolve the issue. As an extraordinary repair tool, MagFone iOS System Recovery can fix a number of iOS and iPadOS issues without data loss. If your iPhone setup stuck on preparing to transfer, you can follow the four steps below to use MagFone and fix this problem in no time.
MagFone iOS System Recovery
Fix various iOS and iPadOS system issues, such as black screen, boot loop, frozen screen, or stuck on Apple logo, without data loss.
Step 1 Connect iPhone to Computer and Run MagFone
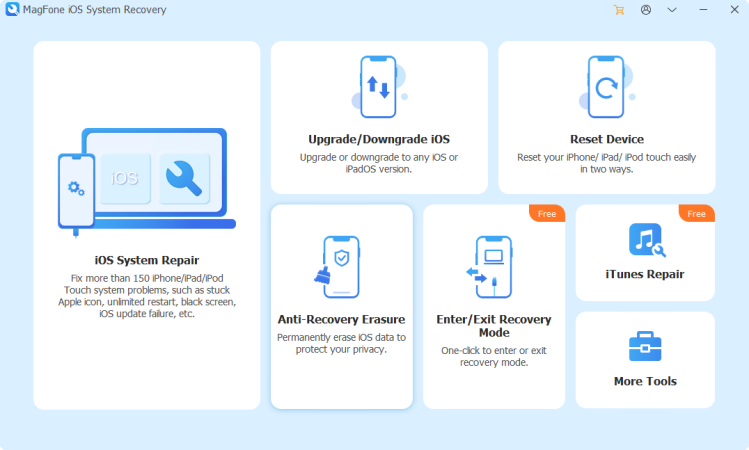
Start by connecting between your iPhone and computer through a USB cable, then open MagFone iOS System Recovery. To fix an iOS issue, you can select iOS System Repair on the main interface of the software, then click the Start button and choose the Standard Repair mode.
Step 2 Go to Put iPhone into Recovery Mode or DFU Mode
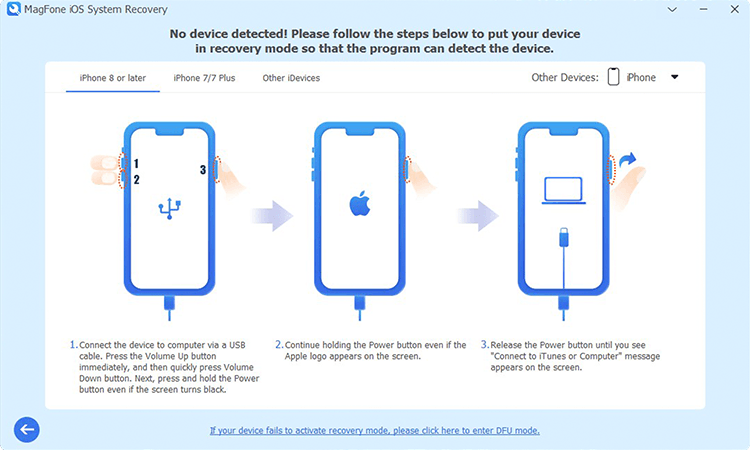
After selecting the Standard Repair mode, follow the onscreen instructions to get your iPhone into recovery mode. If it fails to boot your device into recovery mode, click the link at the bottom of the screen, then you can put your device into DFU mode.
Step 3 Download and Verify the Firmware Package for iPhone
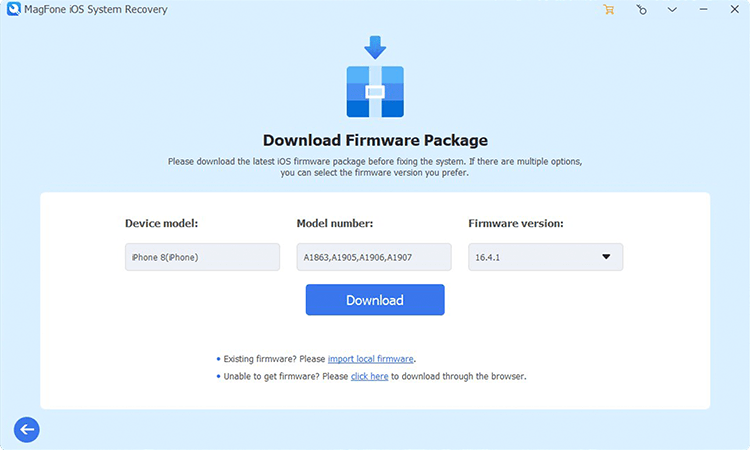
When your device is in recovery mode, you can check the device information shown on the screen. Here you can manually correct the wrong information and select the version of the firmware. Then you can click the Download button to download the firmware package.
Step 4 Start to Fix iPhone Stuck on Preparing to Transfer
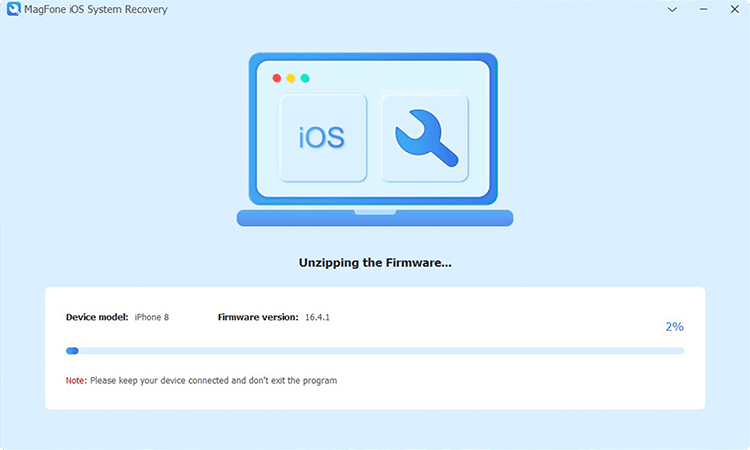
Now you can click the Start Standard Repair button to unzip and verify the firmware package. Then MagFone iOS System Recovery will start fix the iPhone to iPhone transfer stuck on iPhone preparing to transfer. When the process is complete, click the Finish button.
Part 4. Alternative Ways When Transfer Data to New iPhone Stuck
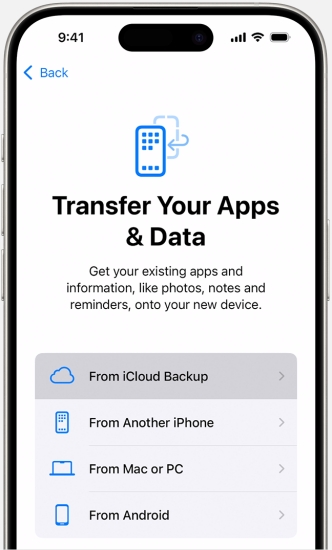
Apple allows you to set up your new iOS device from a backup of your previous iPhone. There are several official methods available for iPhone users to transfer data from old one to new one. In addition to using Quick Start, you can use iTunes or iCloud to transfer your data if you have a backup of your current device. Now follow the steps below to transfer data from old iPhone to new one.
Method 1. Transfer Data to a New iPhone with Quick Start
The quick and easy method you can try is to use Quick Start. With Quick Start, you can wirelessly transfer data to a new iPhone from your current device. Now start to transfer data to your new iPhone with the following steps by using Quick Start.
📝Requirements:
Get iPhone updated to iOS 11 or later
Connect to a stable and good WiFi
Turn on Bluetooth on the iPhone
Place two iPhones together
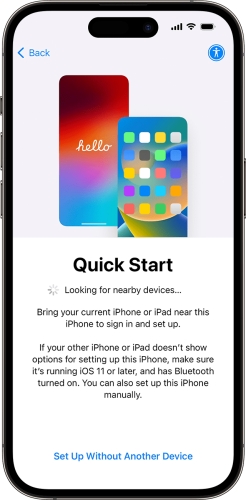
Step 1. On your current iPhone, connect to a WiFi network and turn on Bluetooth.
Step 2. Turn on your new iPhone and place it near your current device.
Step 3. Get started to set up your new device by following the onscreen instructions.
Step 4. On the Apps & Data screen, choose From Another iPhone.
Step 5. Keep your devices near each other and wait for the transfer to complete.
Method 2. Transfer Data to a New iPhone with iTunes/Finder
If wireless methods aren't working, you can use iTunes or Finder to transfer your personal data and purchased content to your new device from a backup that you made. After making a backup of your old iPhone, then you can use iTunes or Finder to transfer and follow the steps below.
📝Requirements:
Have a computer with iTunes
Need a USB cable
Have an iTunes backup of the iPhone
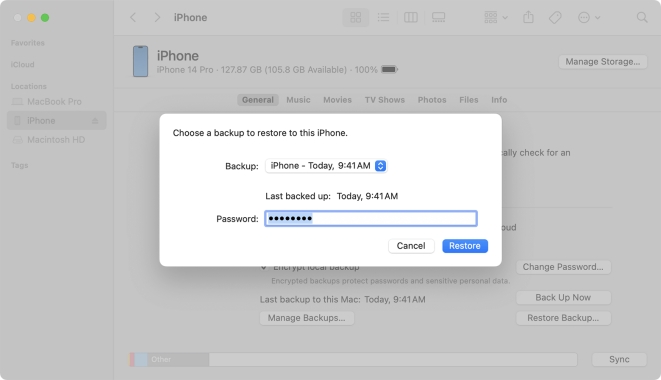
Step 1. Turn on your new iPhone and follow the steps until you see the Apps & Data screen.
Step 2. On the Apps & Data screen, tap Restore from Mac or PC.
Step 3. Connect your device to the computer that you used to back up your previous device.
Step 4. Launch iTunes or a Finder window on the computer and select your device.
Step 5. Select Restore Backup and choose a backup. Keep your device connected to the computer until the rest of the setup steps on your device.
Method 3. Transfer Data to a New iPhone with iCloud
If you have turned on iCloud, all the settings and data on your iPhone will be automatically synced to iCloud. Then when you set up your new iPhone, you can choose to transfer your iCloud backup to your new device. Here's how to transfer data to your new iPhone by using iCloud.
📝Requirements:
Remember an Apple ID and password
Have an iCloud backup of the iPhone
Connect to a good WiFi network
Step 1. Power on your new iPhone and follow the steps until you see the WiFi screen.
Step 2. Select a WiFi network to join and continue to follow the steps.
Step 3. On the Apps & Data screen, tap Restore from iCloud Backup.
Step 4. Sign in to iCloud with your Apple ID and password, then choose a backup.
Step 5. Stay connected and wait for the restore process to finish, then complete the rest of the onscreen setup steps.
Method 4. Transfer Data to a New iPhone with a Cable
In addition to those transferring methods, you can migrate data from your previous iPhone to a new iPhone by connecting the device directly with a cable. To use a wired connection, the cable varies depending on different iPhone models. Here's how to transfer data with a cable.
📝Requirements:
A USB-C charge cable (Between iPhone 15 or later)
A USB-C to Lightning cable (iPhone 14 or earlier to iPhone 15 or earlier)
A Lightning to USB cable (Between iPhone 14 or earlier)
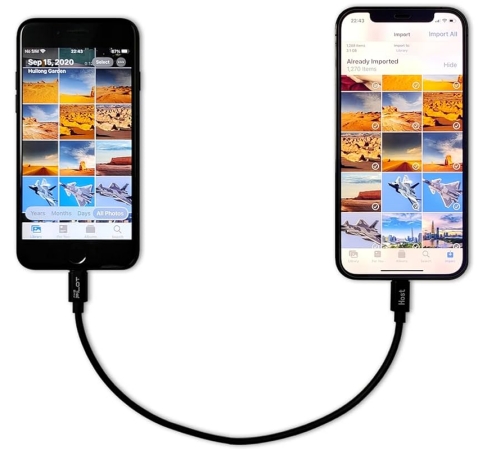
Step 1. Connect your previous iPhone to your new iPhone with a cable.
Step 2. Turn on both devices and follow the onscreen instructions to set up.
Step 3. Connect your new iPhone to WiFi as same as your previous iPhone.
Step 4. Activate the cellular service and set up Face ID.
Step 5. Wait for the transfer to complete on both devices.
Part 5. FAQs about iPhone Preparing to Transfer
-
How long does Preparing to Transfer take iPhone?
It will take around 20-40 minutes to complete the transferring data through Quick Start. So, make sure that you choose a time when you won't need to use your current iPhone for several minutes.
-
How to prepare for new iPhone transfer?
To prepare for a new iPhone transfer, you need to set it up first. Then you can make a preparation according to which way you choose to transfer data from your current device.
-
How to transfer photos from iPhone to computer?
To transfer photos from iPhone to a computer, you can connect your device to your computer. Then you can use iTunes or the Finder to sync photos on your iPhone to the computer.
-
How to transfer contacts from Android to iPhone?
When you set up your new iPhone, you can choose Move Data from Android, then all contacts will be moved from Android to iPhone. Or you can store all contacts on your SIM card, then go to import your contacts on your iPhone.
-
How to transfer music from iTunes to iPhone?
At first, you need to connect your iPhone to iTunes. Then in iTunes, click the device icon and select Music on the left side. Next, select the checkbox next to Entire music library or Selected playlists, artists, albums, and genres. Finally, click the Apply button to start transferring music from iTunes to iPhone.
Part 6. Conclusion
Easy right? After reading the whole article, you can solve the iPhone data transfer stuck on preparing to transfer issue. To quickly solve the issue, you can use MagFone iOS System Recovery. And when the issue is fixed successfully, you can make use of iTunes or iCloud to transfer data from your previous iPhone to a new one.

Dylan Jones
Editor in chief